Changing a Keyframe's Values
In the example cited above, once a keyframe is created, it can be moved and its handles manipulated to change the shape of the curve. Once a keyframe is manipulated it's value changes. This value is displayed in the Value field of the Point section in the Function editor.
However, it is possible to work the other way around; it is possible to enter values into the Value field and watch the keyframe change position and the curve along with it.
To change a keyframe's value:
|
1.
|
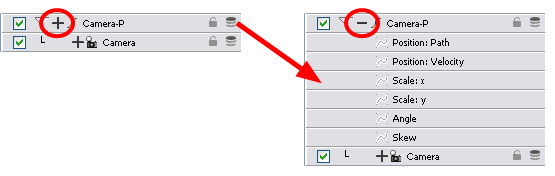
Open the peg element's parameters by clicking on the Plus  sign next the peg layer's name. sign next the peg layer's name. |
|
2.
|
Select the parameter that you wish to create a function curve for: Path, Velocity, Scale: x or y, Angle or Skew. For this example we will use Scale: y. |
|
3.
|
Double-click on the parameter layer name to open the Editor window or click once on the parameter layer to display it in the Function view. |

|
4.
|
In the Point section, enter a value in the Value field or drag up or down the keyframe you want to modify. |
|
5.
|
Press [Enter/Return] or click the Play  button to view the changes made in the Camera view. button to view the changes made in the Camera view. |
|
6.
|
Keep adjusting your values accordingly, until you are satisfied with what you see. |
Related Topics