Custom Vectorization Parameters
You can create your own vectorization settings with Toon Boom Animate Pro.
You can use an interface to select and test the different options and you can also type in some advanced settings.
To open the Vectorization Parameters dialog box:
| 1. | Select File > Import > Images. You can also open it from any other Import option that allows you to customize the vectorization parameters (i.e. From Scanner). |
| 2. | Browse for and select your file and decide on your Layer options. |
| 3. | In the Vectorization section, click the Add New Preset |
The Vectorization Parameters dialog box appears.
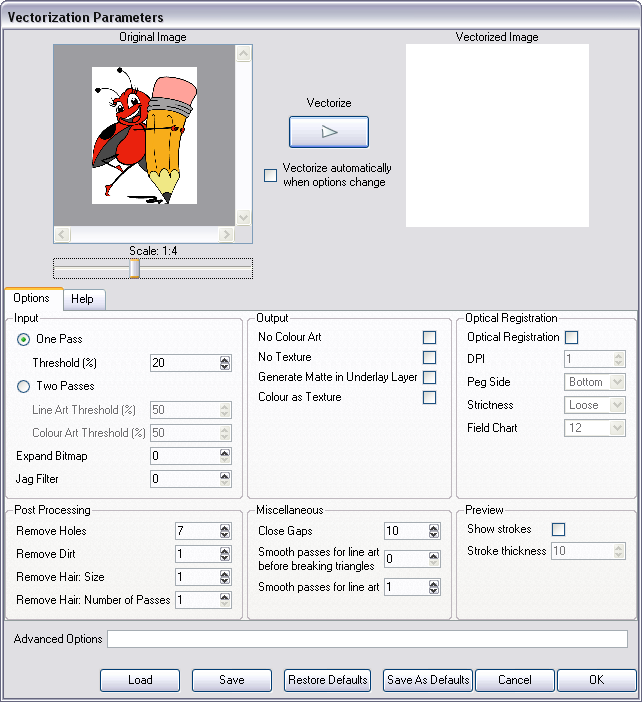
| • | Options Tab |
| • | Help Tab |
Options Tab
The options tab contains the main vectorization settings. More settings are available in the Help tab.
Input
The input filters are applied to the bitmap image before it is vectorized.
| • | One Pass and Two Passes: |
| • | If you select one pass, one threshold value will be applied to both the Line and Colour Art. For drawings with distinct vector-style lines of mattes, you only need one pass. |
| • | If you select two passes, you can apply a different threshold value to each layer. |
For grayscale drawings, you may want to pass through the vectorization process twice to apply different threshold values to the Line and Colour Art layers.
| • | Threshold: Determines which values in the scanned image are considered part of the Line or Colour Art layer and what will be eliminated from the vectorized drawing, 0% (zero) is white and 100% is black. The threshold is between those two values. |
| • | Expand Bitmap: Enter a value to scale the bitmap to detect small variations in the line. Use this option if you scanned a grayscale image and want to preserve small variations in the texture that will be applied to the line art. |
| • | Jag Filter: Enter a value to scale back the bitmap to remove some of the line’s roughness. If you have a drawing that appears quite rough, use the jag filter to eliminate excess strokes in the final drawing. |
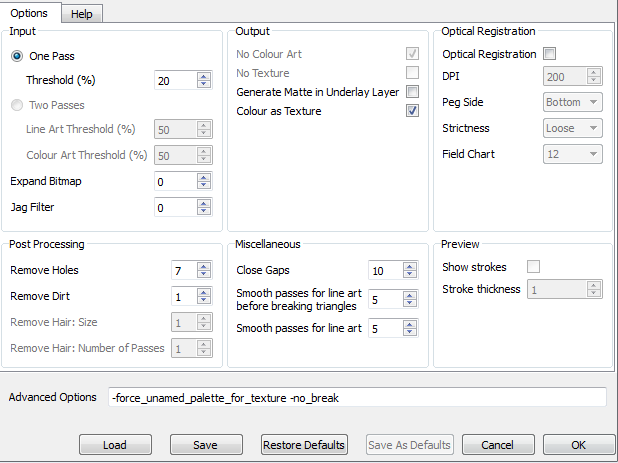
Output
The output filters are applied during the vectorization process.
| • | No Colour Art: Does not generate filling zones in the Colour Art layer. |
| • | No Texture: Does not generate texture in the Line Art in the final images. Select this option to create solid lines in the final Line Art. |
| • | Generate Matte in Underlay Layer: Creates an opaque zone behind your drawing’s lines to avoid seeing through the layers. |
| • | Colour as Texture: Converts colour values into a texture layer. |
Optical Registration
The optical registration options are used to automatically align drawings based on the position of peg holes on the animation paper. The peg holes must appear in the scanned drawings for the optical registration to work.
| • | Optical Registration: Use peg holes to align drawings optically. |
| • | DPI: Type the dots-per-inch value of your image. You must enter the same value as the DPI used to scan the image. |
| • | Peg Side: Select the position of the peg holes on your drawings. Identify whether they are on the top, bottom, left or right. |
| • | Strictness: Determine how exact the location of the peg holes must be for the software to recognize them. You have two values to choose from: |
| • | Strict: The peg holes must be in a tightly defined area to be recognized. |
| • | Loose: The peg holes can be recognized somewhere in a larger area. This is the recommended setting. |
| • | Field Chart: Select 12 or 16 to indicate the size of your animation paper. |
Post Processing
The Post Processing filters are applied to the final vector images.
| • | Remove Holes: Removes holes of a specified value that might make painting difficult. |
| • | Remove Dirt: Removes stray marks and dirt of a specified value. Try a value around 500. |
| • | Remove Hair: Removes small strokes that have no line art. |
| • | Remove Hair: Number of Passes: The number of times the drawing will be analyzed to identify hair marks. |
Miscellaneous
| • | Close gaps: Closes gaps in the Colour Art so that you can paint it. |
| • | Smooth passes for Line Art before breaking triangles: The number of times the smoothing operation runs before creating the triangles that break lines in your drawing. If unnecessary triangles are appearing in your drawing, increase this value. |
| • | Smooth passes for Line Art: The number of times the smoothing operation is performed after the triangles have been created. This further smooths the Line Art. |
Preview
| • | Show strokes: Shows the strokes in the Vectorized Image panel. |
| • | Stroke thickness: Shows the size of the strokes. |
Help Tab
The Help tab contains the most advanced vectorization settings. You must type those in the Advanced Option fields located at the bottom of the Options tab.
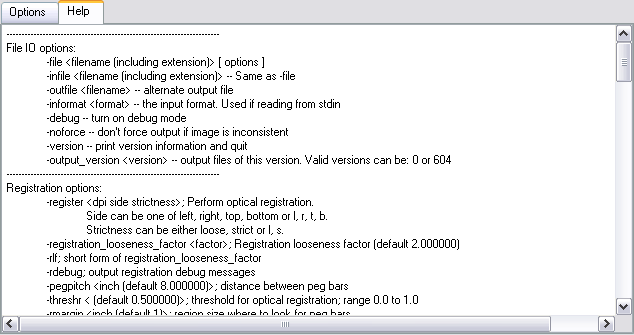
File IO Options
-file <filename (including extension)> [ options ]
-infile <filename (including extension)>; same as -file
-outfile <filename>; alternate output file
-informat <format>; the input format. Used if reading from stdin
-debug; turn on debug mode
-noforce; don't force output if image is inconsistent
-version; print version information and quit
-output_version <version>; output files of this version. Valid versions can be: 0 or 604
-force_unamed_palette_for_texture; will generate a texture in TVG's internal palette
Registration Options
-register <dpi side strictness>; perform optical registration.
| • | Side can be one of left, right, top, bottom or l, r, t, b. |
| • | Strictness can be either loose, strict or l, s. |
-register_center_peg_holes; will use only round holes in 16 fields page
-rcph; short form of register_center_peg_holes
-registration_looseness_factor <factor>; registration looseness factor (default 2.000000)
-rlf; short form of registration_looseness_factor
-rdebug; output registration debug messages
-pegpitch <inch (default 8.000000)>; distance between peg bars
-threshr < (default 0.500000)>; threshold for optical registration; range 0.0 to 1.0
-rmargin <inch (default 1)>; region size where to look for peg bars
-peg_distance_from_center <inch (default 5.25)>; peg distance from centre of the image
-pdfc; short form of -peg_distance_from_center
-out_peg_position <side (default same)>; wanted position of the peg on the drawing.
| • | Can be one of right, left, top, bottom (or r, l, t, b) or same. |
| • | A rotation will be performed if it is different from the side passed to -register. |
-output_peg_matrix; output the peg transformation matrix on standard output.
-scanner_calibrate; < (default 1.0000 1.0000) > x and y scale factors to be applied to scanner image.
Filtering Options
-pixel <pixel_shape (default '4x3')>; Valid values: 4x3
-gap <worldUnits (default 10)>; close gaps up to this big
-pencil; generate line art only
-keep_dirt; don't filter out dirt
-thresh <threshold (default 0.2)>; range 0.0 to 1.0
-rmv_hairs <worldUnits (default 1)> <passes (default 1)>
| • | remove hairs of size smaller than "size" in "passes" passes |
-rmv_holes <area (default 7)>; remove holes smaller than "area"
-rmv_dirt <area (default 1)>; remove dirt smaller than "area"
| • | try values between 100 and 500 for rmv_holes and rmv_dirt. The area is in world units squared |
-rmv_triangles <worldUnits (default 30.000000)>; remove triangles at "pixels"
| • | distance from each other. Use -no_break to remove all triangles |
-no_texture; don't generate textured strokes
-color_as_texture; will vectorize the alpha channel and put the RGB colour in a textured colour
-noclosegap; disable all gap closing algorithms
-no_break; disable the breaking of line art
-jag_filter <pixels (default 0>; expand the pixels in the vectorization bitmap
-expand_bitmap <pixels (default 0>; expand the pixels in the vectorization bitmap
-fit_errorc <error (default 1.000000>; fitting error for the colour art
-fit_errorl <error (default 1.000000>; fitting error for the line art
-smoothl <passes (default 1>; number of smooth passes for line art
-smoothc <passes (default 1>; number of smooth passes for colour art
-first_smooth <passes (default 0>; number of smooth passes for line art before breaking triangles
-first_smoothl <passes (default 0>; number of smooth passes for line art before breaking triangles
-first_smoothc <passes (default 0>; number of smooth passes for line art in colour art pass (needs -2pass)
-2pass; specify two sets of parameters; one for line art "l", one for colour art "c"
(-thresh, -rmv_holes and -rmv_dirt will be overridden by -threshl, threshc, -rmv_holesl,
-rmv_holesc, -rmv_dirtl and -rmv_dirtc)
-threshl <threshold for line art (default 0.5)>; range 0.0 to 1.0
-threshc <threshold for color art (default 0.5)>; range 0.0 to 1.0
-jag_filterl <pixels (default 0>; expand the pixels in the vectorization bitmap for line art
-jag_filterc <pixels (default 0>; expand the pixels in the vectorization bitmap for colour art
-expand_bitmapl <pixels (default 0>; expand the pixels in the vectorization bitmap for line art
-expand_bitmapc <pixels (default 0>; expand the pixels in the vectorization bitmap for colour art
-rmv_holesl <area (default 7)>; remove line art holes smaller than "area"
-rmv_holesc <area (default 7)>; remove colour art holes smaller than "area"
-rmv_dirtl <area (default 1)>; remove line art dirt smaller than "area"
-rmv_dirtc <area (default 1)>; remove colour art dirt smaller than "area"
try values between 100 and 500 for rmv_holesl, rmv_holesc, rmv_dirtl and rmv_dirtc. The values are in world units squared
-margins <inch (default 0.25)>; remove margin around bitmap
-top_margin <inch (default 0.25)>; remove margin at top of bitmap
-bottom_margin <inch (default 0.25)>; remove margin at bottom of bitmap
-left_margin <inch (default 0.25)>; remove margin at left of bitmap
-right_margin <inch (default 0.25)>; remove margin at right of bitmap
-remove_peg_bars; remove the peg bar holes
-field_size <fields (default 12 or use value in scan file)>; set the drawing to this field size
-fs; short hand for -field_size
-peg_bar_size <inch (default 1)>; the size of the peg bar region
-noframe; do not put a frame around the colour art
-frame_fields <default -1.000000>; put a frame of the specified dimension around the colour art
-downscale_input <default 1>; downscale the raw input by this integer factor
-downscale_texture <default 1>; downscale the output texture by this integer factor
-buildmatte; generate a matte on underlay for line test
-buildmatte_colourart; generate a matte on colour art for line test
Note: -buildmatte and -buildmatte_colourart are mutually exclusive
-copystrokes; copy original strokes when building matte.
Options for bitmap that has no registration information
-pixel_margins <inch (default 0)>; remove margin around bitmap
-top_pixel_margin <inch (default 0)>; remove margin at top of bitmap
-bottom_pixel_margin <inch (default 0)>; remove margin at bottom of bitmap
-left_pixel_margin <inch (default 0)>; remove margin at left of bitmap
-right_pixel_margin <inch (default 0)>; remove margin at right of bitmap
-dpi <(default -1)>; dpi information of input bitmap
RGB Keying Options
-rgb; generate separate zones for red, green and blue lines
-rgb_alpha <value (default 255)>; generate red, green and blue colour with alpha of this value
-no_red; ignore red colour in vectorization
-no_green; ignore green colour in vectorization
-no_blue; ignore blue colour in vectorization
-flatten; flatten the drawing after generating colours
-rmv_rgb_dirt <threshold area default 0.0>; remove red, green and blue regions smaller than area
-expand_bitmap_rgb <pixels (default 0>; expand the pixels in the vectorization bitmap for rgb
-threshrgb <value> <threshold for rgb vectorization default 0.200000>;
-threshsv <saturation threshold default 0.500000> <value threshold default 0.500000>; thresholds on saturation and value to consider a pixel to be grey
Colour Vectorization Options
-color_vectorize; perform a colour vectorization
-file2 <colour art filename>; specify the colour art bitmap
-penstyle <center alpha (0.0-20.0)> <edge alpha (0.0-20.0)> <gamma (0-10)><centre pressure effect (0.0-1.0)> <edge pressure effect (0.0-1.0)><texture bitmap downscaling (0.2-20)> <texture bitmap file (valid filename or "" if no file)>; generate brush texture for the line art
-pressure_variation <strategy (0, 1 or 2)> <min pressure (0.0-1.0)> <max pressure (0.0-1.0)> <max variation (0.0-1.0)>; specify a pressure strategy for the centre line.
-blur_radius <pixels (default 0)>; blur the penstyle texture generated
-color_contour_smooth_passes <times (default 3)>; perform number of smooth passes on contour before computing texture
-ccsp <times (default 3)>; short for -color_contour_smooth_passes
-color_rmv_holesl <world units (default 0.000000)>; remove holes of this size when computing texture
-color_fill_holesl <world units (default 0.000000)>; fill holes of this size for colour line art
Bubble Usage (implemented only for colour vectorization's line art)
-create_bubbles; add bubbles into the LineArt. Implemented for colour vectorization only
-bubble_gap <value (default 3)>; max number of colour art points between 2 bubbles
-bubble_length <value (default 10)>; max number of circles in a bubble
-min_radius <value (default 1.5000)>; min radius of a circle in a bubble relative to the line thickness (must be >= 1.0)
-max_radius <value (default 3.5000)>; max radius of a circle in a bubble relative to the line thickness (must be >= 1.0)
-uniform_gap; the space between bubbles is constant
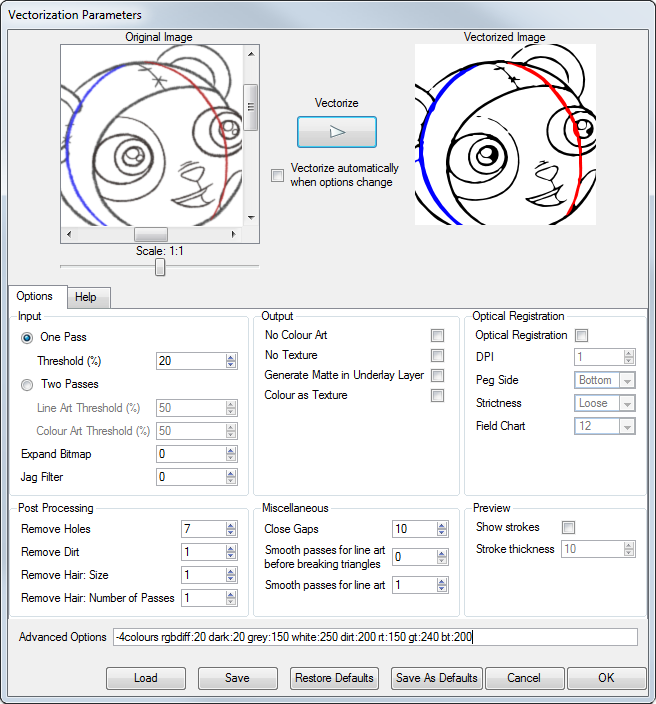
4 Colour Vectorization
-4colours [key:value] ... [key:value] ; The key value list can be empty. The list of keys is:
rgbdiff:value ; between [0.0-1.0] or [0-255]
dark:value ; between [0.0-1.0] or [0-255]
grey:value ; between [0.0-1.0] or [0-255]
white:value ; between [0.0-1.0] or [0-255]
dirt:value ; dirt area. 200 is a good value
rt:value ; between [0.0-1.0] or [0-255]
gt:value ; between [0.0-1.0] or [0-255]
bt:value ; between [0.0-1.0] or [0-255]
Note: There must be no space between the : and the key/value
Ex: -4colours rgbdiff:20 dark:20 grey:120 white:250 dirt:200 rt:240 gt:240 bt:240
Use the Vectorization Parameters dialog box to vectorize your pencil drawings, along with any red, blue or green pencil marks that you may have used to indicate highlights and shadows. The system will vectorize the drawing into pure red, blue, green and black (RGB values), while creating colour art zones wherever lines connect. After painting in your tones and highlights, change your pure RGB colours to transparent (0 Alpha) in the Colour Picker window and watch the indicator colour zone lines disappear.
Related Topics
| • | Creating a Vectorization Style |