Adding New Drawing Layers
In this section, you will learn the different ways to add a drawing layer to your project. By default, when you create a new scene there is one Drawing layer included in your Timeline view.
This topic is divided as follows:
Adding Drawing Layers in the Timeline View
You can add a new layer in the Timeline view in several different ways:
|
•
|
Using the Layer toolbar |
|
•
|
Using the Add Layers dialog box |
|
•
|
Go to the Timeline view menu and select Insert > Drawing. |
To add a Drawing layer using the Timeline’s Layer toolbar:
|
1.
|
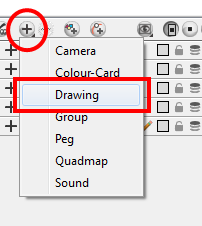
In the Timeline’s Layer toolbar, click the Add Layers  button or press [Ctrl] + [R] (Windows) or [⌘] + [R] (Mac OS X). button or press [Ctrl] + [R] (Windows) or [⌘] + [R] (Mac OS X). |
|
2.
|
In the drop-down menu, select the Drawing option. |
A new layer appears in the Timeline and Xsheet views.
You can also click on the Add Drawing Layer button in the Timeline’s Layer toolbar or press [Ctrl] + [R] (Windows) or [⌘] + [R] (Mac OS X).
To add drawing layers using the Add Layers dialog box:
|
1.
|
In the Timeline view’s layer section,right-click and select Insert > Add Layer(s). |
The Add Layers dialog box opens.
|
2.
|
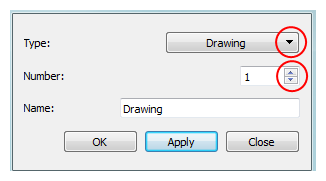
In the Type drop-down menu, select the Drawing option. |
|
3.
|
In the Number field, use the up and down arrows or type the number of layers you want to add at once. |
|
4.
|
In the Name field, type the name of the layer you want to add. If you are adding more than one layer at once, all of the layers use that name with a numerical suffix added. |
|
5.
|
To complete the operation: |
|
‣
|
Click OK to add your new layers and close the dialog box. |
|
‣
|
Click Apply to add your new layers and keep the dialog box open to add another layer. |
|
‣
|
Click Close to cancel the operation. |
Adding a Drawing Layer from the Top Menu
You can add a new layer from the top menu.
To add a new layer from the top menu:
|
1.
|
In the top menu, select Insert > Drawing. |
A new layer appears in the Timeline and Xsheet views.
Adding Drawing Columns in the Xsheet View
To add a drawing column:
|
1.
|
Do one of the following: |
|
‣
|
In the Xsheet view, right-click and select Columns > Add Column. |
|
‣
|
In the Xsheet View toolbar, click the Add Columns button or press [Shift] + [C]]. button or press [Shift] + [C]]. |
|
‣
|
To quickly add a Drawing column, press [Ctrl] + [R] (Windows) or [⌘] + [R] (Mac OS X). |
The Add Columns dialog box opens.
|
2.
|
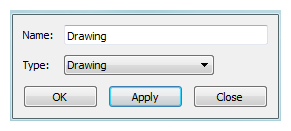
In the Column Name field, name your column accordingly. |
|
3.
|
In the Column Type field, select Drawing. |
Refer to the topic
Layer Types to know more about the different column types available.
|
4.
|
To complete the operation: |
|
‣
|
Click OK to add your new layers and close the dialog box. |
|
‣
|
Click Apply to add your new layers and keep the dialog box open to add column. |
|
‣
|
Click Close to cancel the operation. |
In Animate, you can use the advanced Add Column dialog box, with more file format and field size options, to insert the column.
Related Topics
|
•
|
Advanced Column Types on page 1 |
|
•
|
Modifying the Look of the Column on page 1 |