Setting the Camera Frame
The scene action occurs inside the camera frame, so it’s really important to set it up correctly.
The Camera layer is static which means that if you need to animate it, you must add a peg.
Refer to the
Animation Paths chapter to learn how to animate layers using pegs.
Refer to 3D Camera Motion to learn more about setting and moving the camera in the 3D space.
Adding a Camera Layer
To set the camera frame, you need to add a Camera layer to your scene so you can edit the default camera frame.
To add a Camera layer in the Timeline view, do one of the following:
|
‣
|
In the Timeline view, click the Add Layer  button and select Camera. button and select Camera. |
|
‣
|
From the top menu, select Insert > Camera. |
A new camera layer is added to your scene and appears in the Timeline view.

You cannot add a camera inside a symbol. If you try to do so, a warning message will pop-up and inform you that this operation is not possible.
If you've added more than one camera to your scene, you can switch the active camera by going to Scene > Camera and selecting the camera you want to use.
Setting the Camera Using the Translate and Rotate Tools
You can reposition your camera frame directly in the Camera view, using the Translate  and Rotate
  tools.
To reposition the camera frame directly in the Camera view:
|
1.
|
Select Animation > Tools > Translate or press [Alt] + [2]. |
|
2.
|
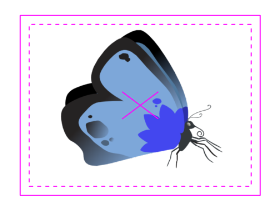
In the Camera view, click on the camera frame to select it. You can also select the camera layer from the Timeline view. |
The selected camera frame is highlighted in purple.
|
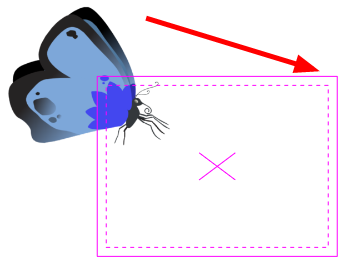
3.
|
Drag the camera frame to a new position. |
|
4.
|
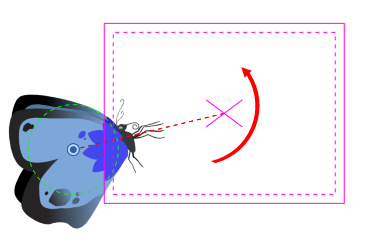
To tilt the camera frame, select Animation > Tools > Rotate or press [Alt] + [3]. |
|
5.
|
In the Camera view, click on the camera frame to select it and rotate the camera frame until it reaches the desired rotation angle. |
The Translate and Rotate tools can also be found in the Advanced Animation toolbar.
Setting the Camera using the Camera Layer Properties
One way to set up your camera frame is to type the coordinates directly in the Camera Properties dialog box. Doing this positions the camera precisely where you want it.
Refer to 3D Camera Motion on page 1 to learn more about setting the camera in the 3D space.
To set up the camera frame using the camera Layer Properties:
|
‣
|
In the Timeline view, double-click on the Camera layer. |
The camera Layer Properties dialog box opens.
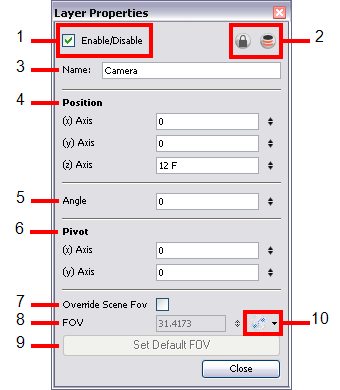
The legend below explains each of the Layer Properties:
|
1.
|
Use the Enable/Disable check box to enable or disable the camera layer. |
|
2.
|
The Lock  and Onion Skin and Onion Skin  buttons. buttons. |
|
‣
|
Once you are satisfied of the camera frame position, you can use the Lock button to lock the camera layer and prevent changes on the camera frame position. |
|
‣
|
The Onion Skin button is used to enable the Onion Skin feature in the Camera and Drawing view. |
|
3.
|
The Name field displays the current layer name and is used to rename it. Type in the new layer name. |
|
4.
|
The Position section displays the current position of the camera layer using X-axis (East, West), Y-axis (North, South) and Z-axis (Forward, Backward) coordinates. To reposition your camera frame, type in the new values corresponding to the desired position coordinates. You can also use the up and down arrows to set the value of each field. |
|
5.
|
The Angle field displays the current rotation value. To set a new rotation position, type in a new angle value. You can also use the up and down arrows to set the new angle value. |
|
6.
|
The Pivot field displays the current position of the rotation pivot of the camera layer. The camera will perform a rotation taking the position of the pivot as its angle centre. By default, the pivot is set at the centre of the camera frame. To reposition the pivot point, type in new X and Y coordinates values in the appropriate field. You can also use the up and down arrows to set the position values.
In order to see the pivot's position you will need to have the Rotate tool selected. |
|
7.
|
Enable the Override Scene FOV check box to enable the FOV field in which you can type in a new field-of-view value. |
|
8.
|
The FOV field displays the current field-of-view default value. When enabled, you can type in a new zoom value for your camera frame. You can also use the up and down arrows to set the new zoom value. |
|
9.
|
Use the Set Default FOV to reset the custom zoom value to its default value. |
|
10.
|
The Function button is used when animating the camera zoom value—see the Animation Paths chapter to learn more about creating functions. |
Resetting the Camera Position
Once you set up your camera frame, you can always easily reset it to its original position. Use the Reset command to reset the value of the selected element to the initial value of the active tool. For example, if the Rotate tool is active, the transformation angle will be reset to 0 and if the Transform  tool is active, then the entire transformation values will be reset.
To reset the camera position:
|
1.
|
In the Tools toolbar, select the Transform tool or press [Shift] + [T]. |
|
2.
|
In the Timeline or directly in the Camera view, select the camera layer. |
|
3.
|
Select Animation > Reset or press [Shift] + [R]. |
The camera automatically returns to its original position.
Camera List
You can only see one camera at the time in the Timeline view. If you add several cameras to your scene and you want different settings on each, you can use the Camera List to display each of them. You can use this feature if you are still working on your scene composition and you have different camera setups to choose from.
To select a camera from the Camera list:
|
1.
|
In the top menu, select Scene > Camera > the desired camera. |
|
‣
|
If you only add one camera to your scene, you will only see Default Camera in your list. |
Related Topics