Scanning Images
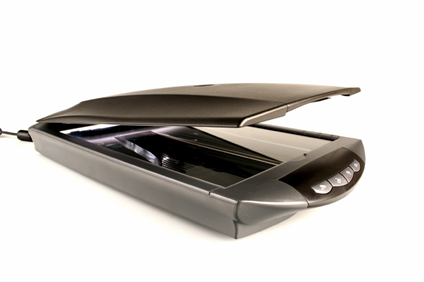
Toon Boom Animate can receive images from any TWAIN device such as scanners and digital cameras. These images can either be loaded into your scene as bitmaps or converted into vector- based images that can be edited using Toon Boom Animate.
If your operating system does not automatically recognize your device after it has been connected, you must install the correct TWAIN drivers in order to access its contents. You can usually download the drivers from the device manufacturer’s website.
TWAIN drivers are not always created for every model of scanner or digital camera. If TWAIN drivers do not exist for your device, you will not be able to use it with Toon Boom Animate.
You can scan in a single image or multiple images in the same session. Before you begin scanning, you need to select your scanning device.
To scan drawings from a TWAIN device:
|
1.
|
In the Top Menu, select File > Acquire > From TWAIN or press [Ctrl]+[Shift]+[A] (Windows) or +[Shift]+[A] (Mac OS X). |
The Scan Drawings window opens.
|
2.
|
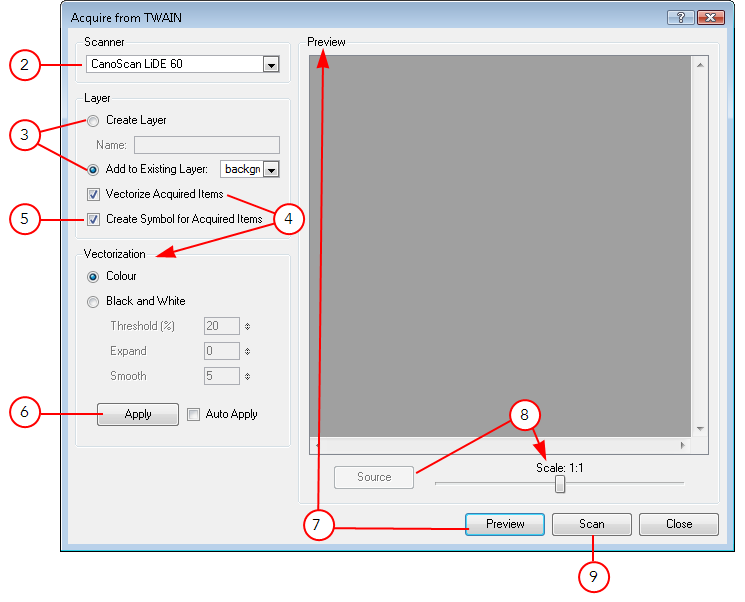
Select your scanner or other supported TWAIN device from the drop-down menu. If none are available, check your device to ensure that it is properly connected to your computer. If your device still does not appear in the drop-down menu, you may have to shut down and relaunch the software. |
|
3.
|
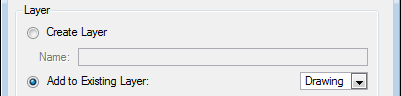
You can import the images to scan into an existing layer or create a new one. |
|
‣
|
To import the image into a new layer, enable the Create Layer option. In the Name field, type a name for the layer. |
|
‣
|
To import the image into an existing layer, select Add to Existing Layer and select the layer from the drop-down list. |
|
4.
|
Decide if you want to vectorize or not the scanned images. If you want to vectorize the scanned images, select the Vectorize Acquired Items option and choose the parameters from the Vectorization section: |
|
‣
|
Colour: this style vectorizes your image as a colourful bitmap texture within a vector frame. |
|
‣
|
Black and White: this style vectorizes your drawings as solid black lines and shapes. This creates a 100% vector-based drawing. Use the filters listed below to transform the bitmap into vector art.
If you select this option customize the parameters below: |
|
‣
|
Threshold percentage: The Threshold value filters out noise in your images. Noise can be dirt or faint smudges on your scanned images. For example, if your value is set to 70%, all colour values below 70% are converted to white and ignored in the final image. If your value is set to 100%, only completely black lines will be kept. |
|
‣
|
Expand: Enter a value between 1 and 100 to thicken lines or the outer edges of the bitmap. Use this option if your line art is too fine or pale so that their visibility is increased in the software. |
|
‣
|
Smooth: Enter a value between 1 and 100 to set the smoothness level. Greater smoothness equals less jaggedness and imperfections, but at a greater loss to detail. |
|
5.
|
Decide if you would like to encapsulate the scanned drawings into individual Symbols. These Symbols will also appear in your Symbols Library. If not, uncheck the Create Symbol for Acquired Items option. |
|
6.
|
Click Apply. Check the Auto Apply box to continually and automatically update your most current settings at the Preview level. The auto-apply is simply for preview purposes. If you do multiple scans, the vectorization parameters used on the first scan in the set are the ones that will be applied throughout, even if the preview does not show the image vectorized. |
The scanning dialog box for your TWAIN device opens. To do a preview inside the Animate interface you will need to do an actual scan in the TWAIN device’s interface. Previewing in just the TWAIN does not send any information to Animate. Use the settings in that box to launch a scan. When the scan is complete, if the device’s window does not close automatically, close it. The image preview now appears in the preview area of the Acquire from TWAIN dialog box in Animate.
|
8.
|
If you chose the Vectorize option, the Source/Vectorize toggle now becomes active. Use this button to toggle between the image as it has been vectorized using the settings in the Parameters section and the original, source image. Use the slider to increase or decrease the preview size in order to check and compare the two images for accuracy. |
|
9.
|
Click Scan to open the scanning dialog box for your TWAIN device. |
|
10.
|
Use the settings from your scanner to scan your drawings. You can close the TWAIN device’s scanning dialog box at any time and readjust your vectorization parameters in Animate’s Acquire from TWAIN dialog box. You can also scan multiple images with your device before closing the Acquire from TWAIN dialog box. |
|
11.
|
To automatically import the scanned images into your scene, exit the TWAIN device scanning interface. |
|
12.
|
Click Close to close the Acquire from TWAIN dialog box. |
The scanned image(s) appears in the centre of your camera frame and fitted with the height of the camera frame.
Related Topics
|
•
|
Cleaning Scanned Drawings
|