Importing and Vectorizing Images
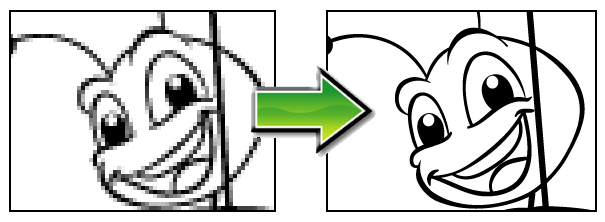
You can turn your images into vector drawings, while maintaining the sketchiness of a pencil line or into vector images with a bitmap fill. Both options can add life to an animation, which straight vectorization with smoothing does not usually afford.
To import and vectorize a bitmap image:
|
1.
|
In the top menu, select File > Import > Images or click the ImportImage  button in the File toolbar. button in the File toolbar. |
The Import Imagesdialog box opens.

|
2.
|
Click Browse to locate images. |
|
3.
|
You can create a new layer for your image or add it to an existing layer. |
|
‣
|
To create a new layer, select
Create Layer(s) > Create Single Layer Named and name your layer accordingly. |
|
‣
|
To create a new layer using the file name, select
Create Layer(s) > Create Layer(s) Based on Filenames. |
|
‣
|
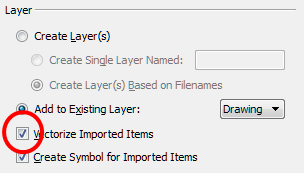
To add the image to an existing layer, select Add to Existing Layer and select the layer already created in your Animate scene from the drop-down menu. If only vector  layers are available in your scene (and therefore the drop-down menu), you will either have to Vectorize Imported Items, Create Symbols for imported Items or check both options to put your bitmap image on a vector layer. layers are available in your scene (and therefore the drop-down menu), you will either have to Vectorize Imported Items, Create Symbols for imported Items or check both options to put your bitmap image on a vector layer. |
To mix bitmap images with vector drawings on the same layer, the bitmap image must be encapsulated in a Symbol and vice versa. When you check the option Create Symbol for Imported Items, these Symbols will also automatically be added to your Symbol Library.
|
4.
|
In the Layer section, select the Vectorize Imported Items option. |
|
5.
|
In the Vectorization section, decide whether you want to import your image in colour, black and white, grey, or if you want to add a new preset. |
|
‣
|
Black and White: Vectorizes drawings as a solid black line; creates a 100% vector-based drawing. |
Threshold%: The Threshold value filters out noise in your images. Noise can be dirt or faint smudges on your scanned images. For example, if your value is set to 70%, all colour values below 70% are converted to white and ignored in the final image. If your value is set to 100%, only completely black lines will be kept.
Expand: Enter a value between 1 and 100 to thicken lines or the outer edges of the bitmap. Use this option if your line art is too fine or pale so that their visibility is increased in the software.
Smooth: Enter a value between 1 and 5 to set the smoothness level. Greater smoothness equals less jaggedness and imperfections, but at a greater loss to detail.
|
‣
|
Colour: Vectorizes your image as a colourful bitmap texture within a vector frame. |
The vectorized images are painted with the Vectorize Line colour swatch from the colour palette.
|
6.
|
Click Apply to make the current settings visible on your image in the Preview section. You can also select the Auto Apply option to automatically apply the changes as you edit the vectorization parameters. |
|
7.
|
In the Preview box, switch between the vectorized and source version of the image by clicking Vectorized or Source. |
|
8.
|
Use the Scale slider to zoom in or out of your preview images. |

A Symbol or new layer contains the vector drawing. For images contained in a Symbol, double-click on the image’s first cell in the Timeline view to enter the Symbol so you can edit the image.
Related Topics