Brush Tool Options
When you select the Brush ![]() tool, its properties and options appear in the Tool Properties view.
tool, its properties and options appear in the Tool Properties view.

These are the options available for the Brush tool:
| • | Normal Brush Mode |
| • | Draw Behind |
| • | Repaint Brush Mode |
| • | Auto-Flatten Mode |
| • | Respect Protected Colour |
| • | Use Stored Colour Gradient |
| • | Brush Styles |
| • | Dynamic Brush |
| • | Brush Tool Options |
| • | Brush Tool Options |
| • | Brush Tool Options |
| • | Brush Tips |
| • | Brush Tool Options |
| • | Line Texture |
Normal Brush Mode
The Normal Brush Mode ![]() creates contour lines as you draw, adding each brush lines on top of the last ones.
creates contour lines as you draw, adding each brush lines on top of the last ones.
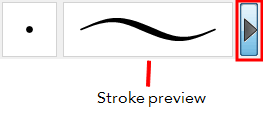
Previewing the Stroke
The Preview area lets you see a preview of the stroke that will be produced after you customize the different parameters in the Tool Properties view.

Maximum Size and Smoothing
This is where you set the minimum and maximum sizes of your drawing tool which will produce the thick and thin effect on your stroke. This works with the pressure sensitivity of a pen tablet.
| ‣ | Maximum and Minimum Size: Defines the maximum width of the stroke. |
| ‣ | Smoothing: Defines the number of control points added to the centre line. |
Brush Presets
Brush presets are created by saving the properties of the current brush to a new preset, which you can reuse for repeated tasks. You can create as many brush presets as you need.
Draw Behind

When the Draw Behind ![]() mode is enabled, the lines you draw will appear behind the art that already exists.
mode is enabled, the lines you draw will appear behind the art that already exists.
Repaint Brush Mode

The Repaint Brush ![]() is used to repaint zones that have already been painted, it will not affect empty zones or pencil lines. It also automatically flattens each of its brush lines so it does not add new brush lines on top of existing ones. You can use this mode to paint tones or highlights onto your character.
is used to repaint zones that have already been painted, it will not affect empty zones or pencil lines. It also automatically flattens each of its brush lines so it does not add new brush lines on top of existing ones. You can use this mode to paint tones or highlights onto your character.
Auto-Flatten Mode
When enabled, the Auto-Flatten mode automatically flattens the new lines created with the existing artwork as you draw in the Drawing or Camera view. Brush strokes will flatten with brush strokes and pencil lines will flatten with pencil lines.
Respect Protected Colour
The Respect Protected Colour ![]() option prevent the colours you marked as protected in the Colour view to be repainted using the Repaint Brush mode or any of the painting tools.
option prevent the colours you marked as protected in the Colour view to be repainted using the Repaint Brush mode or any of the painting tools.
Use Stored Colour Gradient
The Use Stored Colour Gradient ![]() option makes your tool use the previously stored gradient position. This way, every new brush line or colour fill will use the stored gradient position.
option makes your tool use the previously stored gradient position. This way, every new brush line or colour fill will use the stored gradient position.
Brush Styles
A variety of brush styles are provided allowing you to create and save your own. This way you can create brushes with precise sizes and parameters and save them so you can draw and design—see Brush Styles
Dynamic Brush
A Dynamic Brush ![]() can be created to allow you to draw using patterns created from your artwork—see Dynamic Brush
can be created to allow you to draw using patterns created from your artwork—see Dynamic Brush
Brush Tips

In this drop-down menu, you can find a variety of tip shapes from round and square ones to star shaped, select the one you need.
Line Texture
In Toon Boom Animate, you can draw with a textured line. Textured lines are a mixed bitmap image contained in a vector frame. This allows you to sketch as if you are drawing on paper.
Related Topics
| • | How to Draw |
| • | Drawing with the Brush Tool |
| • | Drawing with Line Texture |
| • | Working with Thickness Stencils |