Storyboard Pro 7.0.0 Release Notes
Here is the list of changes in Storyboard Pro 7.0.0, build 17.10.0.15295 (2019-11-26):
- Drawing
- Drawing Guides
- Animatic
- Stage and Camera Views
- Script & Captions
- Video
- Audio
- Images
- Conformation
- Export Movie
- Export PDF
- Project Management
- Preferences
- Installation & Packaging
- Scripting
- Enhancements
- Fixed Issues
Drawing
| Feature | Description |
|---|---|
| Alignment guides |
It is now possible to add horizontal and vertical guides to the Stage View and the Camera View. Alignment guides can be used with the You can add the Alignment Guides toolbar to your workspace by either:
You can also add alignment guides by selecting View > Alignment Guides from the top menu. You can manipulate alignment guides using the For more information, see About Alignment Guides. |
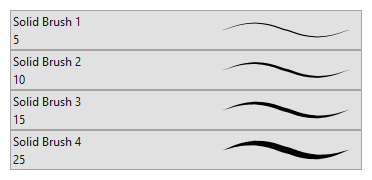
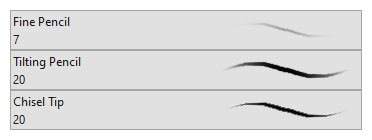
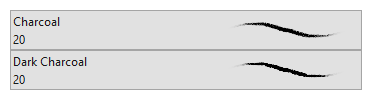
| New & updated brushes |
The brush presets for the
|
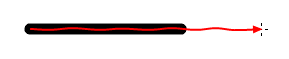
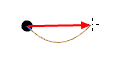
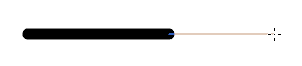
| Pen stabilizer |
The new pen stabilizer can help you draw smooth, stable lines by stabilizing your drawing strokes as you draw, without having to smooth them afterwards. It works by letting you draw a stroke without generating a line immediately, instead it starts generating a line that trails behind your mouse cursor or tablet pen once it reaches a certain length. By trailing behind your stroke, it can smooth out the flaws in your drawing gesture and generate a smooth stroke. There are two different stabilizing methods:
The distance between your mouse cursor or tablet pen and the stroke can be customized. This feature can be enabled by adding the Pen Settings toolbar to your workspace, and selecting either Average or Pulled String in the toolbar's drop-down menu |
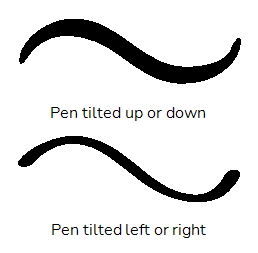
| Pen tilt support |
If you have a tablet and pen that support reading the tilt angle of your pen, you can configure the Brush tool to use this information and draw with a tilted tip. A tilted tip will be stretched or projected at the angle in which you tilt your tablet pen, simulating the effect of drawing with a tilted pencil or felt pen.
This feature can be used by adjusting the Pen Tilt Sensitivity parameter in the Brush Properties dialog |
| Pen rotation |
If you have a tablet and pen that supports reading the rotation angle of your pen, you can configure the Brush tool to use this information so that the rotation of your brush tip is based on how you rotate your tablet pen.
This feature can be used by enabling the Use Pen Rotation property in the Brush Properties dialog |
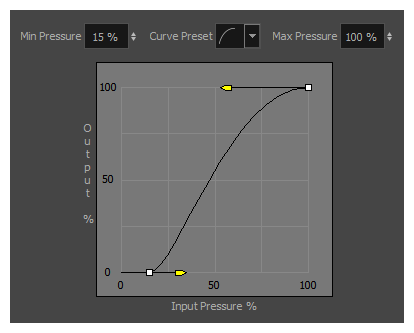
| Pen pressure feel editor |
Storyboard Pro now allows you to edit and customize the curve by which it processes the amount of pressure you put on your pen tablet to calculate the thickness, flow or opacity of your brush or pencil lines.
The Pen Pressure Feel dialog can be accessed by adding the Pen Settings toolbar to your workspace, then clicking on the |
| Easy Drag |
The To enable Easy Drag mode, click on the |
| Lasso/Marquee Selection Mode |
In the Tool Properties view, if you set the selection mode for the current tool to either NOTE The selection mode can be set when using the
|
| Keyboard shortcut for Draw Behind | It is now possible to assign a keyboard shortcut to toggle the |
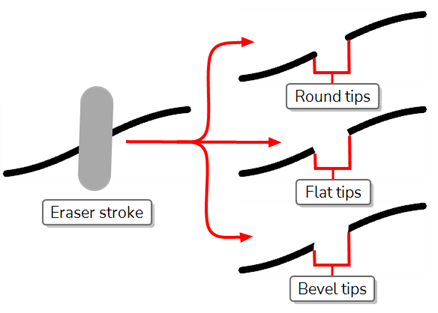
| Tip Style option for the Eraser tool |
The
|
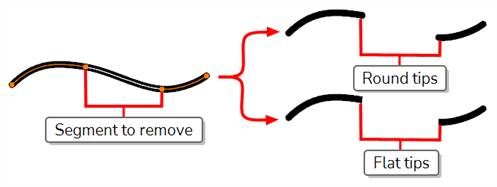
| Tip Style option for the Contour Editor tool |
The
|

Drawing Guides
| Feature | Description |
|---|---|
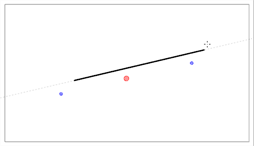
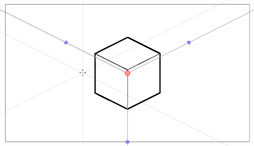
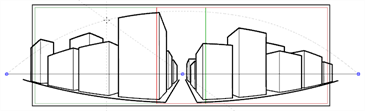
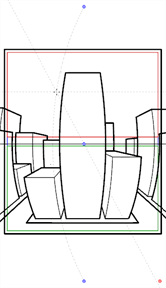
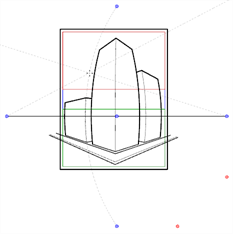
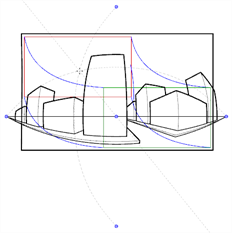
| New drawing guides |
Several new drawing guides have been added:
Each guide is available in the |
| Locking the guide angle |
If you press and hold the Alt key while using drawing guides, the angle of the guide lines will stop following your mouse cursor and lock in position until you release the Alt key, allowing you to keep the guide lines at the right angle. By using this feature, you can rework the thickness or length of lines that you are drawing with a guide. It's also useful if you want to draw a dotted line along an axis. |
| Guide angle display | When you rotate a guide, its exact angle is displayed in the top-left corner of the Stage and Camera views. |
| Rotating guides from centre |
Some guides can be rotated by moving one of the two points on their horizon line, which rotates them around the opposite point. If you press and hold the Alt key while moving one of their points, it will rotate the guide around its centre instead. This works for the following guides:
|

Animatic
| Feature | Description |
|---|---|
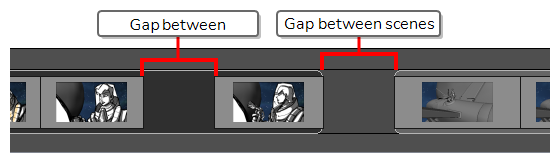
| Animatic editing mode |
It is now possible to create gaps in your animatic when editing its timing, similarly to editing video clips in a video editing software.
By default, any change you make to your animatic will ripple to subsequent panels so as to avoid leaving gaps in the timeline. If you want to create gaps, you must enable Animatic Editing Mode. This can be done by clicking on the For more information, see About Animatic Editing Mode. NOTE Projects with gaps in their timeline cannot be opened in older versions of Storyboard Pro.
|
| Enable & disable clip synchronization by track |
By default, when you offset panels, sound clips and video clips that are cued during those panels will also be offset to remain synchronized with them. You can now disable the synchronization of video and sound clips for each video and audio track in your project. When synchronization is disabled for a track, its clips will not offset when you make changes to the timing of your animatic. To disable synchronization for a track, click on the |
| Separate video and audio sections |
The Timeline view is now divided in two separate areas:
It is possible to reposition the divider between these two areas and to scroll each area vertically without affecting the other area. |
| Navigate to previous and next sequence |
Commands to instantly navigate to the previous or the next sequence have been added to the Play menu. Those commands can also be added to the Navigation toolbar, which, by default, only has the You can also assign keyboard shortcuts to the Previous Sequence and Next Sequence commands, in the Play/Navigation section of the Keyboard Shortcuts dialog. |
Stage and Camera Views
| Feature | Description |
|---|---|
| Overlays |
Where you could previously only display the current frame's time code as an overlay in the Stage and Camera views, you can now also display the name (number) of the current scene and the current panel, as well as one type of captions. You can also customize where this information is displayed, as well as its font, font size and colour. To display overlays in the Stage and Camera view, click on the To customize the types of information displayed in the overlays, as well as how it is displayed, double-click or long-click on |
| Multiple Camera views |
It is now possible to have several instances of the Camera View in your workspace. For example, you can now add a detached Camera View window to your workspace, and position it inside your workstation's second monitor. Your second monitor can then act as a preview and playback monitor. Each Camera View in your workspace has its own zoom level and angle. Additionally, the Action Safe Area, Title Safe Area, 4:3 Safe Area, 4:3 Area, Camera Mask and Show Overlay switches can be toggled independently on each Camera View. |
Script & Captions
| Feature | Description |
|---|---|
| Spell Checker |
Storyboard Pro now has spell checker functionality. It checks the spelling of each word in your captions and in your project's script and underlines the words it does not find in its dictionary. It also allows you to go through each misspelled word in your project so that you can either correct or ignore them. By default, automatic spell checking is enabled. To toggle it off, select Caption > Spelling > Check Spelling While Typing from the top menu. To go through each spelling mistake in your project, or to select which dictionary to use to check your spelling, select Caption > Spelling > Spell Check from the top menu. For more information, see About Spell Checking and Spelling Dialog. |
Video
| Feature | Description |
|---|---|
| Import audio stream |
When importing a movie file, you can now import its audio stream into your project's audio tracks by checking the Import Audio checkbox in the Import Videos/Images as Clips dialog. For more information, see About Video Clip Format, Importing Image and Video Clips and Import Videos/Images as Clips Dialog Box. |
| Video with transparency |
Storyboard Pro now supports videos with alpha (transparency). For more information, see About Video Clip Format, Importing Image and Video Clips and Import Videos/Images as Clips Dialog Box. |
| Import WebM |
It is now possible to import WebM files as video clips into your animatic. NOTE Importing the audio stream of a WebM file is currently not supported.
|
| Use drawing layer as video clip | It is now possible to convert a drawing layer into a video clip. To do this, simply click and drag on a drawing layer, and drop it inside a video track |
| Drag & drop movie file | You can now drag and drop a movie file from your operating system's file browser into one of your project's video tracks. This will instantly import the movie into the video track in which you dropped it. |
Audio
| Feature | Description |
|---|---|
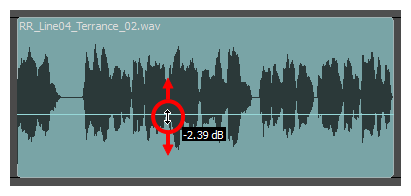
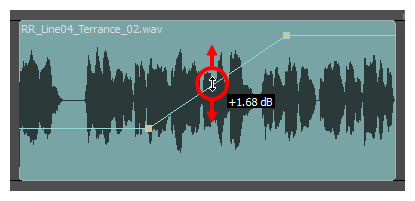
| Sound clip volume |
You can now set the volume for a sound clip without creating a volume keyframe. You can simply click and drag on their volume envelope to adjust their overall volume.
If your sound clip has volume keyframes, you can also click and drag on the segment between two keyframes to offset both keyframes simultaneously.
For more information, see Adjusting Volume and Interpolating the Volume of Sound Clips. |
| Gain effect |
It is possible to add a gain effect to sound clips. To do this, select one or several sound clips, then either:
Gain is different from volume in that it can actually amplify your sound clip. It is applied before the volume is applied. It is possible to select several sound clip and set or offset their gain simultaneously. Hence, if you notice disparities in volume between different sound clips, you can quickly even them out. Audio Gain is an effect which can be adjusted or undone at any time. It is supported with XML and AAF conformation. This means that if you export your animatic as an XML or AAF sequence for conformation and import the sequence in Final Cut Pro, Adobe Premiere and Avid Media Composer, you can adjust the gain on your sound clip in your video editing software, and import those changes into your Storyboard Pro project. For more information, see About Volume & Gain, Setting the Audio Gain for Sound Clips and Audio Gain Dialog Box |
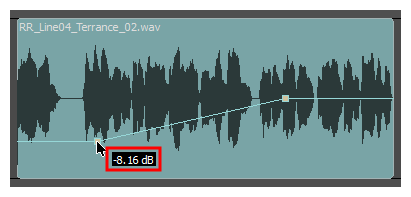
| Precise volume control |
When setting the volume of a sound clip or of a volume keyframe, the overlay that displays the volume you're setting it to in decibels now displays decimals.
|
| Drag & drop sound file |
You can now drag and drop a sound file from your operating system's file browser into one of your project's audio tracks. This will instantly import the sound file into the audio track in which you dropped it. |
Images
| Feature | Description |
|---|---|
| Drag & drop image file |
You can now drag and drop an image file from your operating system's file browser into Storyboard Pro to import it as a layer in a panel, or as an image clip in a video track. You can drop the image file into the following areas of the user interface:
|
Conformation
| Feature | Description |
|---|---|
| Updating sound files |
When importing an XML sequence for conformation, Storyboard Pro will check if the sound files linked to your sequence have been changed since they were exported from your project. If changes have been detected, Storyboard Pro will import the new sound files into your Storyboard Pro project. |
| Gaps in timeline |
Since it is now possible to create gaps in the timeline of your animatic, it is also possible to import a sequence containing gaps for conformation. Gaps in your sequence will be imported into your animatic. |
Export Movie
| Feature | Description |
|---|---|
| Export in H.264 (AVC) |
It is now possible to export a QuickTime Movie (.mov) file without using Apple QuickTime, by instead using a simple H.264 (AVC) encoder. To do this, when using the Export to Movie or the Export to EDL/XML/AAF dialog, select H.264/MPEG-4 (*.mov) in the Movie Format drop-down. This format is available on both Windows and macOS, even if Apple QuickTime is not installed. Movies exported using this option have a video stream encoded with the H.264 (AVC) video codec, and an audio stream in PCM format. For more information, see Exporting a Movie, Exporting an EDL, AAF or XML Sequence, Export to Movie Dialog Box and Export to EDL/AAF/XML Dialog Box. |
| New QuickTime movie interface for macOS |
On macOS, Storyboard Pro now uses the Apple AVFoundation framework that is built into macOS to export movies in QuickTime Movie (.mov) format, instead of the QuickTime application. This allows Storyboard Pro to encode video using the H.264, Apple ProRes 442 and or Apple ProRes 4444 codecs built into AVFoundation. For more information, see Configuring Movie Settings for QuickTime Movies on macOS or Movie Options Dialog Box (macOS). |
Export PDF
| Feature | Description |
|---|---|
| Better visual indication of scenes in Japanese storyboard |
When exporting a PDF using one of the Japanese PDF profiles, horizontal lines are drawn in the CUT and TIME columns to indicate when a scene ends and the next scene starts. |
Project Management
| Feature | Description |
|---|---|
| Versioning |
It is now possible to save multiple versions of your storyboard without having to save your entire project as a copy. By selecting File > Save as New Version from the top menu, you can save your project as a different project file, but inside the same project folder. Each project version will preserve their own animations, timing, video tracks, audio tracks and clip placements. However, the different versions of a single project will share the same drawing files, video files and audio files, as well as the same palette. Project versions will be saved as different .sboard files inside the project directory. To open a specific project version, simply open the corresponding project file. You can also save different project versions when working with Storyboard Packed Files (.sbpz). If you open a Storyboard Packed File that contains several project versions, you will be prompted to select which version you want to open. For more information, see Saving Several Versions of a Project and Deleting Old Project Versions. |
| Project Management view |
The new Project Management view allows you to keep a list of all the projects that were created by splitting your project or by extracting parts of your project. When you split your project, or when you extract smaller projects from your project, you can check the Link extracted project at the bottom of the Split Storyboard or Extract Storyboard dialog to add the smaller projects to the list in the Project Management view. This list displays the name as well as the full path to each project. It also indicates whether or not the project was modified, as well as if the project cannot be found in the location where it was extracted. This view also allows you to remap linked projects that were moved and to remove linked projects that were deleted, and to link other projects to yours. It also provides a quick access to all the commands that are available in File > Project Management in the top menu. For more information, see Project Management View and About Linked Projects. |
| Merge modified panels |
Using the new Project Management view, you can select a project in the list of linked projects, then click on the NOTE The first time you click on this button, you will be prompted to select some merging options. Afterwards, merging changes from a linked project will require a single click.
You can also use the Merge Modified Panels dialog to browse for a project and select the merging options before you import it |
Preferences
| Feature | Description |
|---|---|
| User interface language |
It is now possible to select your preferred user interface language in the Preferences dialog. Storyboard Pro currently supports English, Chinese (Simplified), Japanese and Spanish. In previous versions, Storyboard Pro would always launch in the language of your operating system if supported, or in English otherwise. By setting this preference, you can make Storyboard Pro launch in a specific supported language regardless of the language of your operating system. You can change this preference in the Global UI tab of the Preferences dialog. |
| Panel number incrementing |
The Increment name by preference allows you to configure how new panels are numbered. For example, if you enable this preference and set it to 10 (the default value), panels in a new scene will be named 10, 20, 30, and so on when created in sequence. Then, if you create a new panel between two existing panels, the new panel will be named by using the number between the numbers assigned to the two neighbouring panels, rounded down. For example, if you create a panel between panel 10 and panel 20, this panel will be named 15. If you create another panel between panel 10 and 15, this panel will be named 12. When this option is disabled, if you create a panel between two existing panels, the new panel will be named based on the number of the previous panel + 1, and subsequent panels will be renamed to keep their numbers in sequence. This preference is available in the Naming tab of the Preferences dialog. |
| New panel naming rule |
A new panel naming rule has been added. This new panel is very similar to an existing panel naming rule, it uses letters instead of digits to number panels, in the following way: A ... Z, ZA ... ZZ, ZZA ... ZZZ, ZZZA ... However, while the existing naming rule added Zs at the beginning of the panel's name to count how many times it reached Z, this new rule indicates the amount of Zs it reached using a number, in this way: A ... Z, ZA ... ZZ, 2ZA ... 2ZZ, 3ZA ... Hence, panel names always use at most two letters, and are otherwise preceded by a number. You can select this naming rule in the Naming tab of the Preferences dialog, in the Panel Auto-increment Rule drop-down. |
| Panel name length |
The new Automatically Add Leading Zeroes preference, available in the Naming tab of the Preferences dialog, allows you to create panels with a specific amount of digits in their name, by adding leading zeroes as needed. For example, if you set the minimum amount of characters for panel names to 3, the first panel of a scene will be named 001. |
| Disable using GPU for effects | When applying a blur effect on a bitmap layer, by default, Storyboard Pro uses your computer's graphics processing unit (GPU) to generate the blurred image faster. This may not work as expected on some video cards. If you encounter this issue, you can now fix it by disabling the Render effects using GPU (OpenCL) preference in the Advanced tab of the Preferences dialog. |
| Keyboard Shortcuts dialog |
The Shortcuts tab of the Preferences dialog is now its own dialog, the Keyboard Shortcuts dialog. To access this dialog box, in the top menu, select Edit (Windows) or Storyboard Pro 7 (macOS) > Keyboard Shortcuts. |
| Create, export, import and switch between keyboard shortcuts sets |
It is now possible to create your own keyboard shortcut sets. You can also export your keyboard shortcut sets as XML files and use them as backups or share them with project collaborators. You can create, export and import keyboard shortcut sets using the New, Load... and Save... buttons at the top of the Keyboard Shortcuts dialog. |
| Export and import preferences |
It is now possible to export your preferences as XML files, and use them as backups or share them with project collaborators. You can export and import preferences using the new Load... and Save... buttons at the top of the Preferences dialog. For more information, see Exporting Preferences and Importing Preferences. |
| Default preference sets |
Storyboard Pro now comes preloaded with three different sets of default preferences: Standard, Animatic and 3D. You can quickly switch between these sets in the Preferences dialog. |
Installation & Packaging
| Feature | Description |
|---|---|
| Single application on macOS |
The Storyboard Pro package for macOS now only contains a single application. You can launch License Wizard by selecting Storyboard Pro 7 > Storyboard Pro Tools > License Wizard from the top menu. |
| Easy authorization on macOS |
The way Storyboard Pro is packaged for macOS no longer triggers the operating system's security mechanisms. Hence, it is no longer required to right-click on Storyboard Pro, select Open and authorize the application as a user with administrative privileges to be able to run Storyboard Pro. You will be able to launch Storyboard Pro as soon as it is copied to your Applications folder. |
| No more 32-bit executables |
All 32-bit executables have been removed from the packaging on macOS to ensure that Storyboard Pro can run on macOS 10.15 (Catalina), which dropped support for 32-bit applications. IMPORTANT In previous versions of Storyboard Pro, it was possible to open projects in the legacy project format created by Storyboard 1 and to convert them to the new format. This conversion used the 32-bit Sboard2Xml utility, which is no longer packaged with Storyboard Pro. As such, as of Storyboard Pro 7, it is no longer possible to open projects in the legacy Storyboard 1 format.
|
Scripting
| Feature | Description |
|---|---|
| Smart Script Management |
In the past, scripts packaged with Storyboard Pro were all automatically copied to your preferences folder, in the same location as your custom scripts. Now, scripts packaged with Storyboard Pro are only copied to your preferences if you make modifications to them. Otherwise, they are stored and executed from the Storyboard Pro installation folder. This solves several problems:
For more information, see Editing a Script Packaged with Storyboard Pro, Restoring a Storyboard Pro Script and Script Editor View. |
| Custom Script Folder |
You can now set a custom location in which to store scripts. To do this, you must set the TOONBOOM_GLOBAL_SCRIPT_LOCATION environment variable to the location where you want to store scripts. The scripts in this location will be available in the Script Editor alongside scripts that are packaged with Storyboard Pro and scripts in your user preferences |
| Export to EDL/AAF/XML |
It is now possible to export your project as an EDL, AAF or XML sequence through scripting. You can do this by using the exportToNLE() method of the ExportManager class. The setOneMoviePerPanel() method was also added to the ExportManager class to support exporting one movie file per panel. For more information refer to the Storyboard Pro Scripting Reference. |
| User Interface Responders | The scripting interface now provides you with a list of responders from the Storyboard Pro user interface. You can obtain this list with the getResponderList() method. You can obtain the list of actions for a given responder with the getActionList() method |
| Convert a coordinate for single axis between fields and OpenGL coordinates |
The following methods were added to the scene class to convert the coordinate for a single axis from field coordinates to OpenGL coordinates, and from OpenGL to field coordinates: toOGLX(), toOGLY(), toOGLZ(), fromOGLX(), fromOGLY() and fromOGLZ() |
| Get individual version numbers | The new getMajorVersion(), getMinorVersion(), getPatchVersion() and getBuildNumber() methods of the about class will provide their respective values from the currently installed version of Storyboard Pro |
Enhancements
- The
 Text tool now remembers the last font you used with it.
 - Storyboard Pro now supports True Type Collection (.ttc) fonts. These are font packages containing several True Type Font (.ttf) files. If you have any TTC font installed on your system, you will be able to use them with the Text tool, when formatting captions as well as in Burn-in options when exporting your project.
- The Terminology Style option was removed from the Japanese localization of Storyboard Pro, as Japanese terminology is the same for animation and live action.
- The Start Dictation and Emoji and Symbols menu entries have been removed from the Edit top menu. These entries were automatically added by macOS and were not compatible with Storyboard Pro.
- Toolbars in the top menu and the context menu are now listed in alphabetical order.
- Views in the top menu are now listed in alphabetical order.
Fixed Issues
The following issues have been fixed in this release:
- Storyboard Pro fails to launch on macOS 10.15 Catalina.
- Storyboard Pro
crashes when undoing changes done with the
 Centerline Editor tool.
 - On Windows, when drawing a very long brush stroke with a pen tablet then immediately drawing another stroke, the second stroke starts off with a straight line segment.
- The Spacebar key can still be used to pan views after the user unsets it as the keyboard shortcut for the Free Pan and Zoom command.
- Mouse pointer becomes default mouse pointer when a notification appears on macOS.
- Storyboard Pro fails to import XML sequences exported from OpenTimelineIO for conformation.
- Custom Write node parameters are not exported when exporting Harmony scenes with the Rendered Animatic option.
- Exporting a storyboard in PDF format by running a Storyboard Pro script in a command line interface may cause it to have missing information and garbage text.
- When using the
 Stamp tool with the
  Draw Behind tool mode, the different strokes in the stamp's artwork are laid on the canvas in their reverse order.
 - Using the
 Cutter tool on multiple drawings makes some of the selected artwork turn red.
 - On macOS, attempting to Save As causes Storyboard Pro to freeze if a folder with the same name as your project name exists in the target directory.
- Attempting to Save As inside the project folder will cause the ensuing error message to keep reappearing indefinitely.
- Storyboard Pro crashes if the user cuts and paste a clip, then undoes and pastes again.
- Selecting View > Show Tab Bar from the top menu may cause Storyboard Pro to crash on macOS 10.12.
- When using the
 Rectangle,
  Ellipse or
  Line tool with the
  Snap and Align tool mode, scrolling in or out of the drawing space causes the alignment hints to be offset.
 - Pressing the Del (Windows) or ⌫ (macOS) causes Storyboard Pro to crash in the following circumstances:
- When moving a camera keyframe.
- When adjusting the in-point, out-point of a sound clip, or when moving one of its volume keyframes.
- When moving an animation keyframe in a video clip.
- Pressing Del (Windows) or ⌫ (macOS) to delete the selected panel while attempting to resize it resizes the previous panel.
- Attempting to import a 3D model into a 2D scene while the timeline playhead is past the last panel in the project, then cancelling, causes Storyboard Pro to crash.
- Attempting to add a scene between two scenes and then cancelling may cause Storyboard Pro to crash if a custom default panel layout is saved to the user's preferences.
- Attempting to import an XML sequence that contains video files instead of images for conformation causes Storyboard Pro to crash.
- Camera frame in Stage View and Camera View is too thin when using a High DPI (Windows) or Retina (macOS) display.
- When duplicating a panel containing vector artwork imported from a PDF, the layers in the duplicate panel are copied from different panels.
- In the Timeline view, the zone in which a template can be dropped to insert it as a new panel at the end of the scene is too narrow and is easy to miss.
- The overlay indicating a volume keyframe's value in dB remains on the screen when dragging the keyframe outside the sound clip to delete it.
- Crash may occur when attempting to add a new sequence while the Timeline View playhead is beyond the last panel.
- If the user extracts a scene from a project, deletes the extracted project and extracts the same scene in the same target folder with the same name, the audio in the extracted project will be corrupted.
- Moving panels in the Timeline view has no effect if the Timeline view is not docked to the main application window.
- Main application window does not appear if workspace configuration file is invalid or corrupted.
- When drawing a closed shape with the
 Auto Fill tool mode and a custom colour that does not exist in the project's palette, the shape gets filled with red.
 - Playback skips frames when playing a project for the first time since opening it on macOS.
- Exporting a Windows Media Video (.wmv) movie at 100% quality creates a corrupted movie file.
- The value of volume keyframes, displayed in decibels, is slightly inaccurate relative to their actual value, which is stored in amplitude ratio, in the project file.
- Drawing stroke does not appear until it is completed when drawing with the
 Pencil tool with the Draw Behind tool mode enabled and while using any modifier key.
 - The
 Easy Drag mode of the
  Select tool does not work when pressing and holding the ⌘ key on macOS.
 - The
 Show / Hide button for a video track does not work properly if the timeline playhead is over a video clip, but not over a panel.
 - Left and right area of the Timeline view end up scrolled at different positions when clicking and dragging on the timeline playhead up and down to make it scroll vertically.
- The Export Current Image command does not work when there are video clips but no panel at the current frame.
- When making a PDF preview of a panel using the Panel PDF Options view, if the PDF profile has a background image, it will obscure everything in the PDF preview except for the thumbnails and the logo.
-
When using Storyboard Pro to run a script in a command line interface, the process does not terminate and outputs the following error:
QThread: Destroyed while thread is still running
- Pasting formatted text in a caption field may result in lines temporarily overlapping each other.
- Attempting to open a Storyboard Pro Packed File that was created in Japanese trial mode (.tbpz) in full license mode results in Storyboard Pro attempting and failing to open an empty project.
- Entry in the Undo menu for updating the position of a 3D model rendered into a 2D layer has no text.
- It is possible to edit the artwork in a locked or hidden layer using the Select, Cutter,
 Perspective,
  Edit Gradient/Texture,
  Eraser,
  Paint or
  Close Gap tool if the artwork in this layer is selected using the
  Select All Drawings in Scene option of the Select tool or by selecting the locked or hidden layer among others layers and selecting the artwork with the Select tool.
 - PDF Export view is not listed in the right alphabetical position in the
 Add View menu.
 - No progress bar displays when saving a project on macOS.
- Checked state of the Remove exported panels from current project checkbox in the Split Storyboard dialog is saved even if the user clicks Cancel.
- Adding a transition fails if the default panel length is set to 3 frames or less and the Preserve project length when adding transitions preference is enabled.
- When a group layer is selected, its name does not appear in the status bar.
- Tool tip for the Overwrite Clips button is "Overwrite Sound Clips".
- Centre is misspelled "center" in various user interfaces.
- Error message when attempting to open a project created in Japanese trial mode in full license mode is not localized in languages other than English.
- Adding a transition between two scenes offsets the video and sound clips cued during the second scene backwards.
- "Brush 1" is missing from the
 Brush tool presets.
 - The Perspective tool has an Align to Grid tool mode, which should only be available in Harmony.