Toon Boom Harmony 17.0.0 Release Notes
Here is the list of changes in Harmony 17.0.0, build 14765 (2019-06-07):
- Master Controller
- Drawing Tools
- Drawing Guides
- Deformations
- Digital Animation
- Node View
- Effects
- Performance
- Export
- Import
- Preferences
- Installation
- Harmony Server
- Scripting
- Enhancements
- Fixed Issues
Master Controller
| Feature | Description |
|---|---|
| Stack Wizard |
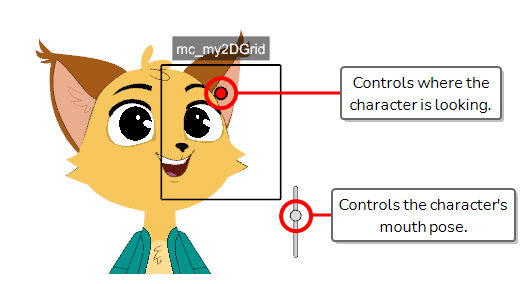
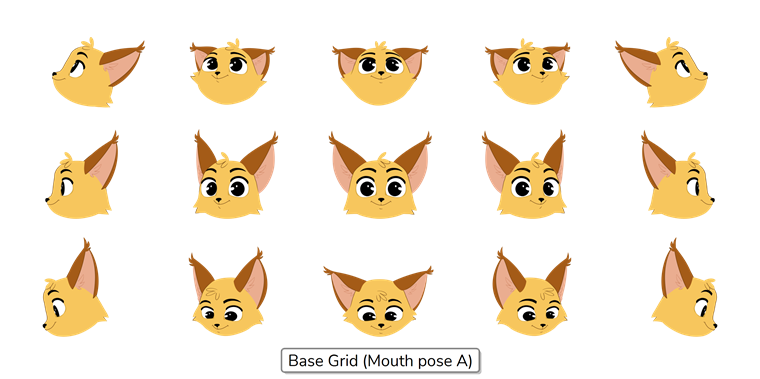
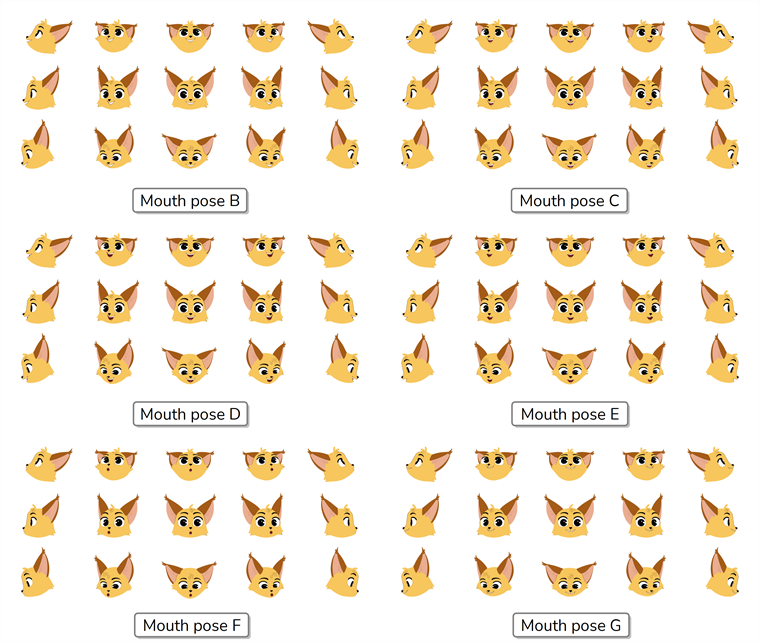
A new Master Controller wizard, the Stack Wizard, allows you to create a Master Controller that combines a 2D point widget and a slider widget. It works similarly to the Grid Wizard, except that it allows you to combine several grids of poses. The 2D point allows you to pose your character based on the current grid of poses, and the slider allows you to switch between grids.
A good example of how this can be used is by creating a 2D point widget that sets the angle your character's head is facing, and a slider that sets its mouth pose. By creating a grid of the character's head looking in every direction, then creating alternate versions of this grid for each mouth pose, you can use the Stack Wizard to generate a Master Controller that controls both aspects of your character.
To use this wizard, create a grid of poses in a scene like you would for the Grid Wizard, then all the variations needed for that grid of poses. Then, in the Master Controller toolbar, click on the |
| New widgets |
The following new Master Controller widgets can be created in Harmony:
For more information, see Harmony Scripting Interface Reference. |
| Editing Master Controllers |
The new Unroll Wizard allows you to "unroll" the original character poses of a Master Controller into the current scene, and makes changes to them. For example, if you have a character with a Master Controller that controls the direction in which it is looking, you can use the Unroll Wizard to recreate the poses of your character looking in every direction that were used to generate this Master Controller, into the current scene. Unrolling a Master Controller can be useful if you wish to make changes to an existing Master Controller. By unrolling its poses into a scene, you get to make changes to the poses, then create a new Master Controller that uses the modified poses. To use the Unroll Wizard, select a Master Controller in your scene. Then, in the Master Controller toolbar, click on the |
| Stepped Slider |
When creating a Slider-type Master Controller with the Slider Wizard, you now have the option to make the slider "stepped". This means that, when you manipulate the slider, instead of interpolating between the different poses that were used to create the Master Controller, it will set the character to one of these poses, with no interpolation. This can be useful if you wish to create a slider to select between a set of poses that are not meant to interpolate between one another, such as mouth poses.. To use this option, simply uncheck the Interpolate Between Poses option when using the Slider Wizard. |
| Pose database storage |
When creating a Master Controller in Harmony Server using the Stack Wizard, the Grid Wizard or the Slider Wizard, you will be prompted to select at which level (scene, job, environment or global) you want the Master Controller's poses database to be stored. |
| Show Master Controllers button | A new button in the Master Controller toolbar, |
| Nudging Master Controller widgets |
It is now possible to select a Master Controller widget and nudge it in any direction by pressing the arrow keys. |
| Persistent Wizard state | When you close the Grid Wizard or the Stack Wizard, the current configuration of its grid or grid stack is saved to your preferences, and will be reloaded the next time you open that wizard. |
| Jumping to selected frame | In the Grid Wizard and the Stack wizard, when you associate a point in the grid to a frame, the current frame in the Harmony user interface is automatically set to that frame. |
| Labels |
In addition to the Label widget, the following Master Controller widgets can be configured to have labels by setting some of their properties:
This can be done by setting the widget's label property, as well as other related properties, when creating the widget. For more information, |
| Customization | It is now possible to make the 2D point widget appear either as circle, a square, a triangle or a diamond. This can be done by setting the widget's point_style property when creating it. For more information, |

Drawing Tools
| Feature | Description |
|---|---|
| Pen stabilizer |
The new pen stabilizer can help you draw smooth, stable lines by stabilizing your drawing strokes as you draw, without having to smooth them afterwards. It works by letting you draw a stroke without generating a line immediately, instead it starts generating a line that trails behind your mouse cursor or tablet pen once it reaches a certain length. By trailing behind your stroke, it can smooth out the flaws in your drawing gesture and generate a smooth stroke. There are two different stabilizing method methods:
The distance between your mouse cursor or tablet pen and the stroke can be customized. This feature can be enabled by adding the Pen Settings toolbar to your workspace, and selecting either Average or Pulled String in the toolbar's drop-down menu |
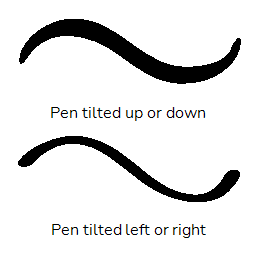
| Pen tilt support |
If you have a tablet and pen that support reading the tilt angle of your pen, you can configure the Brush tool to use this information and draw with a tilted tip. A tilted tip will be stretched or projected at the angle in which you tip your tablet pen, simulating the effect of drawing with a tilted pencil or felt pen.
This feature can be used by adjusting the Pen Tilt Sensitivity parameter in the Brush Properties dialog |
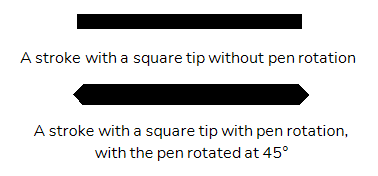
| Pen rotation |
If you have a tablet and pen that supports reading the rotation angle of your pen, you can configure the Brush tool to use this information so that the rotation of your brush tip is based on how you rotate your tablet pen.
This feature can be used by enabling the Use Pen Rotation property in the Brush Properties dialog |
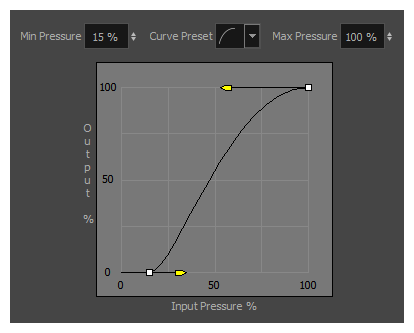
| Pen pressure feel editor |
Harmony now allows you to configure the curve by which it processes the amount of pressure you put on your pen tablet to calculate the thickness, flow or opacity of your brush or pencil lines.
The Pen Pressure Feel dialog can be accessed by adding the Pen Settings toolbar to your workspace, then clicking on the |
| Adjust thickness when drawing straight lines |
When drawing straight lines with the
|
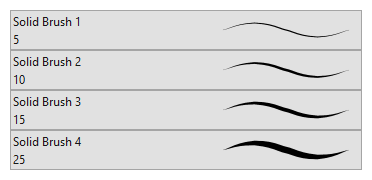
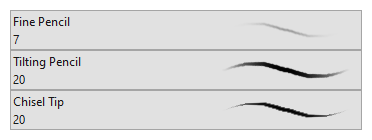
| New & updated brushes |
The brush presets for the
|
| Stroke tool smoothing |
The |
| Keyboard shortcut for Draw Behind | It is now possible to assign a keyboard shortcut to toggle the |
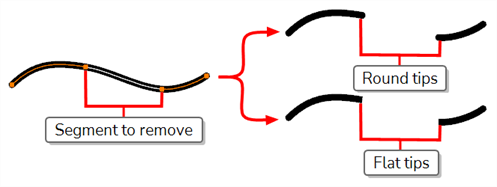
| Tip Style option for the Contour Editor tool |
The
|
| Default Tip Style | When you set the |
| Synchronize Brush and Eraser size | It is now possible to synchronize the size of the Brush and Eraser tools. To do this, open the Preferences dialog and, in the Drawing tab, check Synchronize Eraser and Brush. |

Drawing Guides
| Feature | Description |
|---|---|
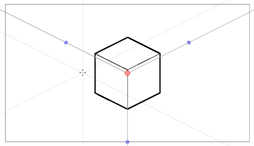
| New drawing guides |
Several new drawing guides have been added:
Each guide is available in the |
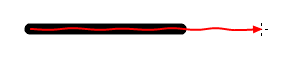
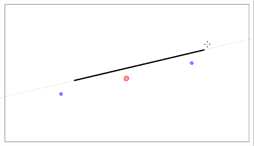
| Locking the guide angle |
If you press and hold the Alt key while using drawing guides, the angle of the guide lines will stop following your mouse cursor and lock in position until you release the Alt key, allowing you to keep the guide lines at the right angle. By using this feature, you can rework the thickness or length of lines that you are drawing with a guide. It's also useful if you want to draw a dotted line along an axis. |
| Guide angle display | When you rotate a guide, its exact angle is displayed in the top-left corner of the Camera view. |
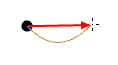
| Rotating guides from centre |
Some guides can be rotated by moving one of the two points on their horizon line, which rotates them around the opposite point. If you press and hold the Alt key while moving one of their points, it will rotate the guide around its centre instead. This works for the following guides:
|

Deformations
| Feature | Description |
|---|---|
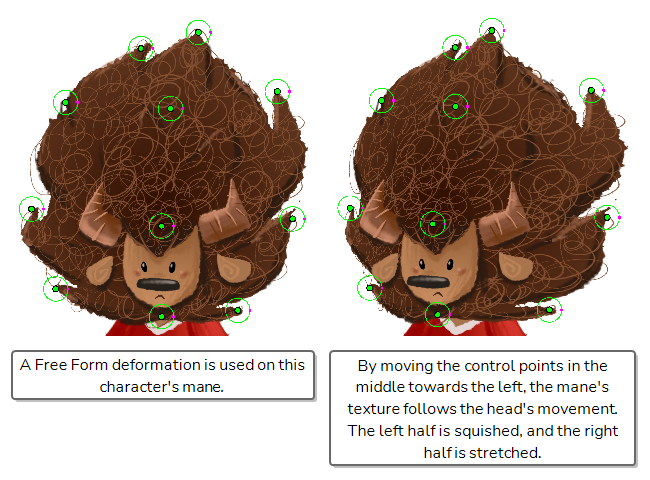
| Free Form Deformation |
The new Free Form Deformation is a type of deformer that can be used to deform textures. It works by creating points anywhere inside an element, then manipulating these points to deform the element in a way similar to pulling on different parts of a piece of cloth.
To create a Free Form Deformation, select the Rigging tool in the Deformation toolbar. Then, in the Tool Properties view, select |
| Show deformations without hiding others | A |
Digital Animation
| Feature | Description |
|---|---|
| Alignment guides in the Camera view |
It is now possible to add horizontal and vertical guides to the Camera view. Alignment guides are visible when the
For more information, see About Alignment Guides |
| Frame markers |
It is now possible to add coloured markers to frames in the Timeline view. Frame markers differ from drawing markers in that they are not tied to a drawing, but to a frame. They can be added to any frame, whether or not it contains a drawing. They also differ from scene markers as they are added to specific layers rather than the entire scene, and only mark a single frame. To add a frame marker, right-click on a frame in the Timeline view and select Mark Frame, then select the desired colour to mark the frame with. It is possible to assign keyboard shortcuts to quickly navigate between frame markers, whether of any colour or of a specific colour. Those keyboard shortcuts can be set in the Timeline section of the Keyboard Shortcuts dialog. For more information, see About Frame Markers |
| Exclude layers in Pose Copier |
The Pose Copier dialog now allows you to select layers in your rig to exclude from the pose copying process. This can be useful if you have a template containing many full character poses, but you only want to paste certain parts of these poses on your character. To use this feature, first, select every layer you want to exclude in the Timeline view. Then, right-click on them and select Tag > Timeline Tag. Then, once in the Pose Copier dialog, check the checkbox next to the Exclude Layers button, then click on this button. |
Node View
| Feature | Description |
|---|---|
| Preference for pass through composite as default |
There is now a preference to make new Composite nodes in Pass Through mode by default. This preference, named Default Pass Through Composite, is available in the General section of the Preferences dialog |
| Rip & insert composite |
It is now possible to insert a composite in the middle of a connection cable by holding the Alt key and moving it over the cable. It is also possible to rip a composite from a connection by holding the Alt key and moving it out of its cables. Up until Harmony, this was possible with every node that has at least one input and one output port, except for the Composite node. |
| Straight cable display | It is now possible to display cables in the Node view as straight lines going directly from one port to the other. This can be useful if your node network uses a lot of waypoints, as connections between waypoints display as straight lines. |
| Set composite mode on several composites |
Using the Set Properties on Many Layers dialog, you can change the mode of all composite nodes in the selection to either As Bitmap or Pass Through. To access this dialog, click on the |
Effects
| Feature | Description |
|---|---|
| New Motion Blur effect |
A new Motion-Blur effect was added to Harmony. This effect has four significant enhancements over the legacy Motion-Blur node:
For more information, see Motion Blur Node NOTE The legacy Motion-Blur node was renamed Motion-Blur-Legacy.
|
| New Chroma Keying effect |
A new chroma keying effect, the RGB-Difference-Keyer node, was added to Harmony. It has the following enhancements over the legacy Chroma-Keying node:
For more information, see RGB Difference Keyer Node. |
Performance
| Feature | Description |
|---|---|
| Node & Rig Caching |
It is now possible to make Harmony cache the output image of nodes and composites for the OpenGL preview of the Camera view:
This can significantly improve the performance of Harmony when working on heavy scenes with several character rigs. For example, by enabling the Cached parameter on a Composite node to which several character rigs are connected, the preview image of each of these character rigs becomes cached. Since a character rig that is cached cannot be manipulated, it is possible to temporarily uncache a cached node or rig simply by clicking on it. Then, if you click on another cached node or rig in the scene, the previously active node or rig becomes cached again, and the newly selected node or rig becomes uncached. To enable cache on a node or composite, open its layer properties and, in the top-right corner, check the Cached checkbox. You can also add the Node Caching toolbar to your workspace, with which you can enable or disable caching on selected nodes and control how caching is temporarily disabled and re-enabled. The For more information, see About Node and Rig Caching and Node Caching Toolbar. |
Export
| Feature | Description |
|---|---|
| Export as MP4 |
It is now possible to export a movie in MPEG-4 (.mp4) format. To export an MP4 movie, select File > Export > Movie from the top menu. Then, in the Video Format drop-down, select H.264/MPEG-4 (*.mp4). NOTE Movies export in MP4 format from Harmony use the H.264 video codec and have no audio.
|
| New QuickTime movie interface for macOS |
On macOS, Harmony now uses the Apple AVFoundation framework that is built into macOS to export movies in QuickTime Movie (.mov) format, instead of the QuickTime application. This allows Harmony to encode video using the H.264, Apple ProRes 442 and or Apple ProRes 4444 codecs built into AVFoundation. For more information, see Configuring Movie Settings for QuickTime Movies on macOS or Movie Options Dialog Box (macOS). |
Import
| Feature | Description |
|---|---|
| Import MP4/M4V | It is now possible to import MP4 or M4V movies into your scene. To import an MP4 or M4V file, select File > Import > Movie from the top menu. |
Preferences
| Feature | Description |
|---|---|
| Keyboard Shortcuts dialog |
The Shortcuts tab of the Preferences dialog is now its own dialog, the Keyboard Shortcuts dialog. To access this dialog box, in the top menu, select Edit (Windows/Linux) or Harmony Premium (macOS) > Keyboard Shortcuts. |
| Create, export, import and switch between keyboard shortcuts sets |
It is now possible to create your own keyboard shortcut sets. You can also export your keyboard shortcut sets as XML files and use them as backups or share them with project collaborators. You can create, export and import keyboard shortcut sets using the New, Load... and Save... buttons at the top of the Keyboard Shorcuts dialog. For more information, see About Keyboard Shortcut Sets. |
| Export and import preferences |
It is now possible to export your preferences as XML files, and use them as backups or share them with project collaborators. You can export and import preferences using the new Load... and Save... buttons at the top of the Preferences dialog. For more information, see Exporting Preferences and Importing Preferences. |
| Default preference sets |
Harmony now comes preloaded with five different sets of default preferences, which you can quickly switch between in the Preferences dialog. Most of the preferences in these sets are the same, except for key workflow preferences such as Focus on Mouse Enter, Default Separate Position for Pegs, Stop-Motion Keyframes |
| Default preference overrides | You can use a specific preference set as the default preferences for Harmony users. To do this, save this preference set as the file prefs_override.xml in the resources sub-folder of the Harmony installation folder. |
Installation
| Feature | Description |
|---|---|
| Single application on macOS |
The Harmony package for macOS now only contains a single application. You can launch any of the side applications bundled with Harmony, such as License Wizard |
| Easy authorization on macOS |
The way Harmony is packaged for macOS no longer triggers the operating system's security mechanisms. Hence, it is no longer required to right-click on Harmony, select Open and authorize the application as a user with administrative privileges to be able to run Harmony and its side applications. You will be able to launch Harmony as soon as it is copied to your Applications folder. |
Harmony Server
| Feature | Description |
|---|---|
| Scene locking mode |
It is now possible to customize the way Harmony Server locks a scene when it is opened by a user. By default, when a Harmony Server scene is opened, it is locked so that no one else can open it. It can also not be opened more than once by the same user. The database server daemon, dbserver, now has a -logical-lock parameter which can be specified to modify this behavior. The parameter supports the following modes:
To learn how to specify command line parameters when launching the database server, please contact support. |
Scripting
| Feature | Description |
|---|---|
| Running script in batch without saving |
It is possible to run scripts on Harmony scenes from the command line by running Harmony with the -batch parameter. However, since scripts are typically used to make changes to a scene, this saves the scene by default. When running a script in command line on a Harmony Server scene, it is possible to make Harmony execute the script without saving the target scene. To do this, simply add the -readonly parameter to the command. |
| Get coordinates of a view |
The viewPosition() method was added to the view class. It returns a QPoint object containing the position of the top-left corner of the specified view, in pixels. The individual coordinates can be obtained by using the x() and y() methods of the returned QPoint object. var myView = view.currentView();
var myViewPosition = view.viewPosition(myView);
var myViewX = myViewPosition.x();
var myViewY = myViewPosition.y();
For more information, see Harmony Scripting Interface Reference |
| Getting and setting Quaternion-type attributes |
The setValue(), setValueAt(), getValue() and getValueAt() methods of the Attribute class can now work with Quaternion functions:
|
| Apply selected colour to selected artwork | The new applyColorSelection() method of the PaletteManager class will apply the selected colour in the Colour view to the selected artwork in the Camera or Drawing view |
Enhancements
- When drawing, the preview of the stroke now refreshes four times as fast, making it feel smoother and more responsive.
- The way Harmony initializes the DirectSound interface on Windows has been modernized, which may increase the stability and reliability of audio playback as well as prevent issues.
- The version of the Cisco OpenH264 library used by Harmony was upgraded to 1.8.
- The Draw Circle and Draw Square options for the
 Ellipsis and
  Rectangle tools are now togglable icon buttons in the Tool Properties view.
 - The Centerline Smoothing slider has been removed from the Tool Properties view for the
 Brush and
  Eraser tool. It is now only available in the Brush Properties and Eraser Properties dialogs.
 - The Apply Parent Modifier's Transformation property of Curve nodes has been renamed Apply Parrent Transformation.
Fixed Issues
The following issues have been fixed in this release:
- Crash when attempting to view the layer properties of an Element node created when the Preserve Line Thickness By Default preference is enabled.
- Rare crash when using curve or envelope deformations on a drawing with pencil lines.
- Rare crash when undoing a modification with the
 Contour Editor.
 - Crash on certain macOS workstations when moving artwork with the
 Select tool while both the Drawing and the Camera views are visible.
 - Crash on certain macOS workstations when selecting a Drawing node that has the Adjust Pencil Line Thickness property enabled with the
 Transform tool if there is a floating Camera view in
  Render View mode.
 - Crash when generating colour art from artwork that was created while the Pixel Density Proportional to Camera preference is enabled and the camera zoom is not at 12F.
- Possible crash when attempting to move the Playback toolbar on macOS.
- Crash when selecting artwork from multiple art layers and multiple drawing layers at the same time, then copying and pasting it into a different layer.
- Crash when selecting Top in the Monitored Attributes list of a Master Controller wizard, then clicking on the
 Search button.
 - Crash when manipulating a 3D Rotation widget in a Master Controller node.
- Crash when attempting to rename a newly created template while the Library view is in Detailed display mode on Windows
- Crash when copying and pasting Master Controller nodes using the copyPaste scripting object.
- Crash when dragging and dropping a vector or bitmap image from the Library view to a cell in the Xsheet view.
- Crash when deleting a composite node inside a group if the composite node is connected to multiple input images going from the Multi-Port-In node and some of its cables are crossed.
- Hang when opening the
 View menu of the Drawing Substitutions view if no layer is selected.
 - Performance of scenes with Pass Through composites is unnecessarily impacted by disconnected drawing nodes that are not displayed in the Camera view.
- Harmony computes the bounding box of selected elements multiple times when refreshing the Camera view, impacting performance.
- The Camera view takes longer to refresh in
 Render View mode each time it has to refresh if the scene has deformations.
 - Output image of composite node does not appear in rendered image if the composite is connected both an element that is at a position higher than 0 on the z-axis and a node such as the Line Art, Color Art, Underlay, Overlay, Image Switch or Layer Selector node and which has no input image.
- Drawing slowly using a pen tablet on a bitmap layer on macOS results in shaky lines.
- On Windows, when drawing a very long brush stroke with a pen tablet, then immediately drawing another stroke, the second stroke starts off with a straight line segment.
- Some Brush tool tips that were packaged with earlier versions of Harmony were not packaged with Harmony 16.0.0 and Harmony 16.0.1.
- When using the
 Stamp tool with the
  Draw Behind tool mode, the different strokes in the stamp's artwork are laid on the canvas in their reverse order.
 -
Random effect of Quake node, Shake node and Lens Flare node renders differently on Windows, macOS and GNU/Linux.
NOTE To avoid affecting existing scenes, this fix only applies to Shake, Quake and Lens Flare Nodes created in Harmony 17 or later. To use the new, platform-independent random effect on a node created in an older version, open its layer properties and set the Version property to 2. - Rendering of 3D models through Maya using Renderman does not work with Renderman 22.0 or later.
- Attempting to use Unicode characters in a scene or layer name does not work on certain GNU/Linux machines.
- In Harmony Server, when inserting a template that contains a Master Controller from a different job, the Master Controller's pose database files do not get copied over.
- Elements connected to a Pixelate node are invisible in the OpenGL preview of the Camera view.
- After having synced a layer with another layer, then unsyncing it, it is impossible to sync it with a different layer.
- Using the
 Reposition All Drawings tool in the Drawing view offsets a drawing multiple times if it is exposed multiple times.
 - Copying and pasting text with rich text formatting into any of the script fields of the Layer Properties for a Master Controller or Script node may result in illegible or scrambled text.
- Exporting a QuickTime movie via the scripting interface fails when passing -1 as the horizontal and vertical resolution. Using -1 is supposed to make it use the default preview resolution instead.
- When pasting layers using Paste Special, with the Palettes option set to Copy and create new palette files in element folder, the palette files get copied to their origin folder and renamed.
- Empty Group layer gets locked and cannot be unlocked when collapsed in the Timeline view.
- Many translation issues across the user interface.
- The Play application always launches in Stand Alone mode in Japanese.
- No option to import 3D models in trial mode in Japanese.
- Error message when clicking on the
 Save Grid Preset button in the Grid Wizard.
 - The
 Load Grid Preset button of the Grid Wizard opens an Open File dialog, then displays an error message.
 - Layer properties of Master Controller or Script node do not have a scroll bar when they exceed the available display space.
- When using a Master Controller wizard on GNU/Linux, the .tbState extension is not automatically added to the pose databases file generated for the Master Controller.
- Seams may appear where different colour zones meet when looking at a drawing with the Backlight mode enabled, at certain zoom levels, in the Drawing view.
- Pencil icon next to modified drawings in Xsheet view is not properly centred on macOS that use a Retina display.
- Some Brush tool tips that were packaged with earlier versions of Harmony were not packaged with Harmony 16.
- Progress bar window appears at the top of the screen when movie file on macOS.
- Up & down buttons right of decimal number input fields appeared only on Windows
- Cannot select a node by clicking on its debug information, when Debug mode is enabled.
- Empty item in Undo/Redo list after using the Rename Transformation button of the Deformation toolbar.
- Tool tips of Game Skinning toolbar are not translated in other languages.
- Buttons to flip a stamp horizontally or vertically in the Tool Properties view appear too small when using a Retina display on macOS.
- When customizing certain toolbars such as
- When nudging a deformation point with the keyboard while in
 Animate Off mode, the deformation point moves too far.
 - If the toolbar for a specific view is hidden, it reappears after switching to another view, then back to that view.
- Impossible to select a point with the Contour Editor using a tablet pen.
- Some frames may be corrupted when exporting a Windows Media Video (.wmv) file at 100% quality.
- When copying and pasting artwork from multiple art layers, with the
 Apply to Line Art and Colour Art tool property enabled, all of the artwork ends up only on the current art layer.
 - Content of Grid Wizard dialog shifts when selecting or deselecting a grid point on macOS.
- Exporting layout images in PSDDP4 format results in 8-bit/channel PSD images, whereas they should be 16-bit/channel.
- Many preferences are not restored to their default value by the Restore All Defaults button.
- When using drawing guides, using the arrow keys to switch between axes also changes the current Stamp tool drawing.
- Using the [ and ] keyboard shortcuts to substitute the current drawing does not work in the Timeline view
- Keyframe is created when modifying a deformation point with the
 Rigging tool.
 - Imported layers are not properly scaled when importing a multi-layer PSD file as individual layers with the alignment rule set to Project Resolution.
- The custom configuration of some toolbars is not preserved after closing Harmony.
- When changing the icons for scripts added to the Scripting toolbar, they do not get updated until Harmony is relaunched.
- Harmony cannot load SDK plugins unless their path is specified in the TOONBOOM_PLUGINPATH environment variable on GNU/Linux.
- Some synced layers are ignored when using the Pose Copier dialog with a template that has synced layers.
- Some drawings are discarded when importing a template containing synced layers.
- Drawings offset with the
 Shift and Trace tool appear offset when using Mini Playback.
 - Selected preset for the
 Pencil tool and the Eraser tool are swapped each time Harmony is launched.
 - Changing the scene's length from the Timeline view while it is fully zoomed-in positions the end-of-scene handle one frame off the actual end of the scene.
- Errors in the script samples of the Master Controller widgets provided in the scripting documentation.
- Bounding box of element selected with the
 Transform tool is inaccurate if the element is selected while the Camera view is rotated, then the Camera view is reset to its default angle.
 - Render Preview node does not update when selecting a frame in the Timeline view if the Enable Interactive Camera View Cache preference is enabled.
- Error messages appear when cancelling any operation while creating a Master Controller using one of the Master Controller wizards.
- View-specific toolbars are not listed in the context menu when right-clicking on the toolbar area of a view.
- Using the Lock All or Lock All Others commands lock group layers in the Timeline view.
- Opening the Layer Properties dialog for a locked layer locks all of its children in the Timeline view.
- Using the Configuration Assistant to add the path to the Harmony executables to the $PATH environment variable on macOS does not always work.
- If two Harmony Server scenes with the same name but different environments are open at the same time, the Database Lock Manager will always display the locks for both scenes when trying to view the locks for only one of them.
- The drawing key object returned by the Drawing.Key() method does not have a layer property if it is created from a synced layer.
- The -adjustpencil parameter of the utransform does not work.
- The
 Perspective tool performs excessive smoothing on short vector lines in the selected artwork.
 - The Line Art options in the
- Options for the
 Centerline Editor tool are labeled "Contour Editor Options" in the Tool Properties view.
 - Wrong translation of the word "name" is used in the Welcome dialog in Japanese.
- Name of some tool properties may not appear translated when using Harmony in a language other than English.
- The FixURLHandler.sh shell script packaged with the macOS edition does not work when run from any directory but its own directory.
- Scripts designed to duplicate the timing of Xsheet columns for paperless workflows (TB_PL_LOKEY, TB_PL_KEYMC and TB_PL_MCIB) renumber the drawings incrementally instead of copying their numbers.
- In the Japanese workflow mode, when using the Create Repeating Cycle dialog in Insert mode, the drawing in the selected cells and all the affected cells will be replaced with the drawing in the first selected cell.
- In the Japanese workflow mode, in the Create Repeating Cycle dialog, it is possible to set the number of cycles to 0, which causes unexpected changes in the Xsheet.
- Blank cells are added after the exposure when extending the exposure of a repeat cycle in Japanese workflow mode.
- Blank cells are left behind when reducing the exposure of a repeat cycle in Japanese workflow mode.