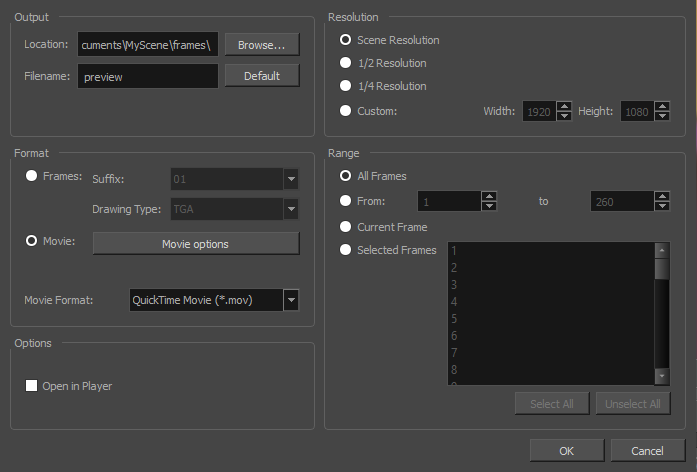
Because rendering scenes requires a lot of computer resources, and playback in Harmony does not always keep up with the scene's framerate, it may be difficult to decide how to preview your animation as you're working on it. Exporting OpenGL frames gives a more convenient alternative.
OpenGL is the name of the engine used to display your scene's content as you are working on it. Hence, exporting OpenGL frames basically means you're exporting frames as they are usually rendered in the Camera view: Without antialiasing, compositing or effects. This is significantly faster than exporting your final frames, and can allow you to preview your animation in real-time without having to wait for a render.
You can quickly and easily create and view an OpenGL render of your scene using the Record and Play command. To do this, do one of the following:
- In the top menu, select Play > Record and Play.
- In the playback toolbar, click and hold the Render and Play
button, select Record and Play
to set the button to Record and Play mode, then click on the button again.
- From the top menu, select File > Export > OpenGL Frames.
The Export OpenGL Frames dialog box opens.

- In the Output section, click Browse and select the directory where you wish to export the frames.
- In the Filename field, enter a file name for the file to export. If you're exporting frames as individual images, the specified file name will be used as a prefix, and the frame number will be used as a suffix. To use the default file name, click on Default.
- In the Format section, select Frames if you want to export each frame as an individual image, or Movie if you want to export a QuickTime movie file.
- If you are exporting frames:
- Select a numbering format in the Suffix dropdown. The numbering format determines how many digits to use for the frame numbers. For example, if the Suffix is set to 001, the first frame will be numbered 001, the second one will be numbered 002, etc.
- If you are exporting frames, select an image format from the Drawing Type dropdown.
- In the Video Format drop-down menu, select the desired format for your movie file:
-
QuickTime Movie (*.mov): The Apple QuickTime format. This is the default export format and is recommended for its portability, and also because it allows you to choose among several video codecs.
NOTES- On Windows, Apple QuickTime must be installed to allow Harmony to export QuickTime movies. You can configure the export of QuickTime movies to use any codec that is compatible with QuickTime, including H.264, MPEG-4 and Animation.
- On macOS, Harmony uses Apple AVFoundation to export QuickTime movies, which allows you to export using codecs such as H.264, Apple ProRes 422 and Apple ProRes 4444.
- On GNU/Linux, Harmony uses the OpenQuickTime library to export QuickTime movies. This only allows you to export videos in non-proprietary formats such as Motion-JPEG, Photo JPEG, PNG or Uncompressed (RGB).
-
H.264/MPEG-4 (*.mov) : A simple movie format that uses the H.264 codec, which is supported by most web browsers.
NOTES- Using this format does not require additional software. However, if this is the first time you export a movie in H.264/MPEG-4 format, you will be prompted to download the OpenH264 library from Cisco. Simply click Yes when prompted, and Harmony will automatically download the library, then export the movie.
- There are no encoding options for this format.
- This format supports resolutions of up to 4096×2304. Each dimension must be a multiple of 16 pixels.
- Audio exported in this format is encoded in PCM 16-bit stereo, 22.05 kHz.
-
Windows Media Video (*.wmv): The native format for Windows Media Player.
NOTES- Windows Media Video (.wmv) files can only be exported on Windows.
- Video players and editors on non-Windows systems can generally not open Windows Media Video (.wmv) files.
- In the Options section, click on Movie Options if you want to configure the video and audio compression settings for the movie to export.
- For information on how to configure movie settings for a QuickTime Movie (.mov), see:
- For information on how to configure the movie settings when exporting in Windows Media Video (.wmv) format, see Configuring Movie Settings for Windows Media Video.
- When exporting in H.264/MPEG-4 (.mp4) format, there are no video and audio compression settings.
- If you are using GNU/Linux and are exporting in QuickTime Movie (.mov) format, there will be a button for the Video Options and one for the Sound Options.
If you are exporting a movie:
- From the Resolution section, select a resolution for export. If you are running some quick tests, then you might want to reduce the resolution to save on exporting time. You can also select the Custom option to specify the desired Width and Height of your exported frames.
- In the Range section, do one of the following:
- If you want to render all the frames in your scene, select All Frames.
- If you want to render a specific sequence of frames, select Selected Frames then, in the fields to the right, enter the number of the first and last frame of the frame sequence you wish to render.
- If you want to export the current frame, select Current Frame.
- If you want to export specific frames, select Selected Frames, then click on each frame you wish to export in the frames list to the right. You can also click and drag to select a range of frames in the list. If you want to remove a frame from your selection, simply click on it again.
- In the Options section, select the Open in Player option to view the rendered frames.
- Click OK.