Space Harvest Tutorial - Replacing Ships
![]()
Export the PlayerShip to a Scene
Configuring Liftoff and Landing Animations
In this tutorial we will follow the procedures to replace the ships using assets created in Toon Boom Jump. The goal of this tutorial is to demonstrate how the designer can take advantage of the Toon Boom Jump workflow.
Creating a New Project
Opening the Project:
-
In the Jump homepage, select the Space Shooter template and fill in the following:
-
Project Name
-
Game Description
-
Set the Project Name as “space harvest adventure”
-
Set the Game Description as “fly through space, collect resources, and beware the space pirates”
-
Select Open Game Engine. The game engine opens.
-
Open the PlayerShip asset in Asset Editor to check the animations, the character ratio, and overall project.
The PlayerShip asset is located in Assets > Ships > PlayerShip in the Project Details Page.
-
Once you are acquainted with the project, export it to be used in the game.
For this tutorial,
![]()
The assets are already provided in the template.
![]()
Once exported, close the Asset Editor and open the Godot game engine.
The game engine will begin importing the exported asset into the game engine project.
Configuring the Asset
In the Toon Boom Project Panel, double-click on the imported asset to check its result and configure it. The asset will open as a tab in the Toon Boom Asset Viewer where it can be configured.
![]()
The animations imported are:
-
“Explode"
-
“Idle”
-
“LandingProcedure”
-
“LiftOff”
-
“PlasmaShoot”
-
“Thrust”
You should not need to set a direction in this template because it has an angular property. However, set them all to “UP” just in case. You will need to inform this on the code.
To configure the asset:
-
Set the following:
-
"Thrust" to "Walk"
-
“Explode” to “Die”
-
“Idle” to “Idle"
-
“LandingProcedure” to “Landing”
-
“LiftOff” to “LiftOff”
-
“PlasmaShoot” to “Fire”.
NOTE If an animation map is not present, you can click on the Pen icon to the right of Motion Mode to create it. Click the Pen icon, type in a name, and click the green check mark.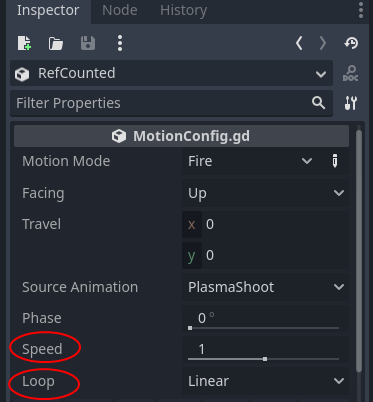
-
-
Set the Loop for the Die, Liftoff, and Landing to None.
-
Set the Speed of the PlasmaShoot to 2.
-
Save the asset.
Export the PlayerShip to a Scene
Find the scene for the game’s player ship and take a look at it. It is called PlayerShip, and it is located in the ships/player folder of the FileSystem.
![]()
In the Scene tab, you will see that it has the Player sprite, Collision Shape, Gun, and Map Transform, which are all inherited from the PlayerShip scene.
It also has a State Machine to control its behaviour.
Adjustments will be needed for the animations so the asset can be used as expected. But first, add it as a child of the scene root node.
![]()
You will still need to make graphical adjustments like the ship scale and the laser position.
Hide the original player ship sprite and run the game to check the results.
![]()
The changes have applied. However, it would be nice for the thrust to light when moving and to trigger the liftoff and landing procedures when undocking or docking.
For this, the code will need to be changed.
The states of the StateMachine knows to which object or scene they belong to.
Adding Routines to the Ship
To set the animation of the asset, routines will need to be added to the ship. To do so:
-
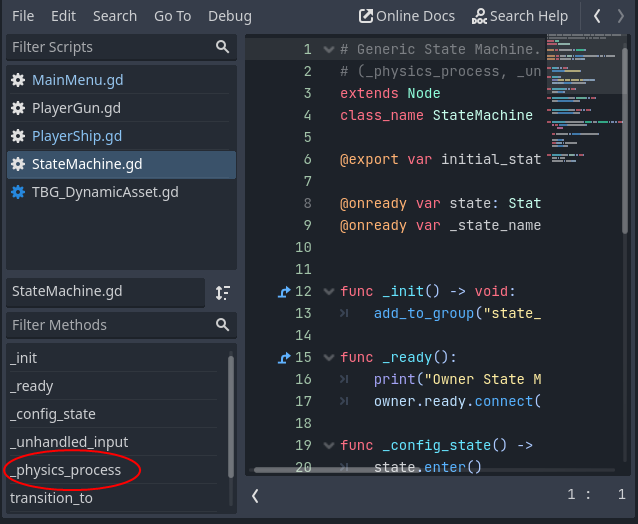
Click on the scroll icon besides the PlayerShip root node to open the script editor and scroll to the bottom.
-
Add the code to change the animation of the asset.
-
Add the following functions: liftoff(), landing(), move(), idle(), and explode(). Do not add the fire. This will be explained later in the tutorial. For now, just copy or type the following code. See the image below.
-
Unfold the StateMachine node and check its children.
-
Check the movement first. There is the Travel node. Open it and go to the routine physics_process.
-
Add this code to call the move and idle animation on the ship object.
-
This would do for the moving animation and thrusters firing. Run the project to take a look.
![]()
Now, you need to call the code for each action or state. You will need to create an extra state as well, but that will be covered later in the tutorial.
On line 19, there is get the movement, a vector2 value for the thrust and rotation. If it is zero, you are idle, otherwise, you are moving.
Configuring Landing and Liftoff Animations
For the landing and liftoff animations, you will need to set each in different places.
The docking procedure (the landing animation) happens when the move state goes from Travel to Dock. You can check this behaviour on the script of the Move node in the State Machine.
You need to call the landing routine on the ship where the State Machine transitions, before the transition is made.
-
You can call it by adding a line for landing() between lines 70 and 71. Run the project to check it out!
The liftoff procedure happens when the ship is docked and going to the Move or Travel state. You will need to check the script for the Dock state.
There are two places you can add the routine to animate the liftoff,
-
When the player calls for the liftoff.
-
When the liftoff is forced.
On the _unhandled_input routine you can easily identify when the undocking is called. This is the place where you will call your routine.
The other one is on the last routine of the script. It is also evident. Just be sure to call the animation before the transition is called.
If you test the project now, you’ll notice something weird. The animation goes directly to the Idle state, or to the Moving state if you are pressing to move.
You need to ensure that the animation is played before the state changes. You can use a timeout to do it. In the script for PlayerShip, each call for the liftoff precedes with the keyword await.
On the player ship script you will create the timer from the scene tree and await its timeout signal.
![]()
Explosion
Now you can run the project and check it. You need only to configure the explosion.
For the explosion we will create a new state.
-
Create a new node child of the StateMachine, a sibling to the move node. Name this state “explosion”.
-
Duplicate the move script just to speed up things.
-
Select the Move.gd script on ships/player/states and press ctrl+d to duplicate.
-
Name it Explosion.gd and assign it to the Explosion state that's just been created.
The Explosion script is an end state. It will just call the Explosion animation on the ship. This means all variables declared from lines 7 to 22 can be erased, leaving only the _init(), ready and config_state() routines. For the _config_state() you can leave only the first instruction to call the parent’s class configuration.
The logic here is, when the state machine enters the Explosion state, it calls the routine on the ship to explode. Let’s create the enter routine, which needs to accept a dictionary and defaults to an empty dictionary, as it is declared on the state script, ancestor of our script.
![]()
Creating Own TBG Scripts
What if you could add behavior to the .tbg assets imported from the studio editor? This is what will be done to configure the system to set the explosion animations.
You can start the procedure in several ways, by clicking on the tbg node added to the player ship and clicking on the edit asset button on the inspector, by clicking on a tbg asset tab you previously opened or by double clicking on the asset in the Toon Boom panel.
By default, the import process already sets a scene asset derived from the tbg asset. That is the resource you have been using for this tutorial. You cannot change the tbg asset, but you can change the derived asset.
You also can derive from the derived asset, inheriting all from both, the tbg and the tbg derived, to add extra behavior. but for now, select the playershio.tscn and add your behavior script to it
On the menu script select the new script item and let’s add our routine to call the explosion.
![]()
Updating Thruster
Replacing Original Sprite with the TBG-Styled Thrusters
Let's add the explode function and configure the code so that our asset plays it when called. Just copy the following code after the physics process, save the script, and we can go back to the player ship script.
Here we need to add the code that will be called by the explosion state. That code calls the explode function in our asset.
We just linked the state to the explosion animation, now we need to set the state transition to explosion when the player dies. This is done on the die routine.
But as soon as the player dies, the explosion effect is called and you barely see the animation. You can call the animation and add a small interval until the explosion effect is called.
Now you have a ship that activates its thrusters when moving, animates for landing and liftoff, and explodes when die. You can play the game to test it all.
![]()
Finish Adding TBG Assets With Animations Configured
The thruster's visual effect is still configured for the original player ship. You can configure it for the thrusters. To do this:
-
Expand the VFX node in the PlayerShip scene and click on the MoveTrail node.
-
In the Inspector, go to the Drawing section and expand it to reveal the Texture property.
-
Click on the Texture property selection arrow on the right side, and select the New AtlasTexture. You will use the texture of the .tbg asset to configure the Thrusters
-
Click on the AtlasTexture to reveal its properties and scroll down to reveal the atlas property, this is the property you will set your sprite atlas.
-
On the project FileSystem, go to the tbg/import/ships/playership/playership/spritesheets and drag the sheet_playership_fullhd-starship.png to the atlas.
Configuring the Thrusters region:
-
Click on the Edit region button and make a square around the thruster sprite.
-
On the inspector, at the top, select the Emitting option to see the changes.
You can adjust the scale. To adjust the scale:
-
In the Inspector, scroll to the Scale property and set the Scale Amount Min to 0.1 and the Scale Amount Max to 0.2.
Remember to deselect the Emitting at the top.
-
Save the project and run it.
Now, the project should work.
![]()
What about the firing animation? This is an issue, because the player can fire while moving. You need to create an animation in the editor for that state and configure it on the code. But if you pay attention, the firing process already triggers a visual effect of distortion that would render the firing animation imperceptible.
Things to try:
Add the pirate ship to replace the enemies.
If you enjoy a challenge, add the firing animation with the thrusters to set the moving and firing animation and configure it in the code.
A more challenging task is to use the scene derived from the .tbg asset as the game asset itself instead of using it just as a programmable animated asset.
Good luck, and have fun!