Download Documentation
Skeleton Effect Properties
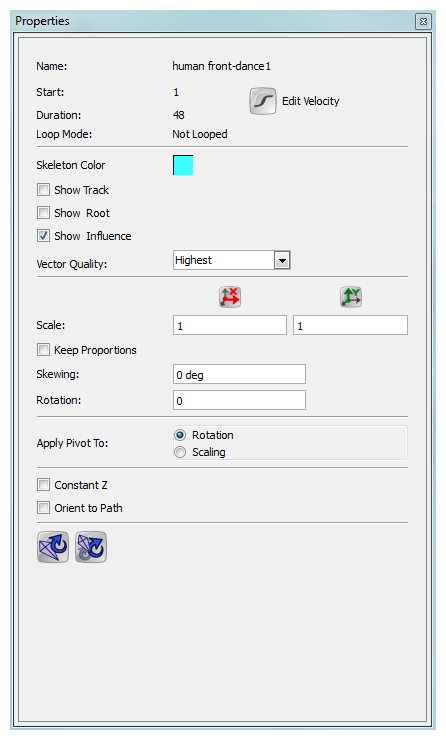
When the Skeleton effect master element is selected, many options are made available to you in the Properties view.
Because you can animate the master element of the Skeleton effect just like the master Peg element of a puppet, many options refer to motion paths.
You can animate this element using the animation tools available in the Animation Tools toolbar—see Using the Different Animation Tools .
|
•
|
Name: Displays the name of the selected Skeleton Effect element. |
|
•
|
Start: Displays the first frame number to which a keyframe is inserted on the Skeleton Effect element. |
|
•
|
Duration: Displays the duration of the animation of the Skeleton Effect element. |
|
•
|
Loop Mode: Displays if the layer is looped—see Change Loops to learn more about looping a peg movement. |
|
•
|
Skeleton Colour: Click in the colour square to open the Select Colour dialog box. Pick a colour to instantly change the colour of the selected Skeleton Effect elements. The colour will change in both the Timeline and Camera view. You can also change the default colour for each new Skeleton Effect you will add to your project using the Preferences panel—see Refer to Preferences . |
|
•
|
Show Track: Displays the motion path of your animation in the Camera view—see Pegs.
|
|
•
|
Show Root: Displays the root, which is the centre point of the bone structure. Before the master element of the Skeleton Effect is animated, the center point is situated in the centre of the Camera view. |
|
•
|
Show Influence: By default this option is enabled, letting you see the influence areas of the skeleton's bones in the Camera view. You can disable this option to hide the influence areas. |
|
•
|
Vector Quality: Choosing the vector quality level of your skeleton will either improve or depreciate the result of the bone distortion effect.
|
Highest
High
Medium
Low
|
•
|
Scale: Type in the desired width and height scaling values: 1 = 100%. You can also use the Scale  tool in the Animation Tools toolbar. tool in the Animation Tools toolbar. |
|
•
|
Keep Proportions: Enable this option to keep proportions when scaling the skeleton.
|
|
•
|
Skewing: Type in the desired skewing angle value. You can also use the Skew  tool from the Animation Tools toolbar. tool from the Animation Tools toolbar. |
|
•
|
Rotation: Type in the desired rotation angle value. You can also use the Rotate  tool from the Animation Tools toolbar. tool from the Animation Tools toolbar. |
|
•
|
Apply Pivot to: Select to which transformation you want to apply the pivot to. |
Rotation
Scaling
|
•
|
Constant Z: This option is disabled by default. When you create a motion path on the Z-axis, the automatic interpolation calculates the X, Y and Z axis values. When it is enabled, the interpolation calculates the X and Y axis values and keeps the Z-axis value as constant—see Pegs |
|
•
|
Orient to Path: Forces the element connected to the path to follow the motion path—see Pegs |
|
•
|
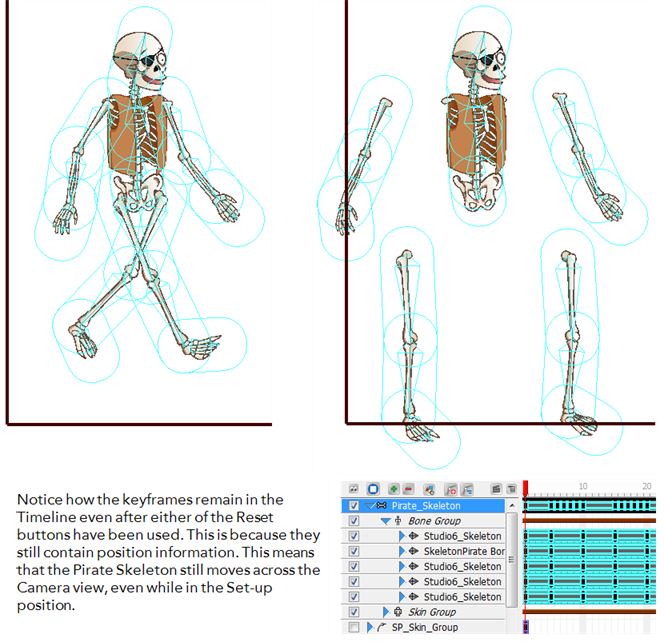
 Copy Resting Position to Current Frame: Brings the skeleton and artwork back to the set-up position only on the currently selected frame. You can then reparent and set up the bones and their corresponding artwork in a new formation. Copy Resting Position to Current Frame: Brings the skeleton and artwork back to the set-up position only on the currently selected frame. You can then reparent and set up the bones and their corresponding artwork in a new formation. |
|
•
|
 Copy Resting Position to All Key Frames: Maintains all the position information in the keyframes that are part of an animated sequence, while restoring the puppet's bones to the set-up position and resetting all the transformation information back to zero. Copy Resting Position to All Key Frames: Maintains all the position information in the keyframes that are part of an animated sequence, while restoring the puppet's bones to the set-up position and resetting all the transformation information back to zero. |