In this section, you will learn about different tools and features available in Toon Boom Studio to help you animate your cut-out puppet.
This topic is divided as follow:
| • | Animating the Parts |
| • | Constant and Non-Constant Segments |
| • | Navigating Inside a Hierarchy |
| • | Using the Different Animation Tools |
| • | Adjusting the Velocity |
| • | Using the Onion Skin in Cut-out Animation |
| • | Swapping Images |
Once you import your cut-out puppet into your Studio project, you can start animating it.
To animate a puppet:
| 1. | In the Animation Tools toolbar, select the Transform Tools > Animation Tools > Transform or press [7]. |
| 2. | In the Timeline view, go to the frame where you want to set the first pose of your puppet. |

| 3. | In the Camera or Timeline view, select the parts to animate. |
| ‣ | If your puppet is collapsed, click the top layer arrow to expand it. |
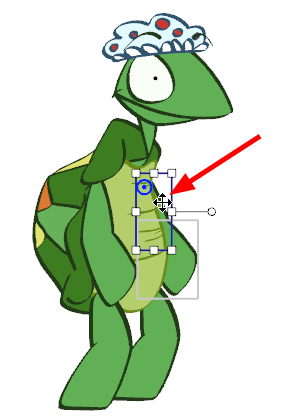
| 4. | Use the Transform tool to rotate, skew, scale or translate the selection to its new position. |
A keyframe is created in the Timeline view. If your puppet is collapsed, note that you do not see the keyframe on the master peg layer.
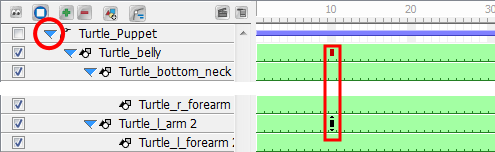
| ‣ | If you expand the elements of your puppet by clicking the arrow next to the master peg element, you will notice a red square on the parent element of the element you moved. This is an indication that a child of this element has a keyframe. |
| ‣ | A black square on the element you moved represents the keyframe. |
| 5. | In the Timeline view, go to the frame where you want to set a second keyframe. |

| 6. | In the Camera view, animate your character. |
Once you position your puppet, you can create a keyframe for all the elements of your collapsed puppet and block the complete body at a specific frame.
To block the entire body position:
| 1. | In the Timeline view, on the master peg, select the frame at which you want to block your puppet's position. |
| 2. | Select Element > Peg > Add Keyframe or press [l]. |

To delete keyframes:
| 1. | In the Timeline view, select the keyframe you want to remove. |
| 2. | Select Element > Peg > Remove Keyframe or press [Ctrl] + [R] (Windows) or [⌘] + [R] (Mac OS X). |
The selected keyframe is deleted.
If you want to copy the value of a keyframe without copying the entire drawing contained in the selected cell, you need to use the Paste Special command.
To copy and paste keyframes:
| 1. | In the Timeline view, select the keyframe you want to copy the position values from. |

| 2. | Select Edit > Copy Cell or press [Ctrl] + [C] (Windows) or [⌘] + [C] (Mac OS X). |
| 3. | In the Timeline view, select the cell in which you want to paste the copied position values. |
| 4. | Select Edit > Paste Special or press [Ctrl] + [B] (Windows) or [⌘] + [B] (Mac OS X). |
The Timeline Paste Special Preferences dialog box opens.
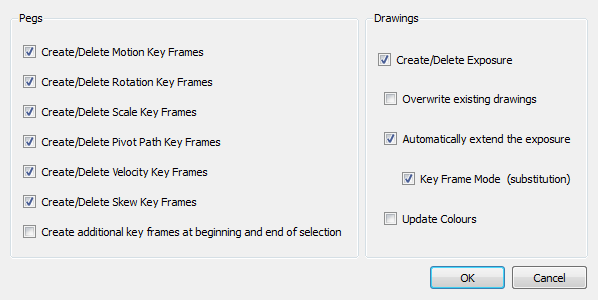
| 5. | In the Pegs section, select or deselect the following options to choose which values of the keyframe you want to paste: |
| ‣ | Create/Delete Motion Key Frames: Pastes the translation value of the copied keyframe. |
| ‣ | Create/Delete Rotation Key Frames: Pastes the rotation value of the copied keyframe. |
| ‣ | Create/Delete Scale Key Frames: Pastes the scale value of the copied keyframe. |
| ‣ | Create/Delete Pivot Key Frames: Pastes the pivot position value of the copied keyframe. |
| ‣ | Create/Delete Velocity Key Frames: Pastes the velocity value of the copied keyframe. |
| ‣ | Create/Delete Skew Key Frames: Pastes the skew value of the copied keyframe. |
| ‣ | Create additional key frames at beginning and end of selection: Creates an additional keyframe at the beginning and at the end of your pasted selection to block the copied values between them. |
| 6. | In the Drawings section, deselect the Create/Delete Exposure option. If this option is selected, the drawing exposure is copied at the same time as the position value. |

By default, when you add keyframes, non-constant segments are created between them. You can change this option to create constant segments.
A non-constant segment means that Toon Boom Studio automatically creates the interpolation between the two keyframes, creating a motion.

A non-constant segment is represented as grey lines going from one keyframe to the other.

To switch from a constant to a non-constant segment:
| 1. | In the Timeline view, select the first keyframe of the constant segment you wish to turn to non-constant. |

| 2. | Select Element > Peg > Set Non-Constant Segment or press [Ctrl] + [Shift] + [L] (Windows) or [⌘] + [Shift] + [L] (Mac OS X). |
The segment turns to a non-constant segment.

A constant segment means that the drawing automatically jumps from one position to the other without creating any motion in between.

A constant segment is represented as a blank gap between two keyframes.

To switch from a non-constant to a constant segment:
| 1. | In the Timeline view, select the first keyframe of the non-constant segment you want to turn to constant. |

| 2. | Select Element > Peg > Set Constant Segment or press [Ctrl] + [L] (Windows) or [⌘] + [L] (Mac OS X). |
The segment turns to a constant segment.

To create a layer hierarchy when you build your puppet, use the hierarchy navigation command to travel up and down the parent-children chain and to move between the children. This is useful if you want to select small parts that are difficult to reach. You can also select different parts from the Timeline or Camera view.
In a hierarchy, elements connected to one another are called parent and child.

To select the parent or child element:
| 1. | In the Animation Tools toolbar, select the Transform |
| 2. | In the Camera or Timeline view, select an element that is attached to a hierarchy. |

| 3. | Select Element > Arrange > Select Parent. |
The selection changes to the parent of the selected element.

| 4. | Once a parent peg is selected, select Element > Arrange > Select Child to select its child. |
To select all children of an element:
| 1. | In the Animation Tools toolbar, select the Transform |
| 2. | In the Camera or Timeline view, select an element which is part of a hierarchy and is a parent of other elements. |

| 3. | Select Element > Arrange > Select Children. |
The selection changes to select all the elements that are attached to the selected parent element.

Elements that are on the same hierarchy level are called brothers.

To select previous and next brother:
| 1. | In the Animation Tools toolbar, select the Transform |
| 2. | In the Camera or Timeline view, select an element that is part of a hierarchy. |

| 3. | Select Element > Arrange > Select Previous Brother or Select Next Brother. |

This option selects the previous or next brother of the selected element. Previous brother is the one situated a level higher, while the next brother is the one situated a level lower in the Timeline view order.

The animation tool you use determines the kind of keyframe you create. In the Timeline view, each of these keyframe types are displayed differently.
| • | Creates a keyframe for motion, scale, rotation and skew values at once. |
![]()
| • |  Motion Tool Motion Tool
Creates a keyframe for the position values only. |

| • |  Rotate Tool Rotate Tool
Creates a keyframe for the angle values only. |

| • |  Skew Tool Skew Tool
Creates a keyframe for the skew values only. |

| • |  Scale Tool Scale Tool
Creates a keyframe for the horizontal and vertical scale values only. |

Use the Transform tool to create a keyframes for position, scale, rotation and skew values simultaneously.
![]()
To use the Transform tool:
| 1. | In the AnimationTools toolbar, select the Transform |
| 2. | In the Camera or Timeline view, select the element you want to transform. |
| 3. | Use one of the bounding box handles to transform your element. |
| ‣ | Hold down the [Shift] key as you scale to keep the ratio when using the corner handles. |
| ‣ | Holding down the [Shift] key as you rotate, locks the rotation every 15 degrees. |
Use the Motion tool to create a keyframe for the position value.
To use the Motion tool:
| 1. | In the AnimationTools toolbar, select the Motion tool, select Tools > Animation Tools > Motion or press [0]. |
| 2. | In the Camera or Timeline view, select the element you wish to reposition and drag it to the new position. |
| ‣ | Hold down the [Shift] key as you reposition your element to temporarily display a guide showing you the starting position and the path of the motion you are creating. |

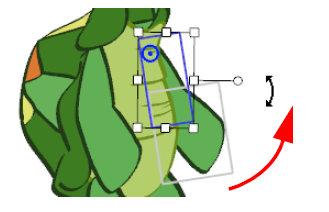
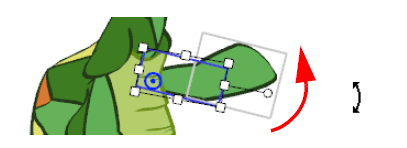
Use the Rotate tool to create a keyframe for the rotation angle value.

To use the Rotate tool:
| 1. | In the AnimationTools toolbar, select the Rotate tool or select Tools > Animation Tools > Rotate. |
| 2. | In the Camera or Timeline view, select the element you want to rotate. |
| 3. | Use the rotation handle to rotate your element. |
As you rotate your element an angle guide appears, displaying the rotation angle you are creating.

| ‣ | Holding down the [Shift] key as you rotate, locks the rotation every 15 degrees. |
Use the Skew tool to create a keyframe for the skew value.

To use the Skew tool:
| 1. | In the Animation Tools toolbar, select the Skew tool or select Tools > Animation Tools > Skew. |

| 2. | In the Camera or Timeline view, select the element you want to skew. |
| 3. | Use the handles to skew your element. |

Use the Scale tool to create a keyframe for the scaling value.

To use the Scale tool:
| 1. | In the Animation Tools toolbar, select the Scale tool, select Tools > Animation Tools > Scale or press [9]. |
| 2. | In the Camera or Timeline view, select the element you wish to resize. |
| 3. | Use the handles to resize your element. |
| ‣ | Hold down the [Shift] key as you scale to keep the ratio when using the corner handles. |
Use the Select tool to position, scale, rotate and skew your elements without creating a keyframe.
![]()
To use the Select tool:
| 1. | In the Animation Tools toolbar, select the Select |
| 2. | In the Camera or Timeline view, select the element you wish to transform without creating a keyframe. |
| 3. | Use one of the bounding box handles to transform your element. |
| ‣ | Hold down the [Shift] key as you scale to keep the ratio when using the corner handles. |
| ‣ | Holding down the [Shift] key as you rotate, locks the rotation every 15 degrees. |
The velocity, or ease-in ease-out, is used on non-constant segments to create a more natural movement.

To adjust the velocity of a movement:
| 1. | In the Animation Tools toolbar, select one of the animation tools, select Tools > Animation Tools > the desired tool, or use the desired tool keyboard shortcut. |
| 2. | In the Camera or Timeline view, select the animated element of which you want to adjust the velocity. |

The selected element's properties appear in the Properties view.

| 3. | In the Properties view, click the Edit Velocity  button. button. |
The Function Editor view opens.
| 4. | In the drop-down menu, select the movement for which you want to adjust the velocity. |

The curve corresponding to the selected movement is displayed.

| 5. | Adjust your curve: |
| ‣ | Click on a keyframe to select it. |
| ‣ | Drag the handle to adjust the curve. |

| ‣ | Repeat Step 3 and Step 4 for each keyframe. |
You can also use the default curve options to quickly adjust your velocity.
| ‣ | Click on the Curve icon to open the drop-down menu and select the desired velocity option. |
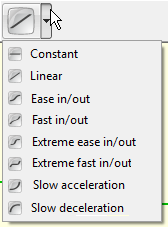
| • |  Constant: Changes a non-constant segment to a constant segment, and removes the automatic motion tweening created by Toon Boom Studio. Constant: Changes a non-constant segment to a constant segment, and removes the automatic motion tweening created by Toon Boom Studio. |
| • |  Linear: Creates a straight line of constant speed for a more automated animation look. Linear: Creates a straight line of constant speed for a more automated animation look. |
| • | Ease in/out: Creates an acceleration effect at the beginning of the curve, speeding up middle and slowing down at the end of the curve. This creates a more natural animation look. |
| • |
 Fast in/out: Creates a curve that starts quickly, slows down in the middle and ends with a final acceleration. Fast in/out: Creates a curve that starts quickly, slows down in the middle and ends with a final acceleration. |
| • |
 Extreme ease in/out: Creates a more dramatic ease in, ease out effect. Extreme ease in/out: Creates a more dramatic ease in, ease out effect. |
| • |
 Extreme fast in/out: Creates a more dramatic fast in, fast out effect. Extreme fast in/out: Creates a more dramatic fast in, fast out effect. |
| • |  Slow acceleration: Creates a curve that starts slowly to smoothly accelerate over time. Slow acceleration: Creates a curve that starts slowly to smoothly accelerate over time. |
| • |  Slow deceleration: Creates a curve that starts quickly to smoothly decelerate over time. Slow deceleration: Creates a curve that starts quickly to smoothly decelerate over time. |

You can use the Onion Skin option to display the previous three and the next three drawings of your character as you animate your puppet. Being able to refer to these poses helps you accurately determine the size, angle or position of the drawing you are working on.
By default the onion skin is displayed as the element's shape in washed-out colours. Green represents the previous frames and red represents the next frames.
To enable the Onion Skin option:
| 1. | In the Onion Skin toolbar , click the Onion Skin  button or select View > Onion Skin > Turn On Onion Skin—see Customizing Toolbars on Mac OS X. button or select View > Onion Skin > Turn On Onion Skin—see Customizing Toolbars on Mac OS X. |
| 2. | Select the range of previous and next frames to be displayed in the Onion Skin. Click and hold the Previous and the Next onion skin buttons to open each drop-down menu and select the desired option. You can also select View > Onion Skin > and one of the following choices: |

| ‣ |
 No Previous Drawing: Does not display the content of the previous frames. No Previous Drawing: Does not display the content of the previous frames. |
| ‣ |
 Previous Drawing: Displays the content of the previous frame. Previous Drawing: Displays the content of the previous frame. |
| ‣ |
 Previous Two Drawings: Displays the content of the two previous frames. Previous Two Drawings: Displays the content of the two previous frames. |
| ‣ |
 Previous Three Drawings: Displays the content of the three previous frames. Previous Three Drawings: Displays the content of the three previous frames. |
| ‣ |
 No Next Drawing: Does not display the content of the previous frames. No Next Drawing: Does not display the content of the previous frames. |
| ‣ |
 Next Drawing: Displays the content of the next frame. Next Drawing: Displays the content of the next frame. |
| ‣ |  Next Two Drawings: Displays the content of the two previous frames. Next Two Drawings: Displays the content of the two previous frames. |
| ‣ |  Next Three Drawings: Displays the content of the three previous frames. Next Three Drawings: Displays the content of the three previous frames. |

If your puppet contains extra drawings, such as extra heads, mouths, eyes or hands, you can use the image swapping trick to animate your puppet.
For example, if your puppet contains extra drawings of eyes, such as an open eye, a half-closed eye and a closed eye, you can easily animate a blink.
To create a blinking eye with image swapping:
| 1. | Use a tool from the Animation Tools toolbar. You can also select Tools > Animation Tools > the desired tool. |
| 2. | In the Camera or Timeline view, select the eye. |

| 3. | In the Timeline view, select the frame at which you want the puppet to start closing its eye. |

| 4. | In the Cells view, use the swapper slider to select the half-closed eye drawing. |

The selected drawing displays in the preview area, and the exposure is updated automatically in the Timeline view.

| 5. | In the Timeline view, select two frames later. |

| 6. | In the Cells view, use the swapper slider to select the closed eye drawing. |
| 7. | To change back to the open eye, repeat Step 5 and Step 6. |
