The scene action occurs inside the camera frame, so it is really important to set it up correctly.
| • | Adding a Camera Layer |
| • | Choosing the Active Camera Layer |
| • | Setting the Camera Frame Position |
By default, Toon Boom Studio automatically adds a camera to every new project you create, but you can also add your own camera layer if needed.
To add a Camera layer from the Timeline view:
| 1. | In the Timeline view, click the Add Element  button. button. |
The New Elements dialog box opens.
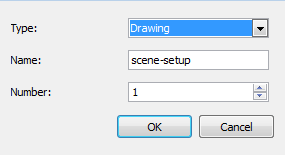
| ‣ | In the Type drop-down menu, select Camera. |
| ‣ | In the Name field, type in a name for your Camera layer. By default, the name of your Toon Boom Studio project appears in this field. |
| ‣ | In the Number field, type in the number of Camera layers you want to add. You can also use the up and down arrow buttons to change the numbers. |
| ‣ | Click OK. |
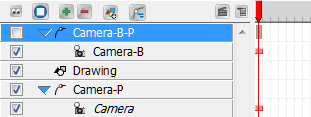
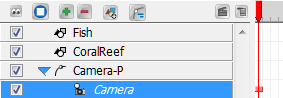
The new Camera layer appears in the Timeline view.
You can also use the Scene View toolbar to add a new Camera layer to your scene.
To add a Camera layer from the Scene View toolbar :
| 1. | In the Scene View toolbar , click the Camera drop-down menu button. |
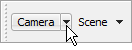
| 2. | Select Add Camera from the drop-down menu. |
A new Camera layer appears in the Timeline view.
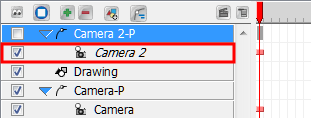
The Camera layer provided in your scene is the active camera by default. If you add several cameras to your scene and want to have different settings on each, you can use the Scene View toolbar camera list to switch from one camera to another. You can use this feature if you are still working on your scene composition and you have different camera setups to choose from.
To select an camera:
| 1. | In the Scene View toolbar , click the Camera drop-down menu button. |
| 2. | Select a camera from the menu. |
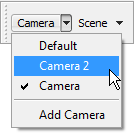
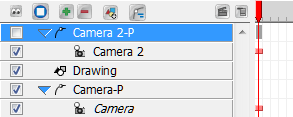
In the Timeline view, the active Camera layer is displayed in italics.
You can set the Camera Frame position by using the ![]() tool or the Properties view.
tool or the Properties view.
First, you can set the position of the camera frame.
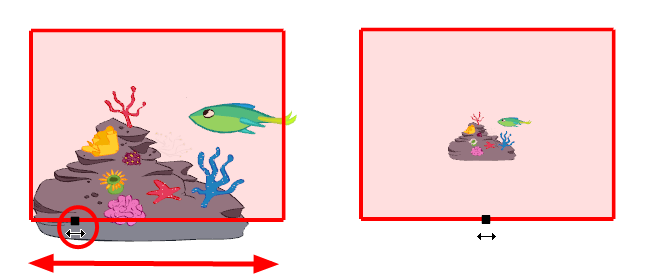
To set up the camera frame using the Select tool:
| 1. | In the Animation Tools toolbar, click the Select |
| 2. | In the Camera or Timeline view, select the camera. |
The frame turns red in the Camera view.
| 3. | In the Camera view, grab the camera frame and drag it to the desired position. |
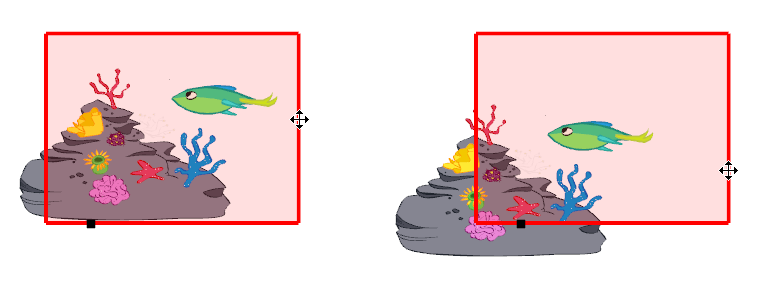
As you position your camera, notice that the camera frame is moving slightly slower than your cursor. This is due to the perspective effect because the Camera is not situated at the same depth level as the elements.
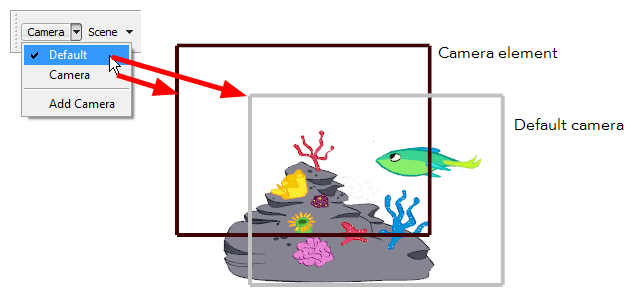
You can set your Active Camera to the Default Camera using the Scene View toolbar . This will enable a default camera frame in which you can position your Camera frame without experiencing the perspective illusion. Note that you cannot move the default camera; it is only an indication of the default camera space.
To enable the Default camera:
| 1. | In the Scene View toolbar , click the Camera menu button and select Default. |
A checkmark identifies the currently active camera in the list.
Refer to Discovering the Interface to learn how to customize your workspace and display the different toolbars.
You can also set the Field of View, which is also called the Zoom level of the camera frame.
To set the Field of View angle using the Select tool:
| 1. | In the Camera or Timeline view, select the camera. Once it is selected, the frame will become red in the Camera view. |
| 2. | In the Camera view, grab the FOV square at the bottom of the frame and drag it to change the zoom level. |
You can also set the camera position and field of view with exact values using the Properties view.
To use the Properties view:
| 1. | In the Camera or Timeline view, select your camera. |
The Camera information is displayed in the Properties view.
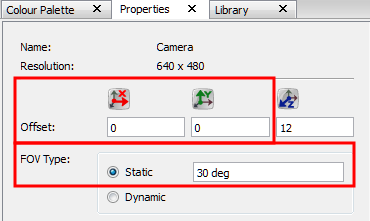
| 2. | In the Properties view, set the desired positioning values: |
| ‣ | Offset: Type in the |
| ‣ | FOV Type: |
Static: By default the Static Field of View type is enabled, this means that the zoom value will not be animated, it will stay the same throughout the scene. Type in the desired Field of View angle value.
Dynamic: Enable this option to animate the zooming value over time—see Animating the Camera to learn more about animating the Field of View.