The Export Movie window lets you export your storyboard and animatic as a movie file which you can share and play back. You can export your movie file in different formats (QuickTime, SWF movie (Flash), jpeg, targa) and as image sequences.
- Select File > Export > Movie.
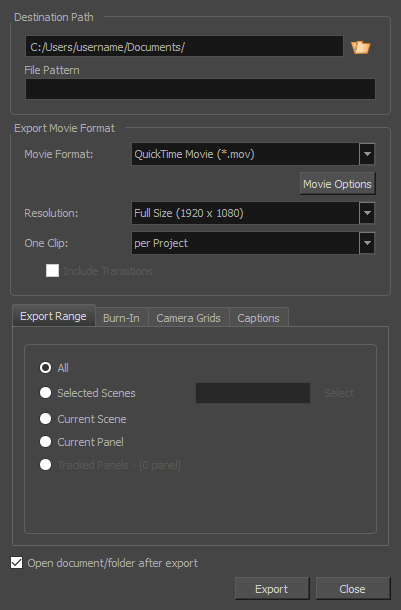
The Export to Movie window opens.
| Parameter | Description |
|
Destination Path |
|
|
Path |
Allows you to specify the directory in which to save the exported files. You can click on the Browse |
|
File Pattern |
Allows you to enter the prefix or the pattern for the names of the exported files. You can leave this field blank to use the default file naming pattern, type in a file name to use it as a prefix, or type a full pattern using the following variables:
TIP Numbers used in file naming patterns are automatically padded by zeros as needed. You can type a number between the % sign and the variable letter to determine the amount of characters you want the variable to use. For example, with the variable %4s, scene 1 would appear as scene 0001.
|
|
Export Movie Format |
|
|
Movie Format |
Allows you to specify the format in which to export the movie. You can choose between the following formats:
NOTE The option to export to Windows Media Video is only available on Windows, and the option to export to QuickTime Movie is only available on machines with QuickTime Player installed.
|
|
Movie Options |
When exporting in Windows Media Video (.wmv), QuickTime Movie (.mov) or Flash (.swf) format, this opens a dialog in which you can select video and audio compression settings for the movie files. NOTE For more information, see QuickTime Standard Video Compression Settings Dialog Box, WMV Settings Dialog Box and Flash Export Settings Dialog Box
|
|
Resolution |
Sets the resolution to be a quarter size, half size, or full size of the current storyboard resolution. |
|
One Clip |
Allows you to select how to separate the exported movie files:
|
|
Include Transitions |
Includes transitions in your export movie files. |
|
Export Range Tab |
|
|
All |
Exports the entire storyboard. |
|
Selected Scenes |
Select this option to export a specific selection of scenes. Then, click on the Select button to open the Scenes Picker dialog box, in which you can:
|
|
Current Scene |
Exports only the currently selected scene. |
|
Current Panel |
Exports only the currently selected panel. |
|
Tracked Panels - [0 panel] |
Exports panels on which tracking changes is enabled |
|
Burn-In Tab |
|
|
Print Time Code |
Prints the project timecode on the video as an overlay on your video. |
|
Print Scene Names and Panel Numbers |
Prints the scene names and panel numbers as an overlay on your video. |
|
Print Additional Duration |
Prints another time code counting the time for the current panel, scene or sequence, depending on what is selected in the Repeat drop-down. |
|
Units |
Displays additional duration information using Time Code or Frames units. |
|
Repeat |
Displays additional duration information per panel, scene or sequence. |
|
Camera Grid Tab |
|
|
Title Safe Area |
Title Safe Area: Prints the Title Safe Area over the picture. By default, this area is 20% smaller than the camera frame. It is used as a guideline of the area that CRT displays might crop out of the picture. Visual elements such as text and logos should be placed within this area.The size of this area can be changed in the Camera tab of the Preferences dialog |
|
Action Safe Area |
|
|
4:3 Safety |
Prints the title safe area and the action safe area for the 4:3 camera frame over the exported image. They can be used to position elements in projects that are meant to be displayed in both widescreen and 4:3 proportions. |
|
4:3 Reference |
Prints the 4:3 camera frame over the exported image. This frame corresponds to the camera frame if the aspect ratio of the picture was 4:3. It can be used to position elements in projects that are meant to be displayed in both widescreen and 4:3 proportions. |
|
Captions Tab |
|
|
Print Captions |
Choose whether to not print captions (None) or select one of your project’s captions to print into the exported movies. By default, a Storyboard Pro project has Action Notes, Dialog, Slugging and Notes captions, but you can also choose to print custom captions if your project has any. |
|
Font |
Select which font the captions will be printed in. By default, they will be printed in Arial. |
|
Height % |
Sets the size of caption lines relative to the height of the exported movies. For example, if exporting a movie at 1080p with 3% Height captions, each caption line will be 32 pixels in height. |
|
Position |
Prints the captions at either the Top Left, Top Centre, Top Right, Bottom Left, Bottom Centre or Bottom Right of the panels. By default, captions are printed to the Bottom Centre. |
|
Max Lines |
Sets the maximum amount of caption lines to print on each panel. If a caption being printed requires more than the maximum amount of lines, it will be cut off with an ellipsis (...) at the end. NOTE Even if captions are printed at the bottom, they will be aligned to the top of the space reserved for them, which is calculated by the amount of Max Lines x the Height %. Therefore, if this setting is too high and captions are printed at the bottom, they may appear closer to the middle of the picture than to the bottom.
|
|
Text Colour |
Select the font colour in which to print the captions. |
|
Bg Colour |
Select the background colour on which to print the captions. If the checkbox is unchecked, the captions will be printed directly into the rendered picture. Otherwise, they will be printed in rectangular boxes of the chosen colour. |
|
Open document/folder after export |
Opens the folder in which files were exported in a file browser once the export is done. |