Simple Platformer Tutorial - Creating a New Level with Extra Features
![]()
Connecting scene 2 to a new scene
Creating a project
-
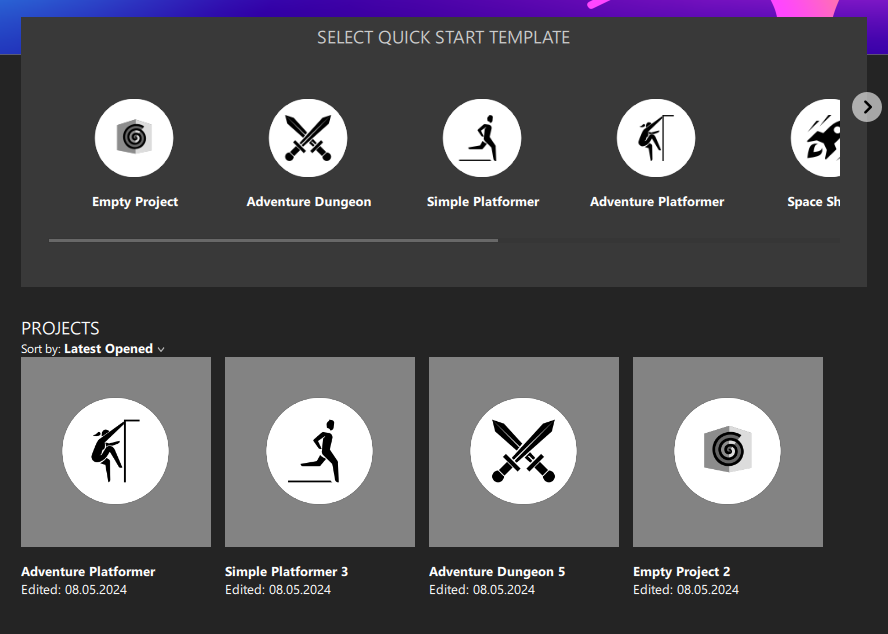
In the Jump homepage, select the Simple Platformer template and fill in the following:
-
Project Name
-
Game Description
-
Set the Project Name as “simple platformer advance”
-
Set the Game Description as “a whole new level with extra features”
-
Select Open Game Engine. The game engine opens.
For this tutorial,
![]()
![]()
Configuring the asset
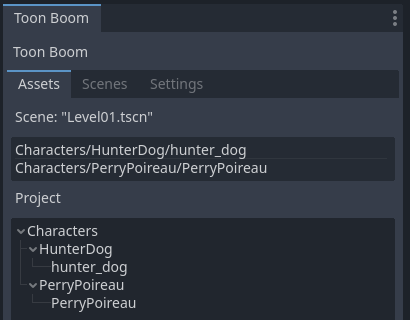
You can find the list of assets in the Assets tab of the Toon Boom Project Panel. It is located in the bottom-right corner of the interface.
Perry Poireau
In the project, there is a character named Perry Poireau, and he comes with several animations.
To configure the character's animations, you will first need to set the direction of each animation (Idle, Jump, and Walk). You will need to set the direction of each to face left and right.
Set the direction of each animation to face right and automatically create the left versions by setting flipped permutations.
Setting each animation to face right
-
In the Toon Boom Project Panel panel in the bottom-right of the interface, click the Assets tab. Your list of project assets will display.
-
Double-click PerryPoireau.
An Asset tab for Perry Poireau will open.
-
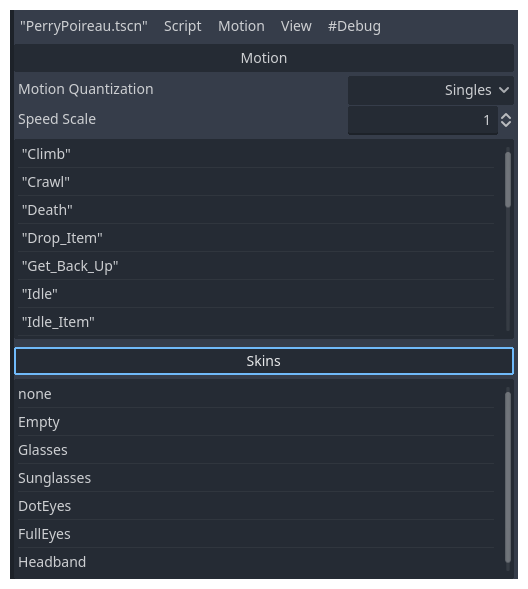
In the PerryPoireau Asset tab, there are two expandable lists: Motion, and Skins. If you click Motion, it will expand and the list of character animations will display. They are :
Climb
Crawl
Death
Drop_Item
Get_Back_Up
Idle
Idle_Item
-
Select an animation under Motion in the character’s asset tab. When an animation is selected, the AnimationOptions.gd section will appear in the Inspector tab to the right.
-
In AnimationOptions.gd, select the Facing dropdown and select Right.
-
Do the same for each animation.
For this tutorial, you will need to set the Idle, Jump, and Walk animations to face right. To do this:
Your animations are now configured to face right. You will now be able to automatically create the flipped permutations for each configured animation. This will create left version of all your right animations.
Creating the flipped permutations:
-
In the Motion dropdown in Toon Boom Asset Viewer the center, select Motion > Create Flipped Permutations.
-
Save the asset by clicking Scene > Save Scene or pressing Ctrl + S.
The animations are now configured for both left and right movement.
Hunterdog
Now, you will configure the animations for HunterDog. HunterDog has only one animation, the “default”.
-
In the Toon Boom Project Panel in the bottom-right of the interface, click the Assets tab. Your list of project assets will display.
-
Double-click HunterDog. The Asset tab for HunterDog will open.
-
For the Motion Mode, select Walk, and for Facing, select Left.
-
Click on the Motion menu and create flipped permutations as was done for Perry Poireau above. See Creating the flipped permutations above.
-
Save your project by selecting Project > Save Scene.
Now you can proceed to create the new level.
-
Check the main and the end scenes to adjust the characters, since the configuration resets their current settings. If you want, you can set the base animation in each so that they are animated.
-
It is a also a good idea to check the actors for the player and enemy. Setting the asset scale to 0.25 for each and then configuring the offset worked. The enemy light occluder needs to be re-scaled and repositioned as well. If you want to know why, perform these steps after opening the level 2 scene.
How levels are built
A good strategy to know what you need to start designing a new level is to understand how the usual levels are built.
![]()
In the lower-left of the interface, you will find the FileSystem tab. In the src/levels folder, double click level 2.tscn to open it.
Look at the level structure of the player and enemy scene in the src/actors folder to understand how you can create your own.
Root Node
The root node is a simple 2D node is a simple scene without script.. The game logic is on the player, enemies, items and on the exit portal.
Background Layer
The background layer is a canvas group node responsible for turning all draw calls from its children into one single draw call. Its child is a parallax background node with three parallax layers and a set of sprites aggregated in a 2D Node for each layer.
We can reuse this node by copying it and pasting on our new level.
Interface Layer
The Interface Layer is the layer that will provide the GUI for the player. In this example, it only shows the score. Note that the Interface Layer node is also a canvas group node, but the User Interface node is a scene defined elsewhere.
The user interface also has a script to define its behaviour. For the moment you can copy it as it is to the scene you will create.
TileMap
The TileMap is one of the most important nodes of the scene. It will define where the player and the enemy can walk. It is invisible, but its behavior is still functional.
Player
The Player node is the actor node. Just drag the player node from the src/actors folder to the scene and it is ready to use if the TileMap is configured.
Portal2D
The Portal2D is a predefined scene that will trigger the level change. Selecting it will set the properties to be inspected or changed on the inspector panel.
We can see on the inspector panel that it has a property called Next Scene, which receives a packedscene object. This is the scene that will be called when the user hits the portal. This means we will need to change this value once we create our scene.
Coins
The Coins node is a simple 2D node object, but it has several children, which are the coins the player can collect to increase the score
Each coin is a predefined scene that can be inspected by clicking on the scene icon ![]() besides the node name.
besides the node name.
Enemies
The node enemies are a node2D object that aggregates a set of children nodes. These are the predefined enemy scenes on the actor/enemy.
Node2D
Finally there is a node named Node2D, which aggregates a set of sprites that composes the scene visuals.
Connecting Scene 2 to a New Scene
You can use the same structure, adjusting the tile set, the number and positions of coins, enemies and visual assets, adding a portal pointing to the end scene and pointing the portal on scene 2 to the new scene.
![]()
-
In the src/Levels folder in FileSystem, duplicate the level template scene and call it level03. You can duplicate a file by selecting it and pressing ctrl+d or right-click and select Duplicate.
You will see that the template level already has a player and a portal.
-
Select Portal2D on the Scene tree
-
Open the src/Screens folder and drag EndScreen.tscn to the Next Scene in the Inspector.
-
Configure the portal of level 2 to transition to this scene level. To do this:
-
Open level02.tscn.
-
Select the Portal2D node on the scene tree.
-
Drag the Level03.tscn scene to the Next Scene property in the Inspector.
-
-
Check the TileMap of the level02.tscn scene. Turn off the visibility of the Portal2D graphical assets and turn on the visibility of the TileMap node.
-
Every black rectangle or triangle is a tile configured for collision. Select the TileMap node on the scene tree to check the grid and on the bottom panel select the TileMap tab. Those are the brushes you can use to paint the grid.
-
Set the visibility of the nodes back to how it was and go back to Level03.
-
Select the TileMap node, and the TileMap tab on the bottom panel.

-
Add a vertical bar on the left side of the screen. You an do this by selecting the top left base tile and draw a vertical bar from the top to bottom.
-
You can draw it cell by cell, or selecting the line tool
 on the toolbar panel of the bottom panel. See above.
 -
Now, add a horizontal line crossing the scene and run the scene just to check how it behaves.
If you hit the portal it goes to the end screen, and if you go beyond the edge of the horizontal line, the character falls.
![]()
![]()
Bumpers
To add a bumper:
Drag a bumper object from src/objects to the scene. Place it in a height that the player can reach. If you want, place some more scattered through the level.
In this example, the player will only reach the portal using the bumpers.
![]()
![]()
Graphics
The visual nodes are under the folder assets either on oak_woodsv1.0 or on toon_boom_assets folder. You can just drag them to the scene and later arrange them grouping in a node.
Background
In your new level, you can reuse the background from level 2. To do so,
-
Select the parallax background and copy it with ctrl+c.
-
So back to level 3 and select the BackgroundLayer node
-
Paste it with ctrl+v.
You may notice that the purple background is still in the way. You can select it and delete or set its visibility to invisible.
![]()
Congratulations! You’ve created a new level for the Simple Platformer in Toon Boom Jump!