Exporting Scenes Offline
Once the setup for working remotely has been completed, the user has the possibility to initiate the exporting and opening of scenes directly from the Producer web interface. If needed, the local desktop application Producer Link will open automatically to assist the user in completing the appropriate operations.
The operation of exporting scenes from the Harmony Database can be combined with the actions of checking out the scene and opening it remotely. However, you may simply export scenes to prepare them for a later usage.
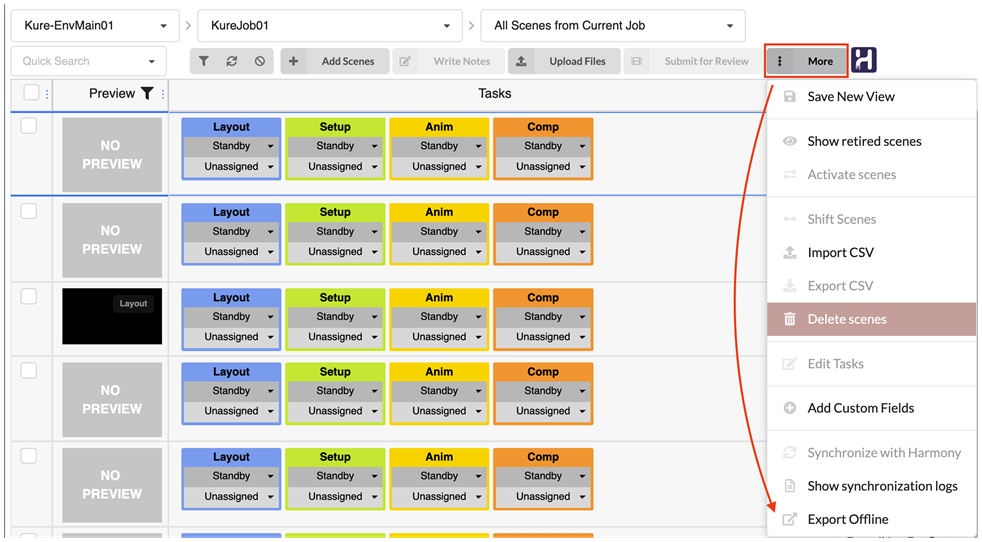
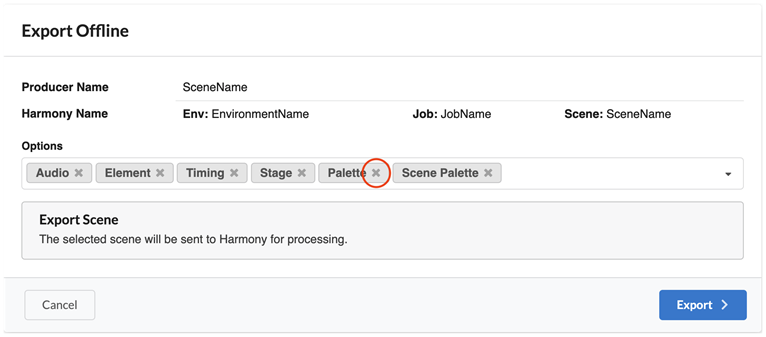
Scenes may be exported explicitly, by opening the Export Offline dialog from the More toolbar button of the Production, Assets, or Open Tasks page or from Producer Link. They may also be exported after clicking on the Open In Harmony button  after selecting a scene, if no up to date version of that scene is already present on the user’s machine.
Default Export Options
When exporting a scene offline from the Harmony database, some default options are used to select which elements should be exported. These options can be changed for the project from General Settings > Harmony Integration > Offline Export Options dropdown. These will be used when exporting a scene from the Open In Harmony button or from Producer Link.
By default, the following options are set:
-
Stage
-
Element
-
Audio
-
Timing
-
Palette
-
Scene Palette
-
Other
Here is a detailed description of each of the options:
|
Option |
Description |
| Annotation |
The different drawings created while drawing in the Annotation columns. |
| Audio | The content of the Audio directory. |
| Element | The contents of the Element directories. (tvg drawings or other file format imported as Elements in Harmony) |
| Timing | The contents of the Timing directories. |
| Stage |
The *.xstage, *.aux and other files that are necessary to open the scene. IMPORTANT This option should always be selected!
|
| Palette | The PALETTE_List file. The Palette list is a file listing every palette used for the scene and their location on the browser. |
| Scene Palette | The palette-library of the scene level. |
| Job Palette | The palette-library from the job level. When you select the job level, the palette-library in lower-level directories will also be exported. Every exported job palette will be placed within the folder named palette-library available under sceneName > jobs > Digital. |
| Env Palette |
The palette-library from the environment level. When you select the environment level, the palette-library in lower-level directories will also be exported. Every exported environment palette will be placed within the folder named palette-library available under sceneName > environments > Digital. |
| Library | Templates created at the selected levels. |
| Scene Library | Templates created at the scene level. |
| Job Library |
Templates created at the job level. |
| Env Library |
Templates created at the environment level. |
| Other |
All other directories and files in the scene's data structure. For example, some studios will place within the scene folder their After Effect, Photoshop or Premiere project used for the scene. This also includes the scene’s scripts folder, which contains assets’ master controllers. |
| Outside Drawings | If the Stage option is selected, it is possible to select the Get Outside Drawings option to copy drawings into the scene folder that is referred to by the Timing columns and their Element (Drawing) nodes. |
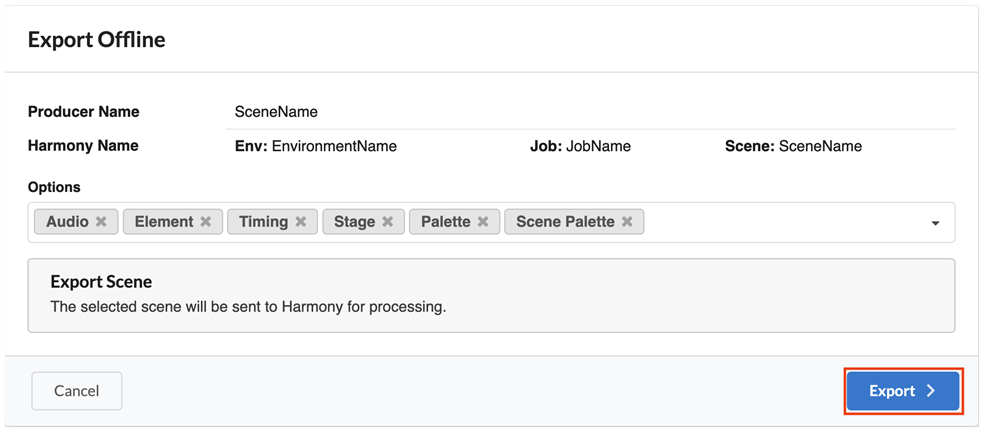
These options may be overridden on a case by case basis from the Export Offline dialog (see below).
-
From the Production page, enter an environment by doing one of the following:
-
Select it from the Environment drop-down list
-
Double click on an Environment
-
-
Enter a job by doing one of the following:
-
Select it from the Job drop-down list
-
Double click on a Job
-
-
Highlight a scene (by clicking on it)
-
Click on the More button and select Export Offline.
-
(Optional) Modify the export options to suit your needs.
-
Click on the Export button.
At the moment, it is only possible to export one scene at a time.
The highlighted scene (the one surrounded by blue lines) will be exported, regardless of which scenes are selected via their checkboxes.
-
From the Asset Manage page, Highlight an asset (by clicking on it).
-
Click on the More button and select Export Offline.
-
(Optional) Modify the export options to suit your needs.
-
Click on the Export button.
The asset must be synchronized with a Harmony Server.
At the moment, it is only possible to export one asset at a time.
The highlighted asset (the one surrounded by blue lines) will be exported, regardless of which assets are selected via their checkboxes.
-
From the Open Tasks page, Highlight a scene by clicking on it.
If the scene is synchronized with Harmony, the “Export Offline” button will appear.
-
Click on the “Export Offline” button.
The Export Offline dialog appears.
-
(Optional) Modify the export options to suit your needs.
-
Click on the Export button.
When exporting a scene offline from the Harmony database, the user can select what should be exported along with the scene. The user can choose to add elements that may be exterior to the scene itself, such as an Environment Palette. Similarly, the user may decide that he does not need everything and choose to remove elements from the export.
By default, the export options set in General Settings > Harmony Integration > Offline Export Options will be used.
To add export options, click on the downward arrow at the end of the option lists to expand the drop-down and select all the options you want to add.
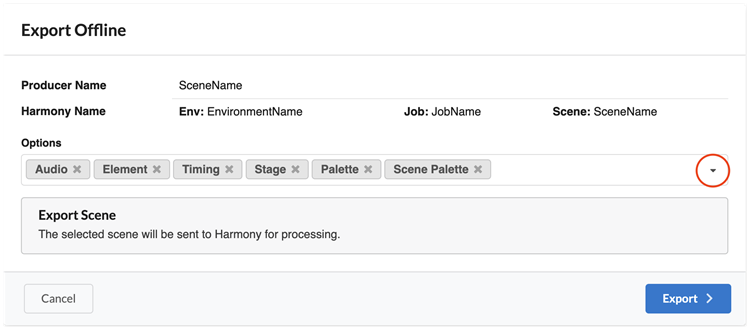
To remove export options, click on the “x” next to it.
Analyzing the Outcome of an Export
A Successful export will result is this pop-up message, offering you to open the scene with Harmony:
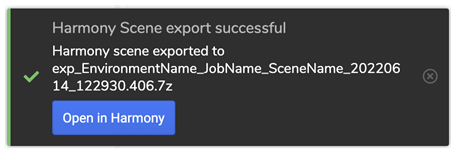
More importantly, the Notification Feed will be updated.

For an export to be successful, the following conditions must be met:
-
WebCC service is running (in the studio).
-
Scene, Job and Environment are synchronized.
-
Producer Link’s settings are properly set.
-
The user is connected to the cloud storage application or can access WebCC directly.
Here is a list of the most common issues that could occur following the export of a scene.
-
Unfinished export
Until the export is completed, the export will show as “In Progress”.
It is normal that an export request takes time to be processed, especially for bigger scenes and if Harmony server is loaded.
Likely causes:
-
Server is slow and takes time to process the request.
-
Too many requests are being processed at the same time.
-
WebCC service is not running
-
WebCC service is not connected to the Producer queue
-
-
Failed Export
A failed export will show up as an error in the notification feed.

Clicking on the
 (log) icon will display a log of the operation, including WebCC log:
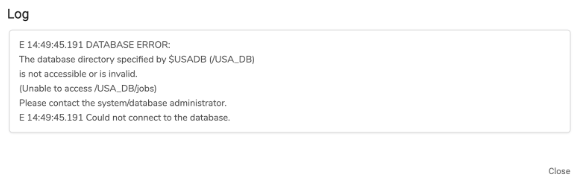
Likely causes:
-
Scene, Job or Environment does not exist in Harmony Database
-
Harmony Database not available
-
Database Server (system) error: Disk full, Write permission error, …
-
-
Successful Export, but the scene never opens
-
While using “Exchange Folder” synchronization mode: WebCC completed the export successfully, but the synchronization (uploading file to the cloud or downloading it to the remote) takes time or is stalled.
-
The location of the exchange folder is not properly set on the server or user side.
Likely causes: