
Download Documentation
Editing a Sound File
Now that you have successfully imported your sound file into Studio, it is time to familiarize yourself with the sound editing interface.
Sound Element Editor
The Sound Element Editor is where you edit sounds that were created outside of Studio and imported into your scene.
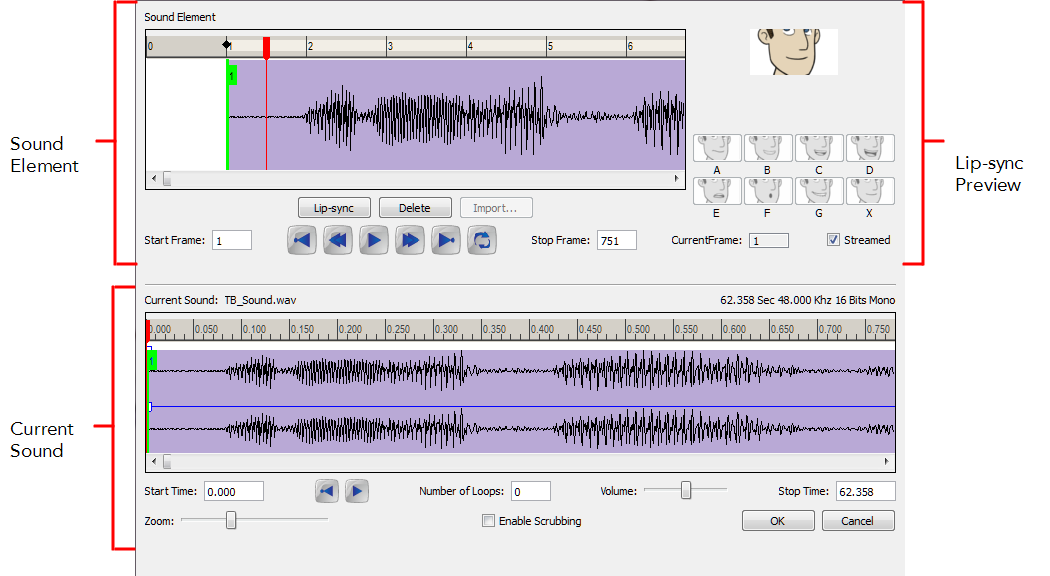
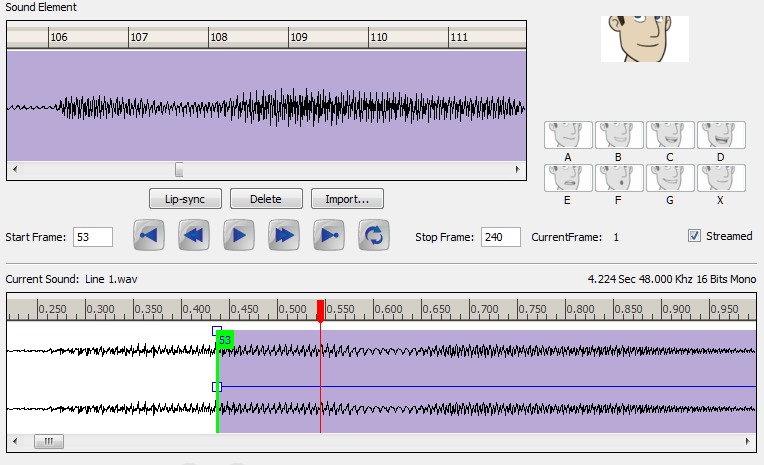
The Sound Element Editor consists of three main panels.
|
1.
|
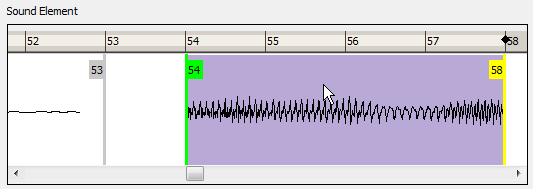
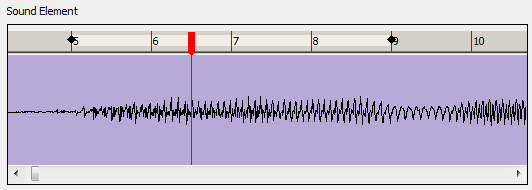
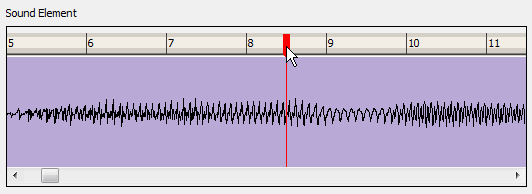
Sound Element - The waveform in the top Sound Element window is the actual sample that will be heard when the final movie is rendered. It may be shorter than the original sound sample due to length of the scene. If any edits are made to the sound sample, they can be heard here. |
|
2.
|
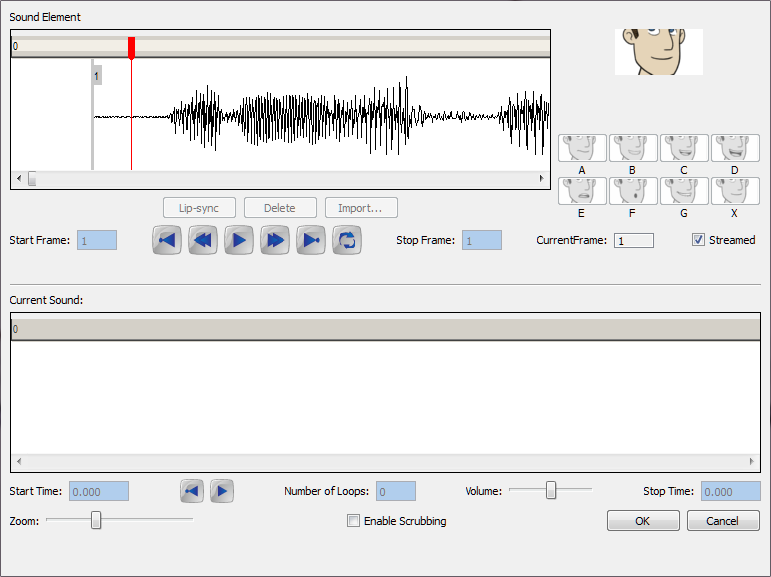
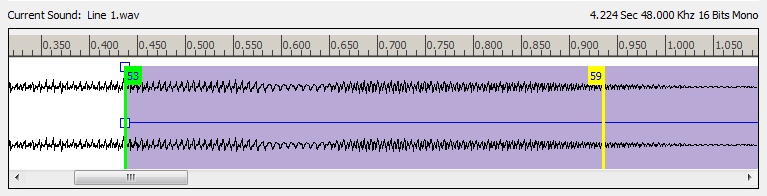
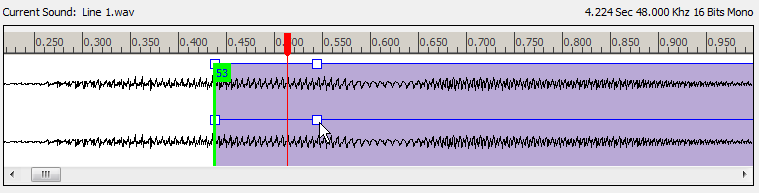
Current Sound - The Current Sound window displays the original sound file in its entirety. This is also where you can edit its properties. This window remains empty until you click inside the Sound Element window. |
|
3.
|
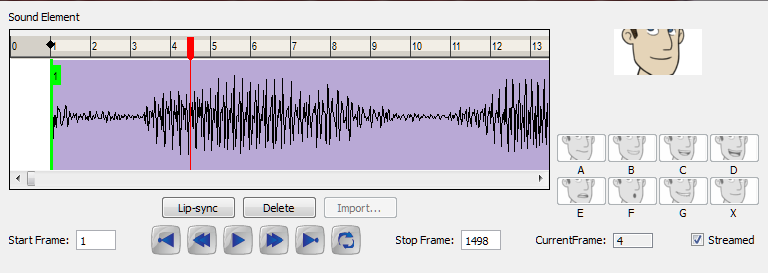
Lip-sync Preview - You can preview the automated detection and manually insert different mouth positions to correspond with the sound sample—see Lip-sync . |
You can do the following in the Sound Element Editor:
To open the Sound Element Editor:
|
1.
|
In the Timeline or Exposure Sheet view, select the sound element you want to edit and do one of the following: |
|
‣
|
In the Sound toolbar or Properties panel, click the Edit Sound  button. button. |
|
‣
|
Click the Timeline View menu  and select Edit Sound. and select Edit Sound. |
|
‣
|
From the top menu, select Element > Edit Sound. |
|
‣
|
Right-click in the Timeline Sound layer or on the Exposure Sheet view sound column and select Edit Sound. |
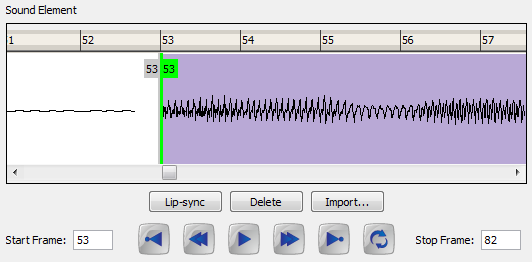
The Sound Element Editor opens.
Changing the Start or End Frame of a Sound
To synchronize the sound with specific images in your scene, you must set a start frame for your sound. To make sure the sound ends at a specific frame, you must set an end frame.
To change the start frame or the end frame of a sound:
|
1.
|
In the Timeline or Exposure Sheet view, select the Sound element you want to edit. |
|
2.
|
In the Sound toolbar or Properties panel, click the Edit Sound button. |
The Sound Element Editor opens.
|
3.
|
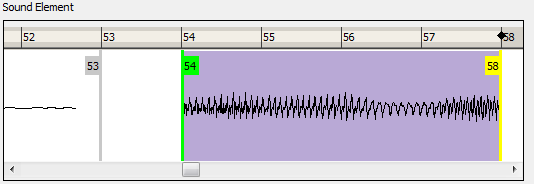
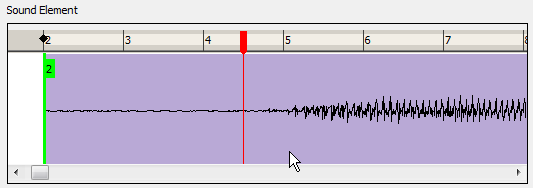
Select a sound sample from the Sound Element panel. To distinguish one sound section from another on the same sound layer, check the frame numbers that appear on the tabs beside the start and stop lines of each waveform section. |
|
4.
|
In the Current Sound panel, click the Play  button (only the selected sound plays). button (only the selected sound plays). |
|
5.
|
In the Sound Element panel, drag the selected clip to the frame number where you want it to start playing. |
You can only move the clip to a section that does not already contain a clip; you cannot overlap two clips in the same element.
|
6.
|
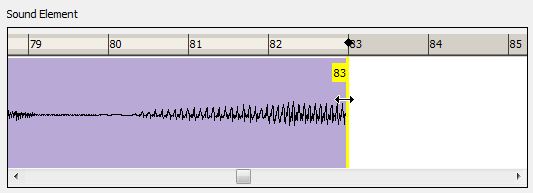
To change the end frame, drag the yellow marker at the end of the waveform to the frame position where you want it to stop playing. |
|
7.
|
To hear how all of the clips fit together in the element, click Play in the Sound Element panel. |
|
8.
|
In the Current Sound panel, click the Play button if you want to hear only the selected clip. |
The Exposure Sheet and Timeline views display the sound clip at the start frame you selected.
Trimming a Sound File
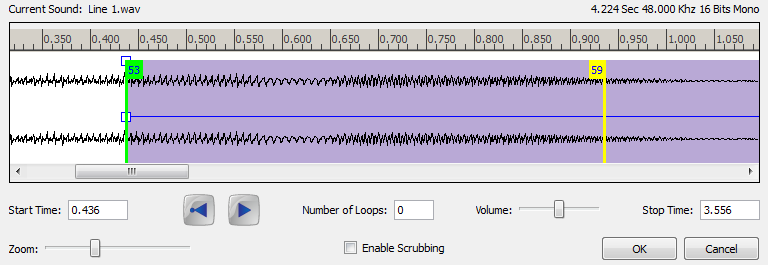
To play only a section of a sound file, use the Sound Element Editor to select the part you want to use. For example, if there extraneous noise at the start of the sound, you can use the Sound Element Editor to edit out the noise.
The Sound Element Editor does not change the original sound file; it only plays a section of it, ignoring the rest. The complete sound file is still kept in the project. This means that the entire sound file is included on export. If you need to consider restrictions in file size, it is better to completely edit the sound files in a third party sound editor before bringing them into Studio.
To trim the start and end of a sound file:
|
1.
|
In the Timeline or Exposure Sheet view, select the Sound element you want to edit. |
|
2.
|
In the Sound toolbar or Properties panel, click the Edit Sound button. |
The Sound Element Editor opens.
|
3.
|
Select a sound from the Sound Element panel. To distinguish one sound section from another on the same sound layer, check the frame numbers that appear on the tabs beside the start and stop lines of each waveform section. |
|
4.
|
In the Current Sound panel, click the Play button (only the selected sound plays). |
|
5.
|
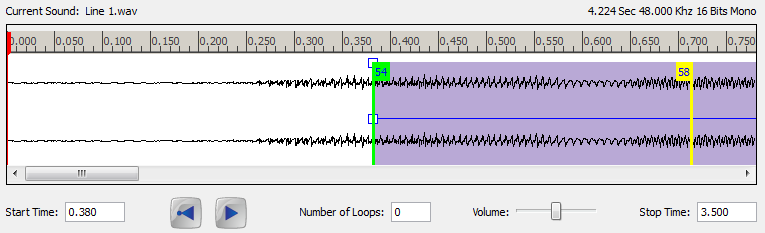
Using the Current Sound panel, you can decide which part of the file you want to play by dragging the left and right boundaries of the selection area. |
|
6.
|
In the Current Sound panel, click the Play button to play the trimmed sound and check that you have trimmed the sections correctly. Use the Zoom slider at the bottom of the panel to zoom in on the waveform so you can trim it more accurately.
|
|
7.
|
Once you are sure that the sound is trimmed correctly, click OK.
|
The trimmed sound sample appears in both the Timeline and Xsheet Views at the start and end positions that you selected.
Looping a Sound
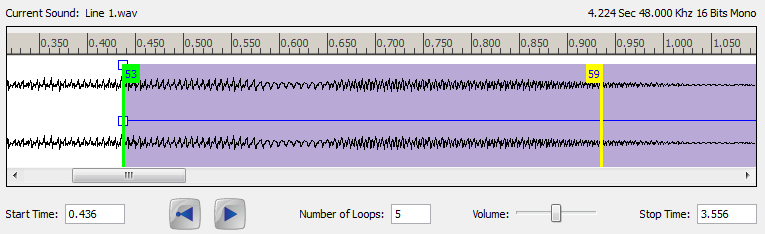
To repeat a sound, you need to specify, in the Sound Element Editor the number of times that you want it to loop.
To loop a sound sample:
|
1.
|
In the Timeline or Exposure Sheet view, select the Sound element you want to loop. |
|
2.
|
In the Sound toolbar or Properties panel, click the Edit Sound button. |
The Sound Element Editor opens.
|
3.
|
From the Sound Element panel, select the sound section you want to loop. |
|
4.
|
In the Current Sound panel, type the number of times you want the sound to play in the Number of Loops field. |
|
5.
|
Press the [Return] key. |
The looped sound appears after the current sound and is represented by grey waveforms, as opposed to black.

When you loop a sound, the looped sections fill the cells in the Sound element (column or layer) until the next sound sample starts or until the scene ends. This means that the looping could effectively get cut if the next sound sample starts too soon or if the scene ends too quickly.
Mixing the Sound Volume
You can adjust the volume of an entire sound clip or modify the volume in increments by adjusting the fade-in and fade-out times. The fade edit only affects the playback; the original sound file is not affected.
To adjust the overall volume of the entire sound clip:
|
1.
|
In the Timeline or Exposure Sheet view, select the Sound element you want to loop. |
|
2.
|
In the Sound toolbar or Properties panel, click the Edit Sound button. |
The Sound Element Editor opens.
|
3.
|
In the Sound Element panel, select the sound that you want to work on. |
An expanded version of the selected sound showing more detail appears in the Current Sound panel.
|
4.
|
In the Current Sound panel, use the Volume slider to adjust the volume. |
|
5.
|
In the Current Sound panel, click the Play button to verify the volume. |
To create a fade in/out effect on a sound clip:
|
1.
|
In the Timeline or Exposure Sheet view, select the Sound element you want to edit. |
|
2.
|
In the Sound toolbar or Properties panel, click the Edit Sound button. |
The Sound Element Editor opens.
|
3.
|
In the Sound Element panel, select the sound that you want to work on. |
|
4.
|
In the Current Sound panel, click the thin blue line above the waveform to add a volume control point. |
|
5.
|
Drag the control point to adjust the volume and to create the time of the transition. The line from the edge of the clip to the control point identifies how the volume increases (fades-in) or decreases (fades-out) over time. |

Dragging the control point to the bottom of the channel will mute the volume, while dragging it upwards will increase the volume. To create an even effect, be sure to adjust the control points uniformly in both the left and right (bottom and top) channels.
|
6.
|
In the Current Sound panel, click the Play button to check the fade. |
Custom Playback Range
To hear a specific section of the sound element, adjust the playback range in the Sound Element Editor to start or stop at specific frames. This custom playback range does not affect the actual sound in the Sound element.
To change the playback range in the Sound Element Editor dialog box:
|
1.
|
In the Sound Element Editor, drag the start or end range markers in the Sound Element panel to the boundary frames you want. |
|
2.
|
In the Sound Editor Element panel, click the Play button to play only the sound between the two markers. |
Changing from Event to Streamed Sounds
You can set up your sounds to be either streamed or event sounds when they are exported to the Adobe® Flash® format.
There are two major distinctions between event and stream sounds in the Adobe® Flash® file:
|
•
|
Event sounds are downloaded by the Adobe® Flash® player before they play. |
|
•
|
Event sounds are reusable. Once downloaded, the Adobe® Flash® player can play the sound repeatedly without downloading it again. This is not possible with streamed sound. |
|
•
|
Streamed sound plays as it arrives. |
|
•
|
Streamed sound samples are broken into small bits and inserted between the video frame. This allows the Adobe® Flash® player to start to play before receiving the full sound track which is helpful for a long sound track (like background music). |
|
•
|
Streamed sounds are kept synchronized with the video by the Adobe® Flash® player. The player drops frames if necessary to keep up with the sound. |
|
•
|
Event sounds are not synchronized with video. After a while, an event sound may fall out of sync with the video. |
By default, the sounds are set to Event, but because streamed sounds are more likely to be synchronized with the images in your animation, lip sync sounds and sound effects should be set to stream. If you set more than one sound to stream, they will be mixed together and exported as one streamed sound.
To stream the sounds in an element:
|
1.
|
In the Timeline or Exposure Sheet view, select the Sound element you want to edit. |
|
2.
|
In the Sound toolbar or Properties panel, click the Edit Sound button. |
The Sound Element Editor opens.
|
3.
|
In the Sound Element panel, select the sound you want to work on. |
|
4.
|
Select the Streamed option. |
This turns streaming on or off. If the Streamed option is not selected, the sound is set as an event sound.
Sound Scrubbing in the Sound Element Editor
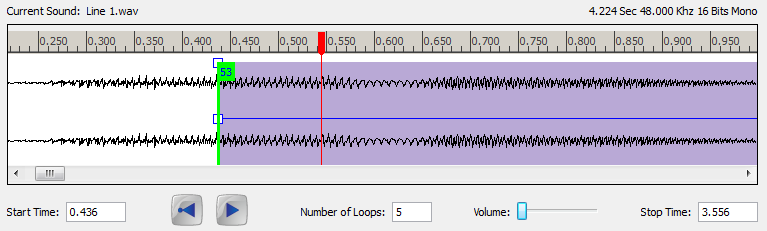
Studio uses a process known as sound scrubbing. This lets you hear the sound in real time as you move the playback pointer forwards or backwards along the waveform. This is extremely useful if you have to fine tune the lip-syncing or sound synchronisation You can scrub sounds in the Sound Element Editor.
To scrub a sound from the Sound Element Editor:
|
1.
|
In the Timeline or Exposure Sheet view, select the Sound element you want to edit. |
|
2.
|
In the Sound toolbar or Properties panel, click the Edit Sound button. |
The Sound Element Editor opens.
|
3.
|
In the Sound Element panel, select the waveform you want to scrub. |
|
4.
|
Below the Current Sound panel, select the Enable Scrubbing option. This option sets the red markers in scrub mode. |

|
5.
|
Drag the red playback marker left and right to hear the sound in sound scrubbing. |
Deleting a Sound
You can delete a sound in the Sound Element Editor.
To delete a sound:
|
1.
|
In the Timeline or Exposure Sheet view, select the Sound element you want to remove the sound file from. |
|
2.
|
In the Sound toolbar or Properties panel, click the Edit Sound button. |
The Sound Element Editor opens.
|
3.
|
In the Sound Element panel, select the sound you want to delete. |
|
4.
|
To distinguish one sound section from another on the same sound layer, check the frame numbers that appear on the tabs beside the start and stop lines of each waveform section. |
The Sound is removed from the Exposure Sheet and Timeline views.