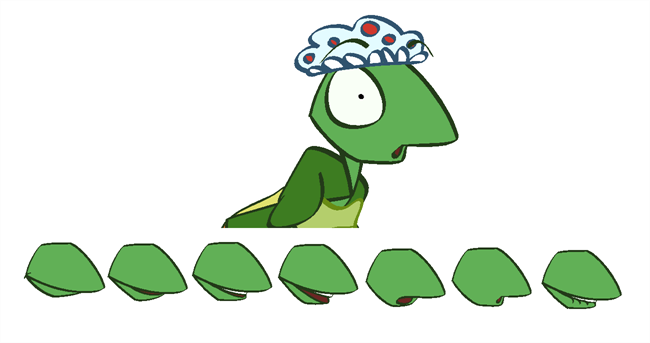
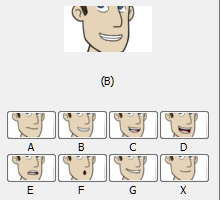
Adding a lip-sync to a project can really enhance its quality and storytelling. However, it can be difficult to shape a character's mouth so it matches the sound at the precise frame. To solve this problem, Studio provides a lip-sync feature which analyzes the content of a sound element and generates a mouth chart based (see below) on the eight animation phonemes (A, B, C, D, E, F, G, and X, which is used to represent silence). You can lip-sync the traditional way or let the Studio automatically create the basic detection.
The mouth shapes used by Studio are based on the conventional mouth chart used in the animation industry. The letters used to represent the shapes do NOT correspond to an actual sound.
Here is an approximation of which sound each mouth shape can produce:
|
Mouth Shape |
Approximate sound the mouth shape matches to |
|
A |
b, m, p |
|
B |
d, h, i, j, k, s |
|
C |
a, e |
|
D |
A, E |
|
E |
o |
|
F |
oo, u |
|
G |
f, ph |
|
X |
Silence, undetermined sound |
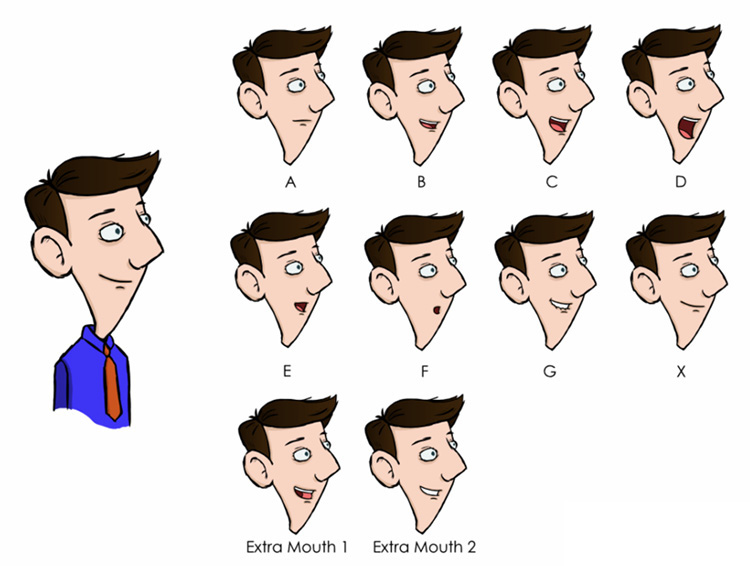
You can refer to the mouth chart positions as you draw the shape of your character's mouth.
This section explains:
| • | Modifying the Lip-sync Detection |
| • | Creating a Lip-sync Using a Mouth Template |
| • | Creating a Lip-Sync Using Your Own Drawings |
| • | Lip-sync |
| • | Automatic Lip-sync Detection |
| • | Modifying the Lip-sync Detection |
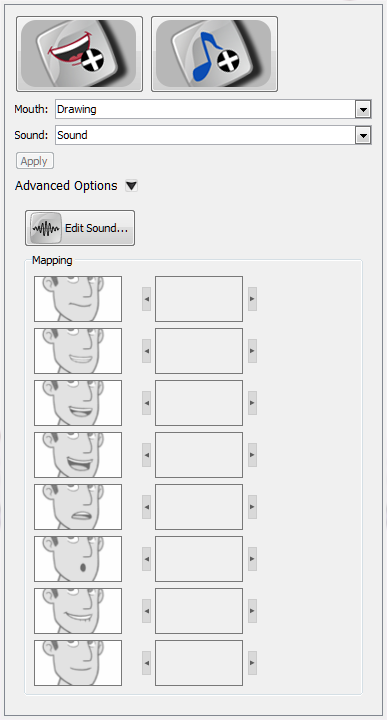
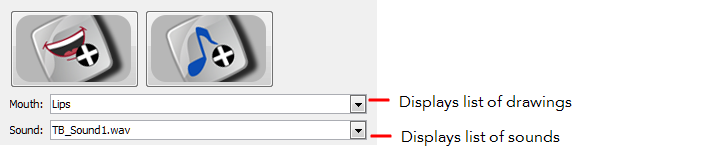
The Lip-sync view is where you can create and map mouth charts, as well as import mouth templates for your characters.
To open the Lip-sync view:
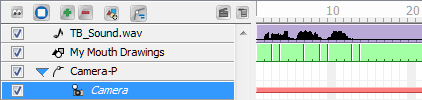
| 1. | Select a sound layer from the Timeline view or a cell in the Exposure Sheet view. |
| 2. | Do one of the following: |
| ‣ | From the Sound toolbar , click the Lip-sync  button. button. |
| ‣ | In the Properties panel, click the Lip-sync button. |
Studio comes with a variety of mouth templates that you can play and experiment with on your characters. You can create a lip-sync and use an existing sound layer or create the lip-sync and then import the sound.
To create a lip-sync using a mouth template:
| 1. | From the Sound toolbar, click the Lip-sync button . |
| 2. | Do one of the following to add sound: |
| ‣ | Click the Import Sound  button. From the Open dialog box, select a sound file and click Open. button. From the Open dialog box, select a sound file and click Open. |
| ‣ | From the Sound list, select a sound file you have already imported. |
| 3. | If needed, edit the sound by clicking the Edit Sound  button and making any adjustments in the Sound Element Editor. button and making any adjustments in the Sound Element Editor. |
| 4. | Click the Import Template  button. button. |
The template dialog box opens to display the mouth templates.
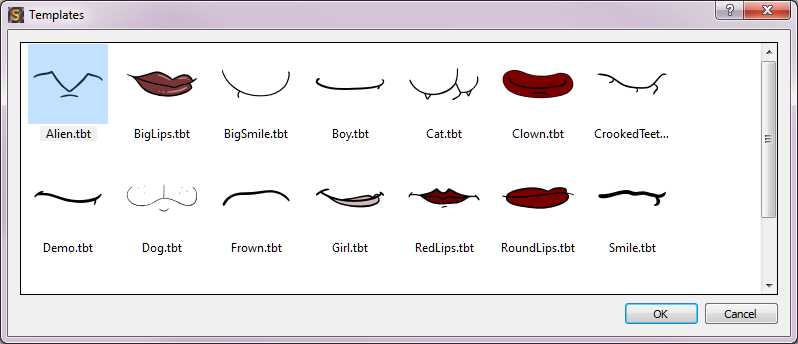
| 5. | Select a mouth template and click OK. |
In the Timeline view, a Drawing layer is created containing eight mouth drawings.

| 6. | In the Lip-Sync view, click Apply to generate the lip-sync with the sound file. |
The mouth shapes are synced with the sound file.
| 7. | In the Drawing view, use the Select tool  in the Animation Tools toolbar to scale the mouth drawings on the layer. in the Animation Tools toolbar to scale the mouth drawings on the layer. |
| 8. | In the Camera view, place the mouth at the correct location on your character. |
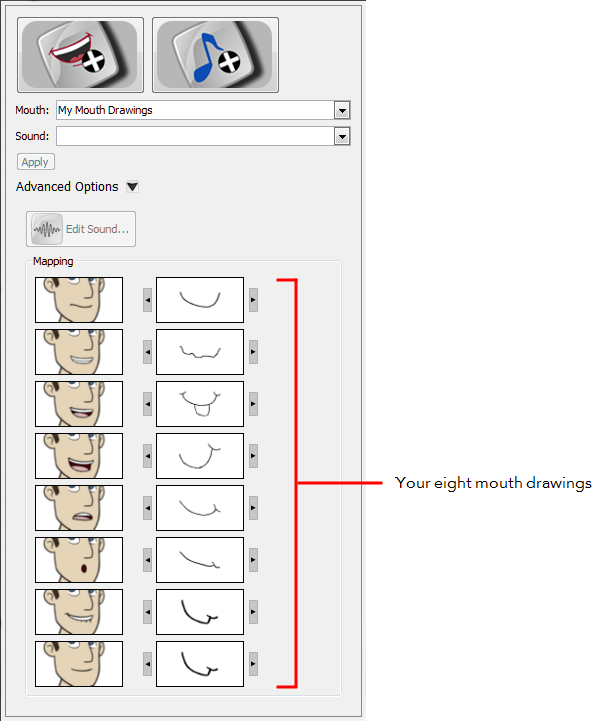
You can use your own drawings to generate a lip-sync.
To create a lip-sync using your own drawings:
| 1. | In the Timeline view, select the drawing layer that contains your eight mouth drawings. |
| 2. | From the Sound toolbar , click the Lip-sync button. |
The Lip-sync view displays. Your eight mouth drawings are automatically mapped with the animation phonemes.
| 3. | Do one of the following to add sound: |
| ‣ | Click the Import Sound button. From the Open dialog box, select a sound file and click Open. |
| ‣ | From the Sound list, select a sound file you have previously imported. |
| 4. | If needed, edit the sound by clicking the Edit Sound button and making any adjustments in the Sound Element Editor. |
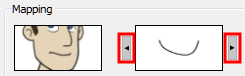
| 5. | If needed, you can adjust the mouth mapping by clicking the Previous Drawing and Next Drawing arrows beside any of the mouths. |
| 6. | Click Apply to generate the lip-sync with the sound file. |
The mouth shapes are synced with the sound file.
You can detect the lip-sync for a sound in the Exposure Sheet view or Sound Element Editor.
To detect lip-sync for a sound in the Exposure Sheet view:
| 1. | In the Exposure Sheet view, right-click on a cell of the sound column and select Show Lip-sync. |
Studio analyzes the selected sound clips and assigns a lip-sync letter to each sound cell. The number in each frame is replaced by a letter that represents the mouth shape.
 button in the Exposure Sheet View toolbar.
To detect lip-sync for a sound using the Sound Element Editor:
| 1. | In the Timeline or Exposure Sheet view, select the Sound element from which you want to generate a chart of mouth shapes. |
| 2. | In the Sound toolbar or Properties panel, click the Edit Sound  button. button. |
The Sound Element Editor opens.
| 3. | In the Sound Element panel, select the waveform from which you want to generate the mouth chart and click Lip-sync. |
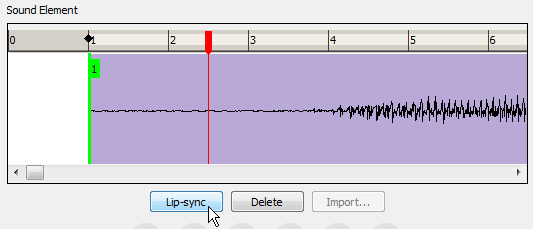
A progress bar appears as Studio analyzes the selected sound clips and assigns a lip-sync letter to each sound cell.
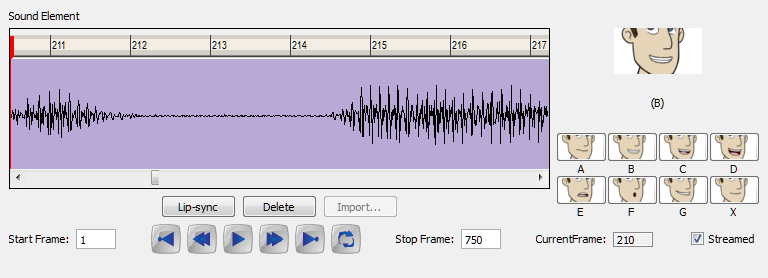
| 4. | Click the Play  button to hear the sound clip. button to hear the sound clip. |
The Lip-sync Preview area shows a preview of the result.
Studio can automatically map drawings in an element to the mouth chart you have generated for a sound using the Lip-sync button in the Sound Element Editor dialog box. This can save time when lip-syncing a voice track.
This means that in the Lip-Sync Mapping dialog box, you can identify each lip drawing of a character mouth element. Studio then automatically labels all of the cells in the character's element with the appropriate name.
To automatically map lip-sync drawings to a mouth chart:
| 1. | In the Exposure Sheet view, right-clickon the header of the sound element was already lip-synced and select Modify Lip-sync Mapping. |
The Lip-Sync Mapping dialog box opens.
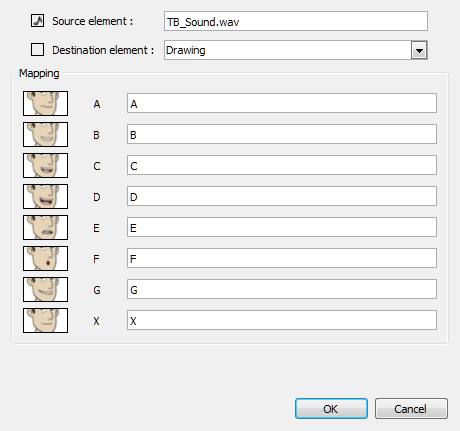
| ‣ | Source element: The Sound element from which the lip-sync mapping will be based. |
| ‣ | Destination element: Lets you select the element that contains the mouth shapes of your character. |
| 2. | Click OK. |
| 3. | Click the Play button in the Playback toolbar to see and hear the results in the Camera view. |
| 4. | To play back your scene with sound, enable the sound if you not already done so. From the top menu,select Play > Turn On Sound Playback. |
If you think that another position would be more appropriate, you can change the mouth position that has been assigned to a frame.
For example, you may have a character who remains silent for ten frames between two speeches. Studio would normally assign an X image to the silence. However, if you want your character's mouth to hang open in astonishment for these ten frames, you can change the lip assignment for these frames from an X to an E.

You can modify the lip-sync from the Exposure Sheet view or Sound Element Editor.
To change the lip assignment of a sound in the Exposure Sheet:
| 1. | In the Exposure Sheet view, right-click in the cell that contains the mouth position you want to change. |
| 2. | Select Lip-sync > A, B, C, D, E, F, G or X. Choose the letter that reflects the mouth position you want to use for that sound. |
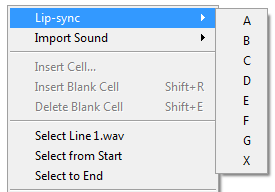
The drawing automatically updates in the Exposure Sheet and Timeline view.
To change the mouth position assignment of a sound in the Sound Element Editor:
| 1. | In the Timeline or Exposure Sheet view, select the Sound element with the lip-sync you want to modify. |
| 2. | In the Sound toolbar or Properties panel, click the Edit Sound button. |
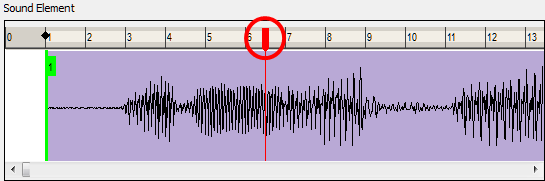
| 3. | In the Sound Element panel, drag the red frame slider to the frame with the mouth position you want to change. |
| 4. |
|
In the Lip-sync image area, the image on top represents the lip position currently assigned to the frame.
| 5. | To change the image assigned to the frame, select a mouth position below the preview image. |
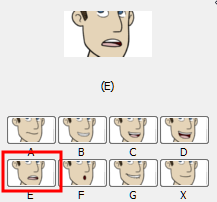
The preview image changes to the mouth position image you selected. The position is also updated in the Exposure Sheet and Timeline views.
When you generate the mouth chart for a sound in a sound element, you can either accept the mouth positions assigned by Studio or assign your own lip-sync images.
However, if you change the sound's start frame, edit it or reassign its mouth position afterwards, you must reanalyze the sound, and regenerate the mouth chart for it.
To recompute the mouth chart for a selected sound in the Exposure Sheet:
Remember that recomputing erases modifications (see warning above).
| 1. | In a Sound column in the Exposure Sheet, right-click on a cell that contains the sound file you want to recompute and select Recompute Lip-sync. |
The mouth position assignment for each frame is recomputed, erasing any modifications you made.
To recompute the mouth chart for a selected sound in the Sound Element Editor:
Remember that recomputing erases modifications (see warning above).
| 1. | In the Timeline or Exposure Sheet view, select the Sound element. |
| 2. | In the Sound toolbar or Properties panel, click the Edit Sound button. |
The Sound Element Editor opens.
| 3. | In the Sound Element panel, select a waveform to recompute and click Lip-sync. |