When it comes to adding bones to your drawings, there are two options to choose from. You can choose one of Studio's pre-made Robo-Skeleton templates that has an animated sequence built in, or you can build your own skeleton. If you choose to create your own skeleton, then you will have the freedom to make your own animated sequences.
| • | Robo-Skeleton Templates |
| • | Building the Skeleton |

Although creating a character can be fun, the process of animating it can be a little daunting. Take away some of the work by using Studio's pre-made Robo-Skeleton templates. You can easily add your own character artwork to the template and watch it move within minutes.
All the Robo-Skeletons are available from the Library view. To access the templates, follow this path: Toon Boom Templates > Robo-Skeleton.

Inside the Robo-Skeleton folder are Robo-Skeleton templates of both human and animal characters. Each character has its own subfolder containing templates grouped into front, side and 3/4 poses. Refer to the following table for a more detailed description of the templates:
| Folder | Human | Animal |
| Front |
Jumping Jumping Jacks Stretching Waving Dance Move 01 Dance Move 02 Dance Move 03 |
Sitting Stretching Tilting Head Walking |
| Side |
Jumping Running Squat Walking Dance Move 01 Dance Move 02 Dance Move 03 |
Jumping Running Sitting Sniffing Stretching Walking |
| 3/4 View |
Jumping Running Squat Walking Waving Dance Move 01 Dance Move 02 Dance Move 03 |
Jumping Running Sitting Stretching Tilting Head Walking |
To see a thumbnail of the template, right-click in the right section of the Library view and select View > Thumbnails.

You can drag a template from the Library view to the Camera or Timeline view to add it to your animation.
To import a template into a scene:
| 1. | In the Library view, select the template you want to import. |
| 2. | Drag and drop the selected template in the Camera view or Timeline view's left side. |


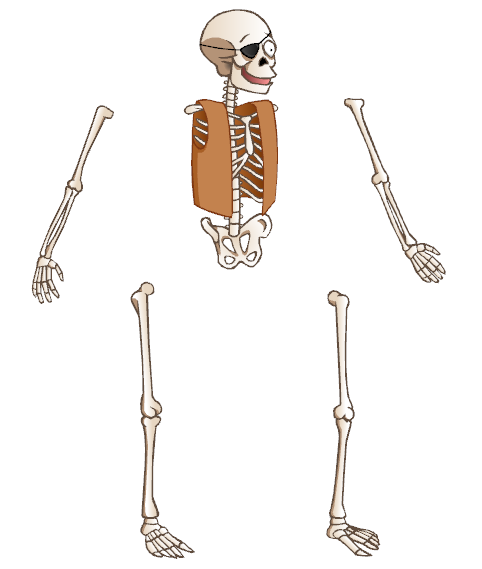
Now that your Robo-Skeleton appears in the Camera view, you have all the pieces necessary to create your own humanoid or four-legged character. This means that you need not use this template as is, but you can use elements of the template, such as the animation, for your own purposes.
The first thing you need to do is examine the layers included in your Robo-Skeleton template, specifically the Skin Group.

Notice how there are two drawing layers attached to the Skin Group. The first layer, in this case called dog_side, contains all the artwork for the dog that you currently see in the Camera view. The envelope layer contains drawings of zones surrounding each body part of the character.
To view the envelope layer:
| 1. | In the Bone Tools toolbar, click the Connect Character Set-up Mode  button. button. |
The envelope zones appear and the character is split apart as you would see it in Setup Mode.
To have the character move with the pre-made animation of the Robo-Skeleton template, you need to add your own artwork to the Skin Group to replace the dog_side layer. You can do this in several ways: by creating a new drawing layer, using the envelope zones as guidelines and then creating your own artwork, or by erasing the artwork from the dog_side layer and drawing your own artwork directly in that layer.
To add your own character to the Robo-Skeleton template:
| 1. | In the Timeline view, click the Add New Drawing Layer  button to create a new drawing layer. button to create a new drawing layer. |

| 2. | Go to the Drawing view by clicking on the Drawing view button on the upper-right side of the Camera view. |

OR
If you want to continue working in the Camera view, click the Connect Character Set-up Mode button to display the envelope zones.

Use the Erase  tool or Select
  tool in combination with the [Del] key to get rid of the current artwork on that layer.
| 3. | If you are working in the Drawing view, turn on the Light Table by clicking the Auto Light Table  button in the Onion Skin toolbar . button in the Onion Skin toolbar . |
The envelope image appears in washed out colours in the Drawing view. You may notice that it does not look as it did in the Camera view; some of the limbs of the character may be detached and spread out.

As is the case with the dog, when the character is whole, two of the legs are partially hidden behind the rest of the body. This would also happen to the image of a human character in profile; one arm and one leg would be hidden. To fix problems like this, all the limbs are separated and then reattached to the body in the Bone setup stage (which is already done for the Robo-Skeleton templates), so all the body parts can move independently.
| 4. | If you are working in the Camera view, in the Timeline view, hide (deselect) the current Skin Group art layer. In this case, it is the dog_side layer. Leave the envelope layer enabled. |
OR
If you are working in the Drawing view, in the Exposure Sheet view, click the Toggle Element List button and then hide (deselect) the current Skin Group art layer. In this case, it is the dog_side layer. Leave the envelope layer enabled

| 5. | In the Drawing or Camera view, import and vectorize an image, or use the drawing tools to create your own version of the chosen character type on the new layer. If you import an image, you can use the drawing tools to cut it up, as long as it is vectorized. You must also scale the pieces and place them in the correct location, over their corresponding envelope zone. In either case, be sure to stay within the envelope zone limits. |

| 6. | In the Timeline view, rename the drawing layer to something appropriate and extend the exposure of the drawing for the total length of the animated sequence. You can do this by: |
| ‣ | Right-clicking on the frame you want to extend the exposure to and selecting Extend Exposure. |
OR
| ‣ | Clicking on the frame that you want to extend the exposure to and pressing [Ctrl] + [Shift] + [1] (Windows) or [⌘] + [Shift] + [1] (Mac OSX). |
| 7. | If you are not already there, return to the Camera view by clicking the Camera view button. |

| 8. | If you did not draw directly on the old Skin Group art layer, then in the Timeline view, select your character artwork layer and drag and drop it over the Skin Group layer. |

| 9. | If you did not create your new character artwork on the old Skin Group art layer, either hide the old Skin Group art layer or delete it from the Timeline view entirely. |
| 10. | Hide the envelope by deselecting the Connect Character Set-up Mode button from the Bone Tools toolbar. |
The envelope disappears and the Robo-Skeleton character appears reassembled. If it does not reassemble automatically, you may have one of the Bone setup tools selected. If so, click the Bone Manipulator  tool.
tool.
As a test, click the envelope layer and take a look at the Layer Properties panel. Notice the Type is set to Envelope. Any layer set to Envelope through the Properties panel can be controlled by the Connect Character Set-up Mode button.


Your character is connected to the Robo-Skeleton template and appears in place of the generic envelope.
| 11. | In the Playback toolbar , click the Play  button to watch the pre-made animation as it now appears, connected with your character artwork. button to watch the pre-made animation as it now appears, connected with your character artwork. |
Once your character design is ready, you can start building the structure of the puppet's skeleton. Here are the different steps and tools:
| • | Adding Bones |
| • | Setting Up the Bones |
| • | Setting the Influence Area |
| • | Parenting Bone Chains |
There are two different ways you can add bones to artwork. The fastest and easiest way is to select the layer with your artwork, and then select the Bone Creator tool. The last step is simply to create bones on top of your artwork. You can also add bones through the Timeline view by adding a Skeleton effect.
To add bones to your character:
| 1. | Make sure you are working in the Camera  view. view. |
| 2. | In the Timeline view, select the layer that contains your artwork. |
| 3. | From the Bone Tools toolbar, select the Bone Creator  tool or press [U]. tool or press [U]. |
| 4. | Take a look at your character or object, and decide which parts will be at the back (hidden behind other parts). These are the parts you should start creating bones for first. |
The bones and bone chains that are created first will be at the top of the Timeline layer stack when you are finished; therefore, they will be located at the front of the visibility hierarchy.
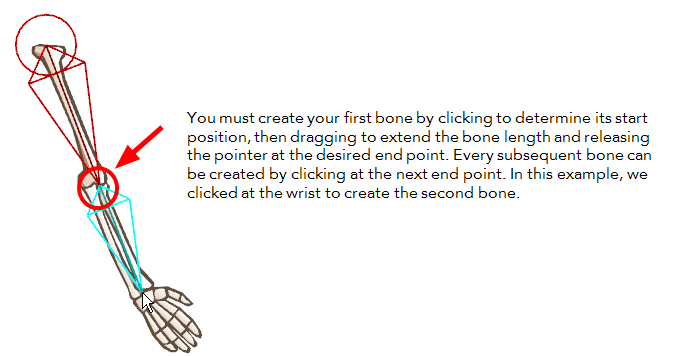
| 5. | In the Camera view, click and drag to create the first bone, following your design. |
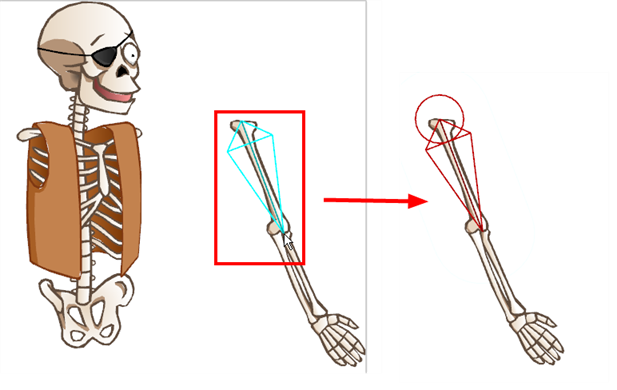
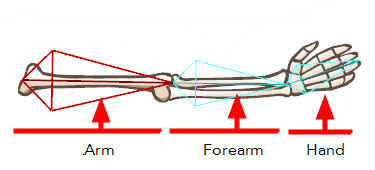
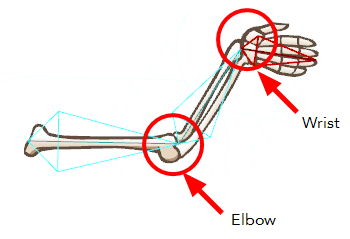
When creating the bone structure, think about where you want the image to bend. In this example, we want to have two bends (one at the elbow and one at the wrist). Therefore three bones should be created: the arm, forearm and hand.
| 7. | Once you have created a full bone chain for one limb, you can, for example, start a new freestanding bone or bone chain for a different part of your character or object. Hold down the [Shift] key to do this. |
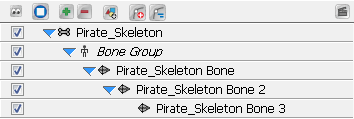
| 8. | Take a look at the Timeline view. As you create a bone chain, notice that a new bone layer is automatically added for each bone in the chain under the Bone Group. The bones in a chain are organized in a hierarchy, while freestanding bones are just below the main Bone Group. |
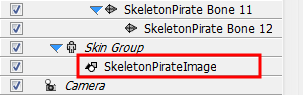
Notice also that the drawing layer with your character or object artwork is automatically connected to the Skin Group of your new Skeleton effect group. This auto-parenting occurs because you started creating your bones with this layer selected.
Your character's bone structure is now complete. Notice how the bones of the body parts, including the body of the character, are independent from each other. They are all separate bone chains, totally unconnected.

Another way to add bones to your artwork is to add a Skeleton effect to your Timeline view and then connect your character's artwork to it.
To add a Skeleton effect:
| 1. | In the Timeline view, click the Add New Elements  button. button. |

The New Elements dialog box opens.

| 2. | From the Type list, select Skeleton Effect. |

| 3. | In the Name field, give a name to the Skeleton Effect element. |

| 4. | Click OK. |
The Skeleton effect appears in the Timeline view.

| 5. | Select and drag the drawing layer containing your character onto the Skin Group. This is where you connect any art layer that you want to be influenced by the bones. Make sure to drop the drawing layer directly on the Skin Group to parent it to the Skin Group. |

If your character's parts are drawn on different elements, make sure to parent all the drawing elements to the Skin Group.

| 6. | Once layers are parented in the Timeline view, you can click on the blue triangle icon at the head of a group to collapse or expand the group. This is useful when the Timeline view becomes filled with layers. |

| 7. | From the Bone Tools toolbar, select the Bone Creator tool or press [U]. |
| 8. | Take a look at your character or object, and decide which parts will be at the back (hidden behind other parts). These are the parts you should start creating bones for first. |
The bones and bone chains that are created first will be at the bottom of the Timeline layer stack when you are finished; therefore, they will be located at the bottom of the visibility hierarchy.
| 9. | In the Camera view, click and drag to create the first bone, following your design. |
| 10. | Once you have created a bone, it automatically becomes selected and appears in red. The next bone you create is automatically linked and parented to the currently selected bone. This creates a chain linked by a joint. |
| 11. | Once you have finished creating the bone structure on a first limb, in the Timeline view, select the top layer of the Skeleton Effect; this lets you start the bone structure for the next limb. Then, repeat steps 8 and 9 until a bone structure is created for each of the body parts. |

Once you start creating bones you can, at any time, modify them in Setup mode to optimize their positioning without creating an animation.
To modify bones using the Bone Setup tool:
| 1. | From the Bones Tools toolbar, select the Bone Setup  tool or press [J]. tool or press [J]. |
| 2. | In the Camera view, select the bone you want to modify. |
The selected bone turns red and two control handles appear.
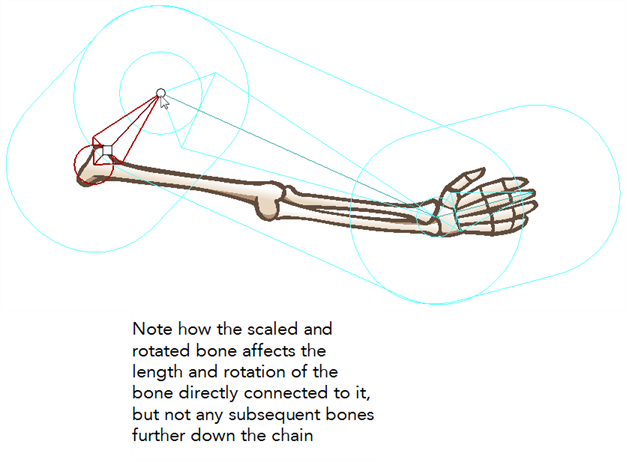
| ‣ | To rotate the bone, place the pointer over the bone until you see the rotation cursor. Click and drag to rotate the selected bone. You can change the rotation angle of any bone in the chain. |
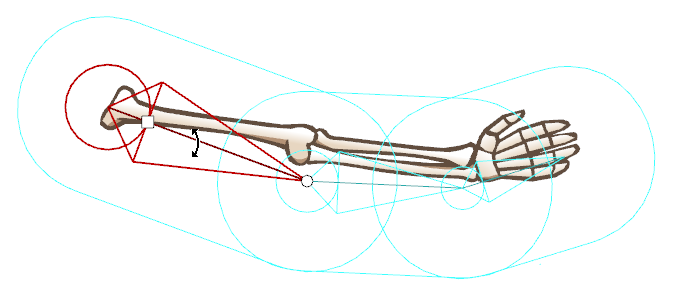
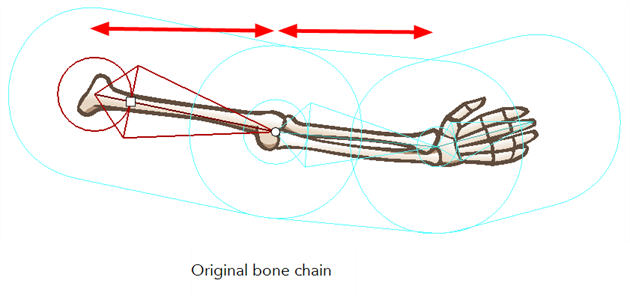
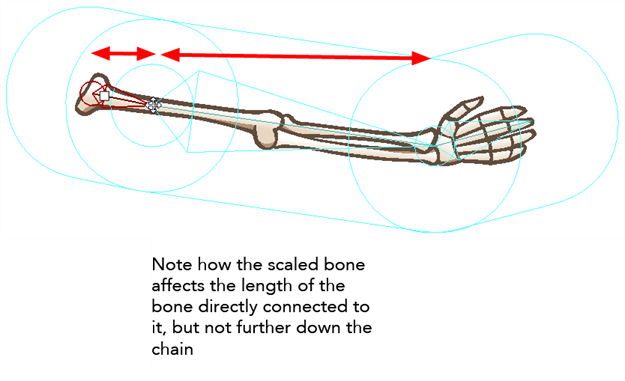
| ‣ | To shorten or lengthen the bone, click on the round handle at the tip of the bone and either drag it towards or away from the root of the bone. You can lengthen or shorten any bone in your chain. You can also rotate as you scale, creating two transformations in one step. |
| ‣ | To reposition the bone, click the square handle and drag it to the desired position. |

You can also use the Properties view to define the position of a selected bone.
To modify bones using the Properties view:
| 1. | In the Camera view or Timeline view, select the bone you want to modify. |
Its position values appear in the Properties view.

| 2. | In the Properties view: |
| ‣ | Position: Enter the X-axis and Y-axis values to set the position of the selected bone. You should not reposition a bone that is not the first parent. This will prevent gaps from forming at the joint area, creating an unwanted distortion of the art. |
| ‣ | Length: Lets you set the length of the selected bone. You can resize any bone from the chain. |
| ‣ | Rotation: Lets you modify the rotation angle of the selected bone. You can change the rotation angle of any bone from the chain. |
You can reset the position of a selected bone at any time using the Properties view. You can also reset the selected bone's position and rotation values to default.
To reset the position of bones:
| 1. | In the Timeline view, select the bone you want to reset. |
| 2. | In the Properties view, set the Position and Rotation values to 0. |
| 3. | Repeat these steps to reset the position of other bones. |
You can also use the Reset option to reset both the bone positions and keyframes simultaneously.
To reset the position of bones and clear keyframes:
| 1. | In the Timeline view, select the bone element you want to reset. You can perform a multiselection and reset the position of multiple bones at the same time. |
| 2. | In the Timeline View  menu, select Reset. You can also right-click in the right or left section of the Timeline view and select Reset. menu, select Reset. You can also right-click in the right or left section of the Timeline view and select Reset. |
The influence area is the zone that defines which art is included in the Skeleton effect and is distorted when animated. Once you setup the bone structure, you need to adjust the influence area of your bones.
This topic is divided as follow:
| • | Influence Area |
| • | Modifying the Size and Shape of the Influence Area |
The influence area determines the boundaries of the effect that a bone will have over artwork that lies within those boundaries.
Any art on a drawing layer that is connected to the Skin Group and appears inside the bone influence area, will follow the movement of that animated bone.

When setting the influence area around bones, make sure that no unwanted art is included in the area. Any unwanted art included in a bone influence area will follow the animated bone and become distorted.


There are two types of influence area possible for a selected bone: Elliptical and Infinite.

By default, the influence area is set to Infinite. The entire art which is part of the Skin Group and which is not contained inside the Elliptical influence area of another bone, will move with the selected bone. If two bones have an Infinite influence type, then they influence the artwork up to where they meet, in other words, up to the joint.
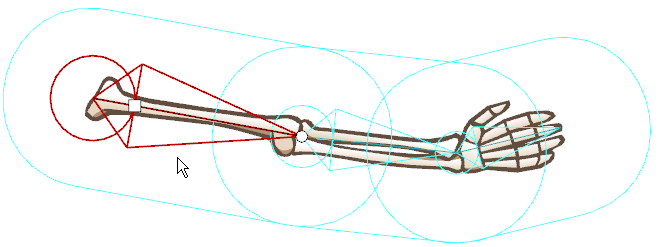
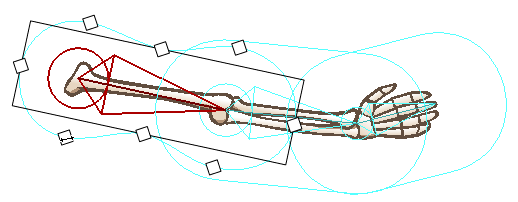
You can set the influence area type for a selected bone to Elliptical using the Properties view. When set to Elliptical, an ellipse appears in the Camera view around the selected bone. An Elliptical influence type means that an ellipse shape determines the boundaries inside which art will be influenced by the selected bone animation. This area can be redefined using the Bone Influence  tool or Properties view.
Note that if two influence areas overlap, the bone that is situated lower in the Timeline view's ordering is the one that will take precedence over the other. Therefore, the influence area of the bone that is situated higher in the Timeline view's layer stack, will have no influence over the overlapping area—see Modifying the Size and Shape of the Influence Area .
If you set the influence area of a bone to Elliptical, meaning it is bound within an ellipse shape, you can modify that shape. To modify the size and form of the ellipse, simply manipulate the square points around its bounding box.
To modify the influence area using the Bone Influence tool:
| 1. | From the Bone Tools toolbar, select the Bone Influence tool. |
| 2. | In the Camera view, select the bone whose influence area you want to modify. Make sure that in the Properties view, the zone of influence is set to Elliptical. |
The selected bone appears in red and a black bounding box is displayed around the influence area.
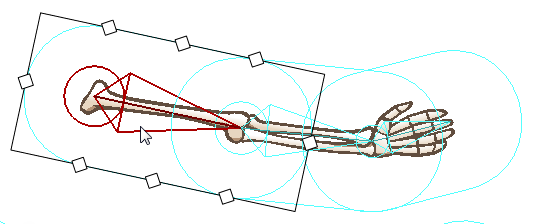
| 3. | Click and drag the square points to resize or reshape the influence area. |
Once you create several bone chains for your character's limbs and body, you can connect them all by parenting them. This unifies the character and, if you want to, allows the limbs to follow the movements of your character's body. This step is very simple, as you only use a single tool, the Bone Parent  tool.
tool.
To parent bone chains:
| 1. | From the Bone Tools toolbar, select the Bone Parent tool. |
| 2. | In the Camera view, locate the bone which is the starting point of the limb you want to parent to another chain. In this example, the arm will be parented to the body of the Skeleton. |

| 3. | Click on the base of the limb bone and then drag the pointer to the bone you want to parent it to. As you drag, a red arrow points in the direction you are dragging. When a straight line appears beside it, it means that it is ready to connect to the selected bone. |

| 4. | Release the pointer to complete the connection. |

| 5. | Repeat the previous steps until all the limbs are parented to the body. |

If for some reason you decide that you no longer want a bone or chain parented to another bone or chain, you can easily unparent.
To unparent a bone or bone chain:
| 1. | From the Bone Tools toolbar, select the Bone Parent tool. |
| 2. | In the Camera view, locate the bone you want to separate from another bone or bone chain. If you want to separate part of a chain from a larger chain, find the bone that would represent the head of the new chain. |

| 3. | Click on the selected bone, then rapidly pull away from the parent bone or bone chain. |

The selected bone and any of its children are separated from its parent bone or bone chain.