
You can share and reuse any elements you create in Toon Boom Studio as templates. The Library in Studio has ready-to-use templates and is where you can store different elements you create like puppets, backgrounds or animations. In fact, almost anything you create or use in Studio can be stored in the library.
In this chapter, you will learn about the following:
| • | Understanding the Library Concept |
| • | Library View |
| • | Structuring the Library |
| • | Templates |
Use the Library view to reuse your artwork and animation in other scenes.
This topic is divided as follows:
| • | What is a Library? |
| • | What is a Template? |
A library is a folder where you store your templates. You can access these folders from your different projects. To store your artwork in the Library, drag the content into the Library. To reuse artwork, drag it into your Timeline view.
A library can be organized using subfolders, you can have several different library folders on your hard drive.
A template is a copy of the artwork stored in the library,which can be reused in different scenes. Once a template is stored in the library, it is accessible from any project. Dragging a template into your scene copies the content to your timeline and does not create a link to the original. This individual copy can be modified at anytime.
You can create a template out of pieces of animation content, such as elements, drawings, images, or sounds or even collections of animation content such as drawings, images and sounds in one single template.
The Library window is the centre for managing reusable content in Toon Boom Studio.

The Library view is used to create and manage your templates, display the folders and manage all of the content.
| 1. | Preview |
| 2. | Library List |
| 3. | Templates List |
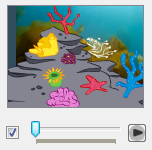
You can use the Preview area to check the contents of the Library. You can preview any type of template. However, if your template consists of a peg or a camera element only, nothing is going to show in the preview window.
To preview content in the library:
| 1. | In the Library view, make sure that the preview checkbox is enabled. |

| 2. | Select the template you want to preview: |
| ‣ | In the Library list, select a Scene folder to display the entire scene in the preview area. |
OR
| ‣ | In the Template list, double-click on the template you want to preview. |
The preview appears in the Preview area.
| 3. | If there are multiple frames in the selected template or scene, click on the Play button to play it back. You can also use the slider to select the frame you want to see. |


The Library List is used to navigate through the different libraries and subfolders. You can also open, close and create new libraries from here.
The Library List contains four default Libraries:
| • | Animation: This library stores all the elements and drawings contained in your project. It is organized by scene and is constantly updated as you work in your project. |
| • | Local: This library store templates that you want to use in the current animation project. In your system, this library is stored in the Template folder inside of your project's main folder. |
| • | Global: This library stores templates that you can use in any project animation that you create on your computer. |
| • | Toon Boom Templates: This library stores templates provided by Toon Boom Studio. Here you can find interesting artwork organized in subfolders,called catalogs, by categories such as Backgrounds, Storyboarding, Props, Characters, Cut-out Characters, Clip Arts and Special Events. You cannot edit this library. |

The templates contained in the selected Library list are displayed on the right side of the Library view as thumbnails, either as a list or as details.
To change the templates list display:
| 1. | In the Library view's right side, right-click and select View > List, Thumbnails or Details. |
As you create templates, you will soon realize that they need to be organized. You can create different libraries and catalogs to easily have access to your assets.
For example, in your global library, you can create a different library for each project and divide it into several categories, such as:
| • | Characters |
| • | Props |
| • | Backgrounds |
This topic is divided as follows:
| • | Creating a Library |
| • | Opening and Closing a Library |
| • | Creating a Catalog |
| • | Renaming a Catalog |
| • | Deleting a Catalog |
| • | Refreshing the Library |
| • | Reloading Default Templates |
| • | Saving the Library |
You can create libraries in the Library view.
To create a library:
| 1. | In the Library List, right-click and select Create Library. |
The Browser window opens.
| 2. | Browse for the location where you want your new library to be stored. |
| 3. | Click Make New Folder. |

| 4. | Give a relevant name to your new library and click OK. |

The new library appears in the Library list area.

To rename a library:
| 1. | In the Library list, select the library you want to rename, right-click and select Rename Library. |
The library name becomes an editable field.
| 2. | Rename the Library and press [Enter] to validate. |
You can load libraries of templates stored on your computer or on another computer through your network.
Libraries make it easier for you to work on productions with other users who share the same templates. Toon Boom Studio identifies libraries with the extension *.tbc. To load a library, the folder must have a file with the *.tbc extension.
To load and close a library:
| 1. | Right-click in the library list and select Open Library. |
A browser dialog box opens.
| 2. | Locate the library you want to open and click Open. |
| 3. | The selected library appears in the library list. |
To close a library:
| 1. | Select the library you want to close and right-click on the library and select Close Library. |
If you have made changes to the library since you last saved the global library, a message appears asking you to confirm your desire to close the library.

| ‣ | Click Yes to close the library without saving changes. |
| ‣ | Click No to keep the library open so that you can save changes. |
| 2. | Select File > Save Global Library to save changes to the library. |
Symbols and templates libraries need to be organized, you can create different subfolders in the Library view so that you can gain easy access to your assets. These subfolders are called catalogs.
To create a catalog:
| 1. | In the Library view's left side, select the library to which you want to add a catalog. |
| 2. | Right-click on the selected library and select New Catalog. |
The new folder appears in the Library. When you have a library with catalogs, click on the plus sign (+) to expand it to make the catalogs visible.

| 3. | Name the new catalog and press [Enter] to validate. |

To rename a catalog:
| 1. | In the Library list, select the catalog you want to rename, right-click and select Rename Catalog. |
The catalog name becomes an editable field.
| 2. | Rename the catalog and press [Enter] to validate. |
To delete a catalog:
| 1. | In the Library list, select the catalog you want to delete, right-click and select Delete. |
The catalog is deleted.
Sometimes you may need to refresh the Template list to see the latest changes.
To refresh the library:
| 1. | In the Template list, right-click and select Refresh or press [F5]. |
The Template list is refreshed.
If you close the Toon Boom Templates library, you can always quickly bring it back to the library list.
To reload the default Templates:
| 1. | In the Library list, right-click and select Reload Default Templates. |
The Toon Boom Templates library is reopened.
When you save your Toon Boom Studio project, the library is automatically saved. You can also save only the changes made to the library without saving your Studio project.
To save the library:
| 1. | Select File > Save Global Library. |
If you want to reuse artwork and animation from your project into other scenes, you need to create a template out of it.
This topic is divided as follows:
| • | Creating a Template |
| • | Deleting a Template |
| • | Editing a Template |
| • | Template Properties |
| • | Importing Multimedia files into the Library view |
| • | Importing a Template in Your Scene |
| • | Linking Templates to Media Elements |
| • | Copying Selected Template Contents into Your Animation |
| • | Using Paste Special to Update Content from a Template |
In Toon Boom Studio, creating a template is as easy as selecting what you want from the Exposure Sheet or Timeline view and dragging it into the Library view.
You can create templates from any piece of animation content:
| • | From the Exposure Sheet view, you can create templates from single or multiple images and drawings, or sounds. |
| • | From the Timeline view, you can create templates from single or multiple layers, or from a selection of frames across multiple layers. You can store anything available in the Timeline view as a template. |
To create a template:
| 1. | Make a selection of what you want to include in the template: |
| ‣ | In the Timeline view, select some cells or layers. |

OR
| ‣ | In the Exposure Sheet view, select some cells from one or multiple columns. |

| 2. | In the Library view, select the destination library or catalog from the library list. |
| 3. | Drag the current selection to the template list in the Library view. |

The template is added to the template list.
| 4. | The name of the template is shown as an active text field, type the desired name for your template and press [Enter] to validate. |

To rename a template:
| 1. | In the Library view, select the folder containing the template to rename. |
| 2. | Select the template you want to rename from the template list. |
| 3. | Right-click on the selected template and select Rename Template. |
| 4. | Enter the new name in the active text field and press [Enter] to validate. |
The template is renamed.
You can easily delete templates from the Library view if you do not need them anymore. This action can be undone if necessary.
To delete a template:
| 1. | In the Library view, select the folder containing the template to delete. |
| 2. | Select the template you want to delete from the template list. |
| 3. | Right-click on the selected template and select Delete Template or press [Del]. |
The template is removed from the library.
You can modify the templates contained in the Global, Local and any Library you created. A template is like a scene, you can open it and edit it as any regular project.
If you want to do some modifications in your templates, you can edit them using the Edit Template command.
To edit templates:
| 1. | In the Library view, select the folder containing the template to modify. |
| 2. | Select the template you want to edit from the template list. |

| 3. | In the Library window, right-click on the selected template you want to edit and select Edit Template from the pop-up menu. |
The identification of the active scene changes in the Scene Manager view.

The contents of the template you are editing appear in all views and the title bar on the Exposure Sheet and Timeline views changes to indicate that you are currently editing a template.

| 4. | Now that you are in template editing mode, you can make any change you want to the contents of the template in any the views. You can adjust timing, add drawings, edit existing drawings or even add layers. |

| 5. | Save your template. |
| ‣ | Select File > Save to save the changes to the local and global template, as well as the animation project. |
| ‣ | Select File > Save Global Library to save the contents of the Library view only and not the animation project. |
| 6. | To exit the edit template mode, in the template list of the Library view, right-click on the selected template and select Return to Scene. You can also double-click on the scene name in the Scene Manager view. |
| 7. | In the Library view, right-click in the template list and select Refresh or press [F5] to refresh the templates so that the thumbnail displays the latest changes. |

If you need more information about a template, you can view the template's properties. The template's properties shows the following information:

| 1. | The name and a preview thumbnail of the template. |
| 2. | The template's type and version of Toon Boom Studio that was used. |
| 3. | The name of the artist who created the template and copyright information. |
| 4. | The size of the template and the date of the latest modification. |
| 5. | The contents of the template and their duration. |
To display a template's properties:
| 1. | Right-click on a template and select Template Properties. |
The Properties dialog box opens.
If you have a SWF file, a QuickTime file, a sound file, an image, or even another template that is not currently in your animation set, you can import it into the Library view to gain quick access to them.
To create templates from multimedia files:
| 1. | In the Library view, select the library into which you want to import the multimedia file. |
| 2. | Right-click in the template list and select Import > and one of the following choices: |
| ‣ | Import Image File: Imports a bitmap image. |
| ‣ | Import Movie File: Imports a movie file. |
| ‣ | Import Sound File: Imports a sound file. |
| ‣ | Import Template File: Imports a template created in Toon Boom Studio. |
A browser opens.
| 3. | Browse and select the file you want to import and click OK. |
The file is added in the library.
You can drag a template from the Library view to the Exposure Sheet or Timeline view to add its contents to your animation.
To import a template into your scene:
| 1. | In the Library view, select the template you want to import. |
| 2. | Drag the selected template to the Camera view or Timeline view's left side. |

| ‣ | You can also drag a template to the Timeline view's right side into existing layers if the layer structure is the same as the existing one. |

You must use media elements to link templates to your animations. Media elements identify the contents they contain as references to a centrally stored file. If the template you link contains multiple elements, all of those elements are composited into one element, the media element.
Linking templates has two advantages:
| • | It keeps the file size of your SWF animations small. |
| • | It updates and manages frequently-used material in a central location. |
To link a template to a media element:
| 1. | Select Element > Add > Media. |
A new element appears in the Timeline view.
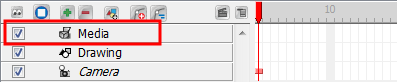
| 2. | In the Library view, select the template you want to link and drag it to the media element you created in the Timeline view's right side. |

| ‣ | You can also create a media element as you link a template, by pressing [Alt] as you drag the template to the Timeline view's left side. |

Studio links to the original file.
When you drag templates from the Library window, you can open the Timeline Drag & Drop Preferences to select the template contents that you want to copy into your animation.
To copy selected template contents into your animation:
| 1. | In the Library view, select the template you want to copy. |
| 2. | Drag the template to the Timeline view and place the template on top of the elements where you want to place it. |
You must select the same number and hierarchy of elements as there are in the template. Otherwise you cannot complete the drag operation. Refer to the Template Properties topic to learn how to open the Template properties.
| 3. | Press and hold [Alt] and then release the mouse button. |
The Timeline Drag & Drop Preferences dialog box opens.

| 4. | Select the properties you want to copy to the animation. |
| 5. | Click OK. |
You can use the Paste Special command to update selected content with material stored in a template file. You can use this command to update drawings, timing, layout, as well as palettes.
To use paste special to update content:
| 1. | Select the template in the Library and select Edit > Copy Template. |
| 2. | In the Timeline, select the elements you want to paste the template onto. |
You must select the same number and hierarchy of elements as are in the template. Otherwise you cannot complete the paste operation. Refer to the Template Properties topic to learn how to open the Template properties.
| 3. | Select Edit > Paste Special or press [Ctrl] + [B] (Windows) or [⌘] + [B] (Mac OS X). |
The Paste Special dialog box opens.

| 4. | Select the options from the Paste Special dialog box. |
| 5. | Click OK. |