
Download Documentation
Positioning the Scene Elements
In Studio it is easy to position your elements. You can do this by using the Select  tool or the Properties view.
This topic is divided as follow:
Positioning Elements Using the Select Tool
Using the Select tool, you can position, scale, rotate, and skew elements directly in the Camera view without creating a keyframe.
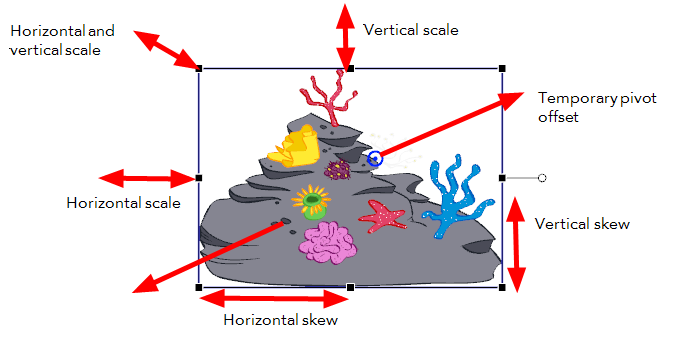
To use the Select tool:
|
1.
|
In the Animation Tools toolbar, click the Select tool, select Tools > Animation Tools > Select, or press [6]. |
|
2.
|
In the Camera or Timeline view, select the element you want to position. |
|
3.
|
Use one of the bounding box handles to position and transform your element. |
|
‣
|
Hold down the [Shift] key as you scale to keep the ratio when using the corner handles. |
|
‣
|
Hold down the [Shift] key as you rotate to lock the rotation every 15 degrees. |
Positioning Elements Using the Properties View
Using the Properties view, you can position, scale, rotate, and skew elements using exact values.
To use the Properties view:
|
1.
|
In the Timeline view, select the layer of the element you want to position. |

The layer is displayed in the Properties view.

|
2.
|
In the Properties view, set the positioning values: |
|
‣
|
Rotation: Enter a rotation angle value for the position of your element. |
|
‣
|
Skew: Enter a skew angle value for the position of your element. |
|
‣
|
Offset: Enter the X and Y values for the position of your element. |
|
‣
|
Rotation Pivot: Enter the X and Y values for the position of the Rotation Pivot of your element. This is the central point to which your rotation angle is calculated. |
|
‣
|
Scale Pivot: Enter the X and Y values for the position of the Scale Pivot of your element. This is the central point to which the scaling is calculated. |
|
‣
|
Scale: Enter the scaling value for the position of your element. 1 = 100%. |
|
‣
|
Keep Proportions: Retains the proportions of the original element when scaling it down or up. |
You can change the type of unit that is displayed and used in the Properties view to inches or centimetres instead of the default Field values—see
Preferences.
Flipping Elements
Sometimes you may need to flip a character element when you are positioning it. For example, if you want a face to look in the opposite direction. This can be easily done using the Flip commands which can produce a horizontal or vertical mirror image of your element.
To flip an element:
|
1.
|
In the Camera or Timeline view, select the element you want to flip. |
|
2.
|
Select Element > Transform > Flip Horizontal or Flip Vertical. |

Show Outline Selection
When you position many overlapping elements, use the Show Outline Selection option. This is very useful and once enabled it displays the outline of the selected element as blue lines that appear on top of everything else. 
To enable the Show Outline Selection option:
|
1.
|
Select View > Show Outline Selection. |
Locking Elements
When you are positioning your elements in the Camera view you can lock the layers so that they will not move. Locking layers prevents them from being accidentally selected or moved.
Locking and Unlocking a Layer
To lock a layer:
|
1.
|
In the Timeline view, select the element you want to lock. |

|
2.
|
In the Timeline View Menu, select Lock > Lock or right-click on the selected layer and Lock > Lock. |
The name of locked layers appears in red.

To unlock a layer:
|
1.
|
In the Timeline view, select the locked element you want to unlock. |

|
2.
|
In the Timeline View menu, select Lock > Unlock or right-click on the selected layer and Lock > Unlock. |
Locking and Unlocking All Layers
To lock/unlock all layers:
|
1.
|
In the Timeline view, select a layer. |
|
2.
|
In the Timeline View menu, select Lock > Lock All or Unlock All or right-click on the selected layer and Lock > Lock All or Unlock All. |
All layers in the Timeline view are locked or unlocked depending on what you selected.
Locking All Other Layers
To lock all other layers:
|
1.
|
In the Timeline view, select the element you want to keep unlocked. |

|
2.
|
In the Timeline View menu, select Lock > Lock All Others or right-click on the selected layer and Lock > Lock All Other. |
All layers, except the selected one is locked.
