There are several reasons why you may need to import a movie into your animation project— to create a rotoscope animation, add 2D animation to a live video or incorporate a television showing a program inside your scene.
Studio allows you to import several movie types into your project:
| • | AVI |
| • | MP4 |
| • | MPG |
| • | QuickTime |
AVI, MP4, MPG and QuickTime movies have one thing in common. They are all bitmap movie files. When they are imported into Studio, a bitmap image sequence is created.
To import an AVI, MP4, MPG or QuickTime movie:
| 1. | Select File > Import File. |
The Open browser opens.
| 2. | Browse for your video file and click Open. |
The Import Options dialog box opens.
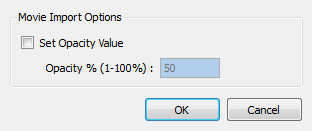
| 3. | In the Import Options dialog box, set the Movie Import Options: |
| ‣ | Set Opacity Value: Sometimes you want to import a movie as a reference and you would like it to have a specific transparency value. Select this option to edit the opacity value of the movie. |
| ‣ | Opacity% (1-100%): When the Set Opacity Value option is selected , the Opacity% field becomes available. Type in the desired Opacity% value from 1 to 100. |
| 4. | Click OK. |
The video appears on its own image layer in the Timeline and Exposure Sheet view as a bitmap image sequence.

You can import a bitmap movie file in an already existing image layer.
To import a movie as an image sequence:
| 1. | In the Timeline or Exposure Sheet view, select the cell on which you want your movie to start playing. |
| 2. | Right-click in the cell and select Import Movie File as Image Sequence. |
The Open browser opens.
| 3. | Browse for your movie file and click Open. |
The Import Options dialog box opens.
| 4. | In the Import Options dialog box, set the Movie Import Options: |
| ‣ | Set Opacity Value: Sometimes you want to import a movie as a reference and you would like it to have a specific transparency value. Select this option to edit the opacity value of the movie. |
| ‣ | Opacity% (1-100%): When the Set Opacity Value option is selected , the Opacity% field becomes available. Type in the desired Opacity% value from 1 to 100. |
| 5. | Click OK. |
The image sequence appears in the image layer at the selected starting cell.