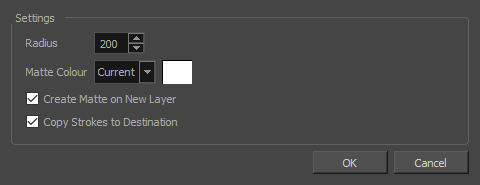
The Generate Auto-Matte dialog box enables you to quickly fill in sketch objects, hiding anything that is behind the object.

For tasks related to this dialog box, see Automatically Filling Drawings with a Matte.
- Do one of the following:
- In the top menu, select Layer > Generate Auto-Matte.
- In the layer panel, right-click on a layer and select Generate Auto-Matte.
| Parameter | Description |
| Radius | The radius used to analyze the drawing to generate its matte. The default value is 200 and its value can range between 1 and 9999. A lower setting will create a more precise matte but may make the generation slow and the resulting matte too detailed for its purpose. A higher setting will make a more approximate matte. |
| Matte Colour | The colour to fill the matte with. By default, this is set to Current, which is the currently selected colour in the Colour view. You can select Custom in the drop-down, then click on the colour swatch to select a different colour. |
| Create Matte on New Layer |
If checked, a new layer will be created under the source layer and the matte will be stored in that layer. The new layer will have the name of the source layer followed by _Matte. If unchecked, the matte will simply be added to the source drawing in its source layer, behind the existing artwork. NOTE When creating a matte on a new layer, all of the source layer's properties (ie: alignment, export options, opacity) as well as its transformations and animations are copied onto the new layer.
|
| Copy Strokes to Destination |
If checked, the contours of the source drawing will be copied onto the matte, as invisible strokes. This separates the matte into different sections that you can fill with different colours, based on the outlines of the drawing. |