After creating your storyboard, the next step is to make it into an animatic. An animatic is basically a video that plays out each panel of your storyboard. Each panel should be timed to match the intended timing of actions, and each scene should be timed to match the intended pace of the story. Camera movements can be animated to simulate what the action will look like relative to the camera movements and framing. Layers in the storyboard can also be animated to make the action and its timing more legible.
Sound effects, voice clips and music tracks, be them provisional or final, can be added so that action can be paced around them, as well as to make a draft of the sound mix for the final product. Videos and still images, such as opening or ending sequences, overlays, captions, logos, or live action footage can also be added to the animatic to be used as references or so that they do not have to be sketched into panels.
In Storyboard Pro, you can create an animatic from your storyboard by using the Timeline view. The Timeline view is very much like the timeline in a video editing software. Among other things, it allows you to visually adjust the timing of each panel, to import, cue and clip sound and video clips, to animate camera movements, to animate layers and to add transitions between scenes. Hence, it will accompany you in each step towards making your animatic.
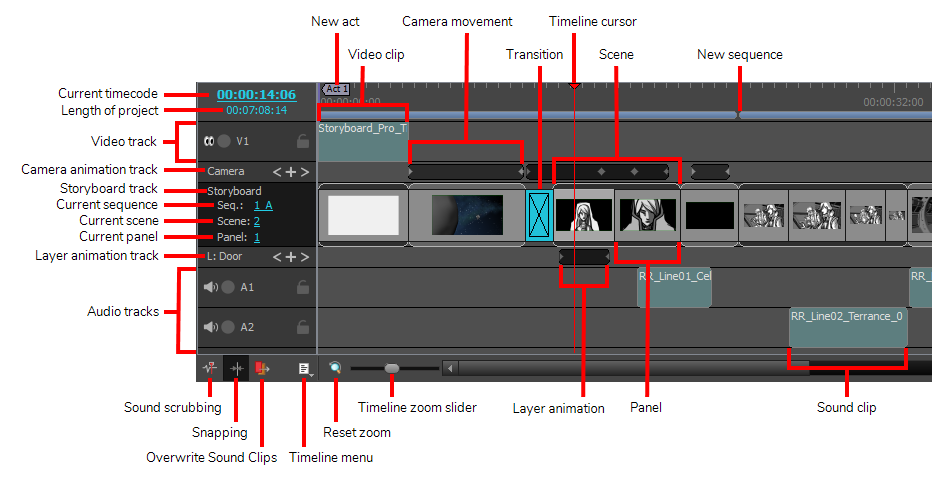
When you first open the Timeline view after creating a storyboard, you will notice that all the panels of your storyboard are already in the track, and that they are all already timed to last one second each. Therefore, your storyboard is already a barebone animatic, and you can just start adjusting the length of each panel to match the intended timing of the actions and the intended pace of the scenes.
In the end, an animatic can be exported into video files or even Toon Boom Harmony scenes—see How to Export your Project.
- Do one of the following:
- In the top-right corner of the Thumbnails view, click on the Add View
 button and select Timeline.
 - Select Windows > Timeline.
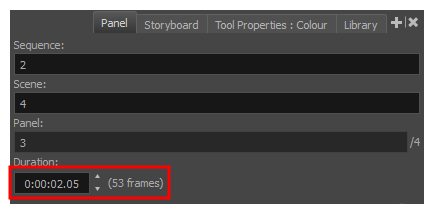
Setting the Panel Duration
There are several ways of setting the duration of a panel. The panel view allows you to type in the exact duration of the current panel. The Timeline view allows you to visually extend or shorten panels. You can also fine-tune the duration of a panel using the Add Frame to Panel and Remove Frame to Panel keyboard shortcuts.
- In the Timeline or Thumbnails view, select a panel.
- In the Panel view, do one of the following:
- In the Duration field, type in the exact desired length for the panel, in the H:MM:SS:FF format, where H means hours, M means minutes, S means seconds and F means frames.
- Right of the Duration field, click on the Up
 arrow to extend the panel by one frame, or on the Down
  arrow to shorten the panel by one frame.
- Place the cursor over the right edge of the panel you want to resize.
The resize icon displays.
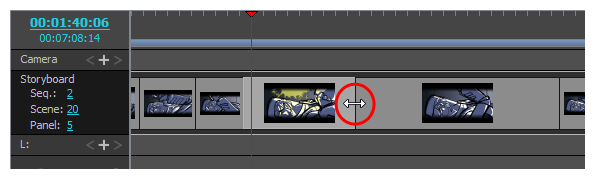
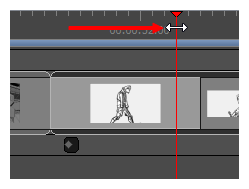
- Click and drag the edge of the panel to the right to extend it, or to the left to shorten it. As you drag, the new length of the panel is indicated, along with the amount of time you are adding or subtracting from it.
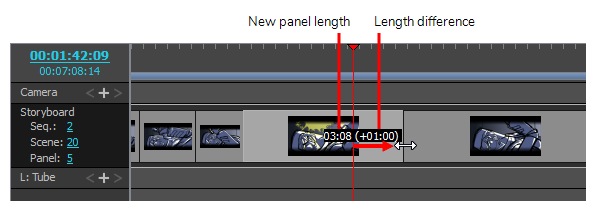
All subsequent panels will be rippled forward or backward to preserve their length.
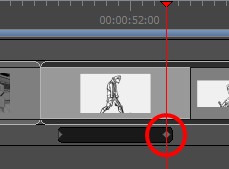
- Place the cursor over the right edge of the panel you want to resize.
The resize icon displays.
- While holding the Alt key, click and drag the edge of the panel to the right to extend it, or to the left to shorten it. As you drag, the new length of the panel is indicated, along with the amount of time you are adding or subtracting from it.
The length of the following panel will be adjusted to avoid shifting subsequent panels.
- In the Timeline or Thumbnails view, select a panel.
- Do one of the following:
- Press + to add a frame to the panel, or - to remove a frame from the panel.
- From the top menu, select Storyboard > Add Frame to Panel or Storyboard > Remove Frame from Panel.
Animating Layers
By default, layers in Storyboard Pro are static, but they can be animated.
A layer is animated by setting it in different positions, angles or sizes at two different frames in the timeline, then letting Storyboard Pro calculate the position, angle and size of the layer for each frame between those two frames. The frames at the beginning and end of an animation are referred to as keyframes.
You can animate a layer by enabling animation on it, which will create a keyframe for it in its current position, at the current frame. From there, you can just go to another frame and change its position, which will automatically create another keyframe at the current frame. At this point, the layer is already animated from its original position to the position you just moved it to.
- In the Timeline view, select the panel with the layer you want to animate.
- Move the Timeline cursor to the exact time where you want to create the first keyframe for your animation.
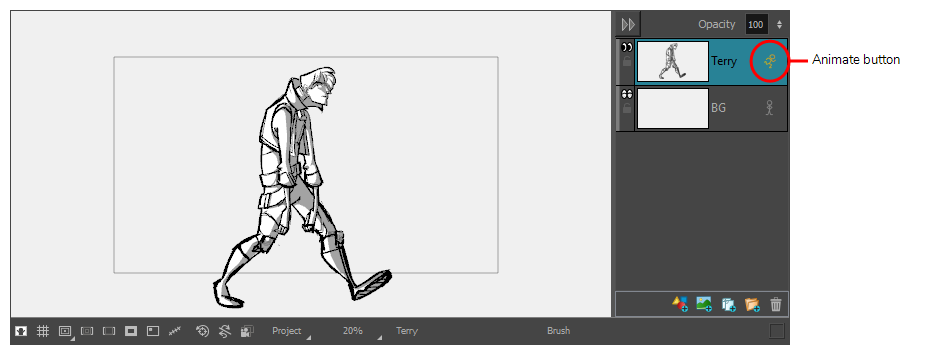
- In the Layer panel of the Stage or Camera view, click on the Animate
 button of the 3D object you wish to animate.
The Animate button turns yellow and changes shape:  .
.
In the Layer Animation track of the Timeline view, a keyframe is created at the current frame. This keyframe stores the position, angle and size of the layer at the current frame.
- In the Tools toolbar, select the Layer Transform
 tool.
tool.
In the Stage or Camera view, the controls of the Layer Transform tool appear around the selected drawing layer.
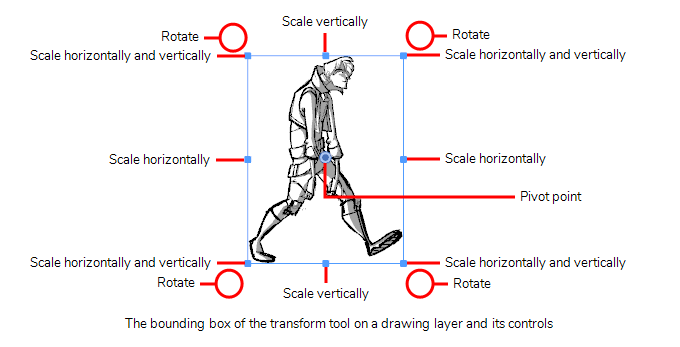
- Using the manipulator box, transform the layer so that it is in the position, angle and size you want it to be at the beginning of the animation:
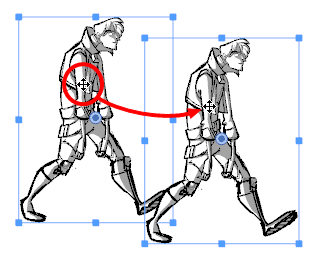
- To move the layer, either click on its artwork or on the blue point in the centre, then drag it to the desired position.
- If you are having trouble dragging the layer by its artwork, you can also click and drag on the blue point
 in the centre. However, this point may be obstructed by the layer's pivot point
  . If that is the case, you can click and drag on the pivot point to move it out of the way, then click and drag on the centre point to move the layer.
 - You can also nudge the selection by using the arrow keys on your keyboard.
- You can also enter specific coordinates in the Horizontal Offset
 and Vertical Offset
  fields in the Tool Properties view.
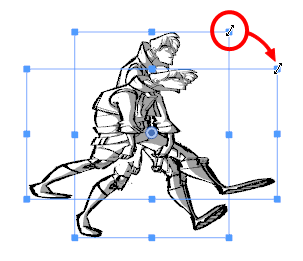
 - To scale the layer, click on one of the squares at the edges or corners of the manipulator box and drag them to stretch or shrink the drawing.
- You can preserve the horizontal and vertical proportions of the selection by holding the Shift key.
- You can also enter specific scale percentages in the Horizontal Scale
 and Vertical Scale
  fields in the Tool Properties view.
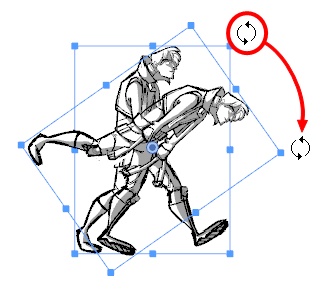
 - To rotate the layer, move the cursor just outside of one of the corners of the manipulator box until the mouse cursor becomes
 . Then, click and drag in either direction to rotate the layer clockwise or counterclockwise.
 - You can rotate the artwork in 15° increments by hold the Shift key.
- You can also enter a specific angle in degrees in the Angle
 field of the Tool Properties view.
 - You can also rotate the clip in 90° increments by clicking on the Rotate 90 CW
 button in the Tool Properties view to rotate it 90° clockwise, or on the Rotate 90 CCW
  button to rotate it 90° counterclockwise.
 - To flip the layer horizontally, click on the Flip Horizontally
 button in the Tool Properties view.
 - To flip the layer vertically, click on the Flip Vertically
 button in the Tool Properties view.
 - To reset a layer to its original position, scale and angle, do one of the following:
- Select Layer > Reset Transform.
- Press Ctrl + R (Windows) or ⌘ + R (Mac OS X).
- In the Timeline view, move the cursor to the frame where you want to create your second keyframe.
- In the Stage or Camera view, use the manipulator box to transform the layer so that it is in the position, angle and size you want it to be at the end of the animation.
A keyframe is created at the current frame as soon as you make the first transformation.
- Move the timeline cursor back to the beginning of the panel.
- In the Playback toolbar, click on the Play
 button to preview the animation.
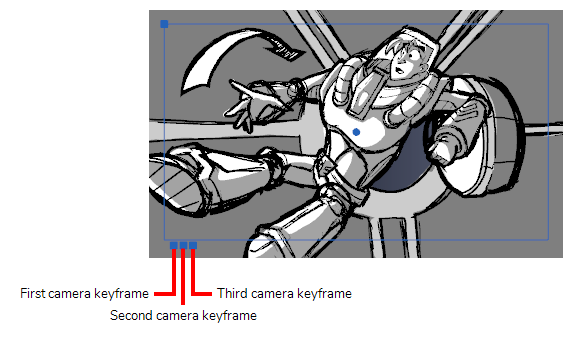
Animating the Camera
To create camera movement in a scene, you must start by creating at least two camera keyframes, then set the position of the camera in each of those keyframes. Storyboard Pro will interpolate the position of the camera on each frame between two keyframes.
- Select the Camera tool by doing one of the following:
- From the Tools toolbar, select the Camera
 tool.
tool. - From the top menu, select Tools > Camera.
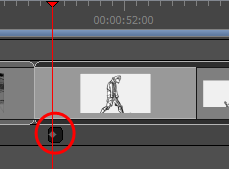
- In the Timeline view, click and drag the timeline cursor to the frame at which you want your camera movement to begin.
- Create a camera keyframe by doing one of the following:
- In the Timeline view, in the left column of the Camera track, click on the Add Keyframe
 button.
 - In the top menu, select Camera > Add Camera Keyframe at Current Frame.
- In the Tool Properties view, click onthe Add Keyframe
 button in the Camera Transform panel.
A keyframe is added in the Camera track of the Timeline view, where the timeline cursor is.
- In the Timeline view, click and drag the timeline cursor to the frame when you want your camera movement to end.
- Create a camera keyframe by doing one of the following:
- In the Timeline view, in the left column of the Camera track, click on the Add Keyframe button.
- In the top menu, select Camera > Add Camera Keyframe at Current Frame.
- In the Tool Properties view, click onthe Add Keyframe button in the Camera Transform panel.
Another keyframe is added in the Camera track of the Timeline view, where the timeline cursor is.
- Do one of the following:
- In the Camera track of the Timeline view, select the camera keyframe you want to modify.
- In the Stage or Camera view, zoom out to see all of the camera frames. Then, select the camera frame you want to modify by clicking on its edge or its centre point.
TIPEven if your camera frames are in the same position, you can still select a specific one in the Stage or Camera view. Just below the bottom-left corner of the camera frames, you will find blue square-shaped dots. Each of these dots can be clicked on to select a specific camera frame. If two or more camera keyframes are in the same position, the order of these dots will represent their relative position on the timeline. The leftmost dot can be used to select the first camera keyframe, the second leftmost dot can be used to select the second camera keyframe, etc.
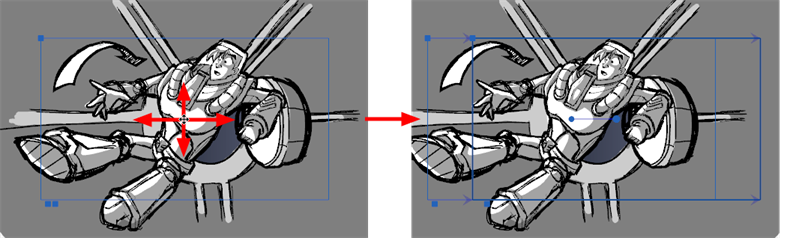
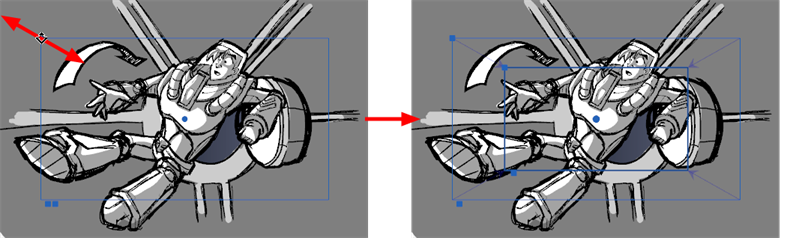
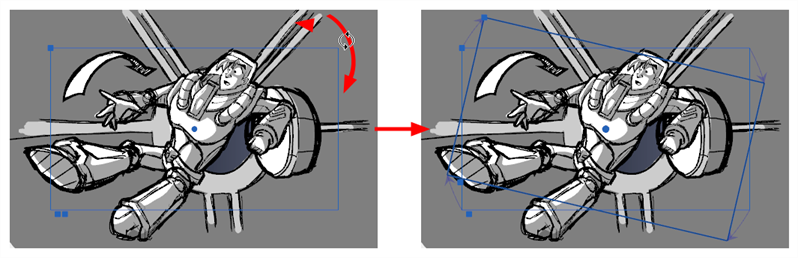
- Use one of the following methods to modify the camera frame:
- Move: Move the mouse cursor over the edge or the centre point of the camera frame until the mouse cursor becomes
 , then click and drag the camera frame to move it.
 - Truck In or Truck Out: Move the mouse cursor over the point in the top-left corner of the camera frame until the mouse cursor becomes
 , then click and drag this corner to shrink or stretch the camera frame. Shrinking the camera frame will make it zoom in, and stretching it will make it zoom out.
 - Rotate: Move the mouse cursor just outside of one of the corners of the camera frame until the mouse cursor becomes , then click and drag the corner in either direction to rotate the camera frame clockwise or counterclockwise.
- Repeat for the other camera keyframe(s), if needed.
- Move the timeline cursor back to the beginning of the scene.
- In the Playback toolbar, click on the Play button to preview the camera movement.
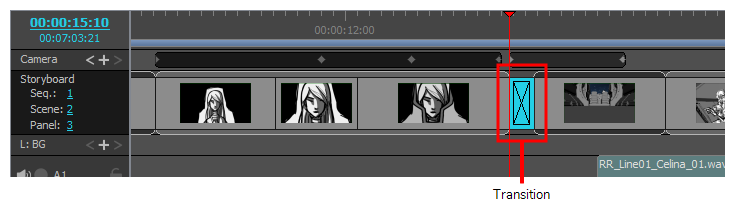
Adding Transitions
Transitions are animated effects that can be added between two scenes to move from one scene to the next gradually, such as a dissolve or an edge wipe. Among other things, adding transitions can help fine-tune the pace between your scenes, or mark changes in the story setting.
- In the Thumbnails or Timeline view, select the first of the two scenes between which you want to add a transition. For example, if you want to add a transition between scenes 2 and 3, select any panel from scene 2.
![]()
-
Do one of the following:
- From the Storyboard toolbar, click the New Transition
 button.
 - Select Storyboard > Add Transition.
- Right-click the scene thumbnails and select Add Transition.
- From the Storyboard toolbar, click the New Transition
- From the Storyboard toolbar, click the New Transition button.
- Select Storyboard > Add Transition.
- Right-click the scene thumbnails and select Add Transition.
![]()
- Click on the transition to select it.
- Open the Panel view. When a transition is selected, the Panel view displays its properties and allows you to change them.
- In the Type drop-down, select which type of transition you want to use:
- Dissolve: Fades the first scene out to black, then fades the second scene in from black.
- Edge Wipe: Wipes the first scene out with the second scene, with a straight line going all the way across the screen. The angle of the line can be customized.
- Clock Wipe: Wipes the first scene out with the second scene, with a line going from the centre of the screen to its edge, which rotates 360 degrees to cover the whole screen. The initial angle and direction of the line can be customized.
- Slide: When set to Slide In, this makes the second scene slide from the edge of the screen over the first scene. When set to Slide Out, this makes the first scene slide towards the edge of the screen, leaving the second scene on the screen as if it had always been behind it. The angle at which the scene slides in or out can be customized.
- Determine the length of the transition by doing one of the following:
- In the Timeline view, click and drag the right edge of the transition towards the right to extend it, or towards the left to shorten it.
-
In the Panel view, right of the duration field, click on the Up arrow to extend the transition by 1 frame, or on the Down arrow to shorten the transition by one frame.
- In the duration field of the Panel view, type in the duration of the transition in the H:MM:SS:FF format, where H means hours, M means minutes, S means seconds and F means frames
Adding Sound
Importing Sound Clips
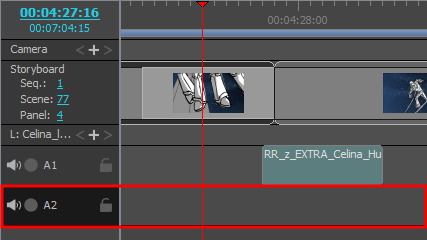
You can import sound files into the audio track in your project's timeline. You can cue and edit sound clips so that they are timed with the action in your animatic. By default, your project has a single audio track, but more audio tracks can be added as needed.
- In the Timeline view, select the audio track in which you want to import sound clips.
- Do one of the following:
- In the top menu, select File > Import > Sound Clip.
- Right-click on the audio track in which you want to import sound clips, then select Import Sound Clips.
- Right-click on the empty space below the tracks in the Timeline view, then select Import Sound Clips.
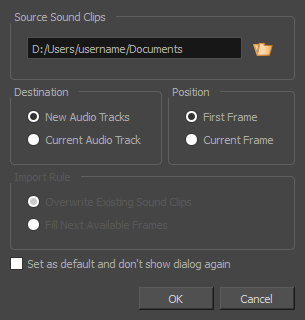
The Import Sound Clips dialog box opens.
- Click on the Browse
 button.
- In the file browser, locate and select the sound file that you want to add to your project, then click on Open.
- In the Target Audio Track panel, select New Audio Track if you want to create a new audio track and import the sound file in it, or Current Audio Track if you want to import the sound file into the selected audio track.
- In the Target Frame section, select whether you want the sound clip to be added to the First Frame of the audio track or to the Current Frame, where the timeline cursor is.
- If you selected the Current Audio Track option, and if other sound clips are present in the target audio track, specify what will happen if the imported sound clip is too long and spans over another existing sound clip by selecting an Import Rule:
- Overwrite Existing Sound Clips: If there are existing sound clips where the imported clips are supposed to be added, the existing clips will be overwritten.
- Fill Next Available Frames: If there are existing sound clips where the new clips are supposed to be added, the clips will be trimmed just before the existing clips.
- Select the Set as default and don’t show dialogue again option if you want to use the same settings next time you need to import a sound file.
Adding Audio Tracks
If you need to have several sound clips playing at the same time, you must add additional audio tracks to your project so that you can cue several sound clips in the same areas of the timeline.
- Do one of the following:
- In the top menu, select Storyboard > New > New Audio Track.
- In the Timeline view, either right-click on an existing audio track or underneath all tracks, then select New Audio Track.
- In the Clips and Tracks toolbar, click the New Audio Track
 button.
You can now import or move sound clips to the new audio track.
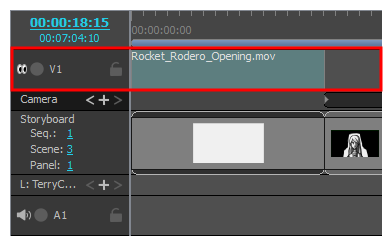
Adding Images and Videos
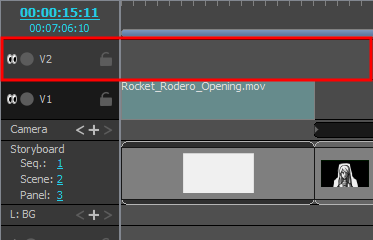
By default, when you create a Storyboard Pro project, the only track containing visuals in your animatic is the storyboard track. However, you can also add video tracks to your project, which can contain still images or video files that will display over or under your animatic. This can be useful if you need to use reference images or videos, to have elements such as logos or backgrounds span over several panels or scenes, or to insert videos, such as opening sequences, credit sequences or live action footage to your animatic.
Importing Image or Video Clips
Since your project does not have a video track by default, you can start by importing an image or a video into a new video track.
- Do one of the following:
- In the top menu, select File > Import > Videos/Images as Clips.
- Right-click on the empty space below the tracks in the Timeline view, then select Import Videos/Images as Clips.
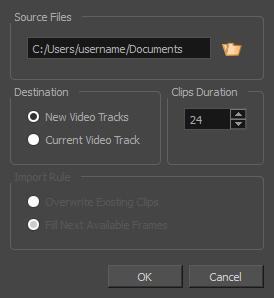
The Import Video Clips dialog box opens.
- Click on the Browse button.
- In the file browser, locate and select the image or video file that you want to add to your project, then click on Open.
- In the Destination panel, select New Video Track.
- If you have selected an image, set the desired duration of the still image in the Clips Duration field. This determines the amount of frames the image clip will span over in the timeline. For example, if the frame rate of your project is 24 frames per second, and you want the image to span for 1 second, set the Clips Duration to 24.
- Click OK.
A video track is created above the storyboard track, and the image or video is added to it as a video clip.
- If you want the video track to display behind the animatic, right-click on the video track and select Move Track Down.
Adding Video Tracks
Just like audio tracks, you can add several video tracks to your project and have clips overlap each other.
- Do one of the following:
- In the top menu, select Storyboard > New > New Video Track.
- In the Timeline view, right-click on an existing video track or in the empty space below the tracks, and select New Video Track.
- In the Clips and Tracks toolbar, click the New Video Track
 button.
You can now import or move video clips to the new video track.