Once you have finished your storyboard or animatic, you can export it to take it to the next stage of your production.
If you look in the File > Export menu in the top menu, you will see that there are many ways of exporting your project. This chapter will introduce you to three commonly used types of export:
- PDF: Exporting your storyboard as Portable Document File (.pdf) creates a document containing a traditional-style animation storyboard, presenting each panels in their chronological order, with their scene and panel numbers as well as their captions. In this format, you can print it or share it digitally, and it can be used as reference or as pitching material.
- Movie: Exporting your animatic as a movie allows you to share your animatic with project collaborators as well as to import it into third party software.
- Harmony: You can export each scene in your animatic into separate Toon Boom Harmony scenes, with the panels inserted into the scenes so they can be used as references to create the animation. If you intend to create your animation in Storyboard Pro, this allows you to quickly take the production from the storyboarding stage to animation.
Exporting a PDF
Exporting a PDF will create a traditional animation storyboard displaying the panels along with their scene and panel number and their captions.
- In the top menu, select File > Export > PDF.
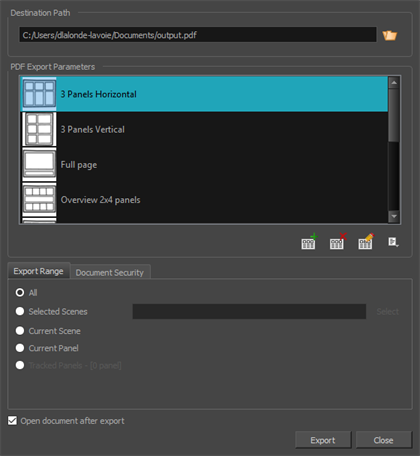
The Export to PDF dialog box opens.

- In the Destination Path section, click the Browse
button.
- In the Save dialog, browse to the location in which you want to export your PDF document. In the File name field, type in the desired name for the document and click on Save.
- In the PDF Export Parameters section, select a layout for the PDF file.
- In the Export Range section, select whether you want to export the entire project, or only specific parts of it:
- All: Exports the entire storyboard.
- Selected Scenes: Select this option to export a specific selection of scenes. Then, click on the Select button to open the Scenes Picker dialog box, in which you can:
- Type the number of a sequence or of a scene in the Sequence or Scene fields in the Filter section, to only show matching sequences or matching scenes in the list.
- Click and drag to select a range of scenes.
- Hold the Ctrl key and click on each scene you want to add to your selection.
- Hold the Shift key, then click on the first scene and the last scene you want to add to your selection, to select every scene between those two scenes inclusively.
- If your project has sequences, click on a sequence to select every scene in that sequence.
- Current Scene: Exports only the currently selected scene.
- Current Panel: Exports only the currently selected panel.
- Tracked Panels:Exports panels on which tracking changes is enabled.
- If you want to view the storyboard after it is exported, check the Open document after export option.
- Click on Export button.
Exporting a Movie
Once you have created your storyboard and animatic, you can export it as a movie file to share it with project collaborators or import it in third party software. You can export your animatic as a video file with audio, or as a sequence of image files, the latter which can be assembled in Harmony or in a third party software.
- In the top menu, select File > Export > Movie.
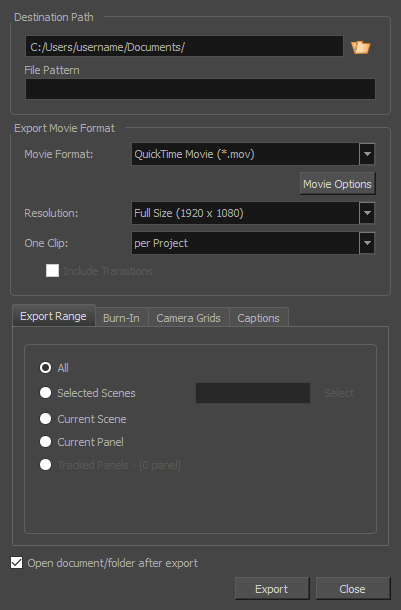
The Export to Movie dialog box opens.

- In the Destination Path section, click the Browse
button and choose a folder in which to save the exported files.
- In the File Pattern field, type in a prefix for the exported files.
- In the Export Movie Format panel, configure the following options:
- In the Movie Format drop-down, select an export format:
- QuickTime Movie (*.mov) to export a video in QuickTime Movie (.mov) format.
- Windows Media Video (*.wmv) to export a video in Windows Media Video (.wmv) format. This option is only available on Windows.
- In the Resolution dropdown, select whether you want the exported movie to be in Full Size, Half Size or Quarter Size, relative to the resolution of your project. It is recommended to export your animatic in full size unless you want to quickly export a test video.
- In the One Clip drop-down, select how you want your video clips to be separated:
- Per Scene: Create one movie file for each scene in your project.
- Per Sequence: Create one movie file for each sequence in your project, if any.
- Per Project: Export your whole animatic into a single video file.
- In the Export Range section, select whether you want to export the entire project, or only specific parts of it:
- All: Exports the entire storyboard.
- Selected Scenes: Select this option to export a specific selection of scenes. Then, click on the Select button to open the Scenes Picker dialog box, in which you can:
- Type the number of a sequence or of a scene in the Sequence or Scene fields in the Filter section, to only show matching sequences or matching scenes in the list.
- Click and drag to select a range of scenes.
- Hold the Ctrl key and click on each scene you want to add to your selection.
- Hold the Shift key, then click on the first scene and the last scene you want to add to your selection, to select every scene between those two scenes inclusively.
- If your project has sequences, click on a sequence to select every scene in that sequence.
- Current Scene: Exports only the currently selected scene.
- Current Panel: Exports only the currently selected panel.
- Tracked Panels:Exports panels on which tracking changes is enabled.
- If you want to automatically play the video or view the exported files once the export is done, check the Open document/folder after export option.
- Click on the Export button.
Exporting to Harmony
Storyboard Pro can automatically export each scene in your project into a scene that can be opened in Harmony, where you can use the animatic to create and time your animation. The resulting Harmony scenes will be the same length as the scenes in your Storyboard Pro project, they will contain each of their panels so that you may animate over them, and they will contain their respective part of the animatic's soundtrack.
- In the top menu, select File > Export > Export to Harmony.
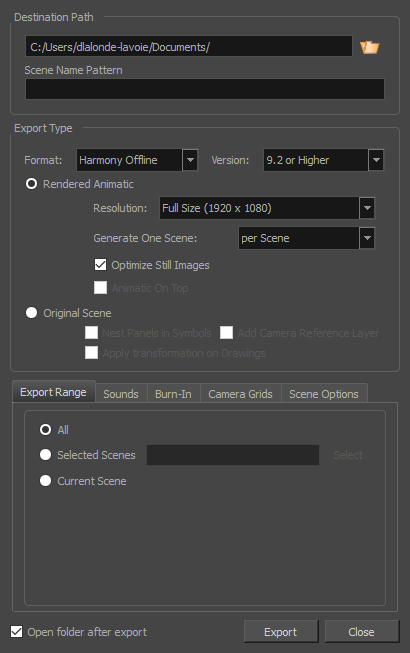
The Export to Harmony dialog box opens.

- In the Destination Path section, click the Browse
button and choose a folder in which to save the exported files.
- In the File Pattern field, type in a prefix for the exported files.
- In the Format drop-down, select one of the following options:
- Harmony Offline: This will create scenes that can be opened in Harmony Stand Alone.
- Harmony Database: This will create a package of scenes that can be imported into a Harmony Server database.
- Select one of the following export types, depending on what you prefer to work with.
- Rendered Animatic: Renders the animatic into a sequence of bitmap images that are assembled into the exported Harmony scenes. This ensures that the content of your animatic is accurately rendered in Harmony, especially if you intend to use an older version.
- Original Scene: Exports the animatic directly into Harmony scenes without rendering it. This preserves the layers, drawings and camera movements so that they can be used in Harmony.
- In the Export Range section, select whether you want to export the entire project, or only specific parts of it:
- If you want to view the exported files once the export is done, check the Open document/folder after export checkbox.
- Click on Export.