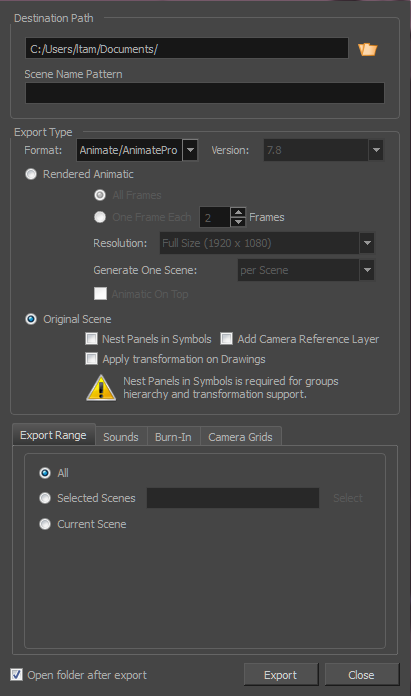
Export to Toon Boom Window
The Export to Toon Boom window lets you export an animatic as Harmony, Animate 2 or Animate Pro 2 scene files. You can export the entire storyboard project or a selection of scenes. You can export the entire storyboard project or a selection of scenes. When the export is ready, you can open it in the destination software. When you first save this new scene, the exported file will be converted in the proper format depending on the software you used.The following elements of your storyboard will be exported: layers, layer motion and camera moves.
Before exporting to Toon Boom, you can use the Layers view to deselect specific layers. In the Layers view, deselect the Toon Boom option from the Export To section. Note that this layer will still be exported to Toon Boom, but it will be disabled. You can enter the symbol and re-enable it at anytime.
To learn more about the Layers view, see About Layers.
- Select File > Export > Export to Toon Boom.
The Export to Toon Boom dialog box opens.

| Parameter | Description |
|
Destination Path |
|
|
Path |
Lets you specify the location and name of the folder for the exported file. |
|
File Pattern |
Lets you set the file name pattern. Leave this field blank to use the default pattern. |
|
Export Target |
|
|
Export to Animate/Animate Pro |
Exports your animatic to Animate or Animate Pro. |
|
Export to Harmony |
Exports your animatic to Harmony Server or Harmony Stand Alone. |
|
Format: Select To Database if you are using Harmony Server or Offline for Harmony Stand Alone. |
|
|
Version: Depending on the Harmony version you have, select either 7.8 or 9.2 or higher. |
|
|
Export Style |
|
|
Rendered Animatic |
Exports a storyboard to be rendered in bitmap images and exports to Animate/Animate Pro/Harmony scene. For each scene in your storyboard, an Animate/Animate Pro/Harmony scene will be created. Use this option if you have 3D content and want to export to Animate, Animate Pro, or Harmony 9.2 and earlier. And also to export to Harmony if you have bitmap drawing layers. |
|
All Frames: Renders the full storyboard project. |
|
|
One Frame Each: Renders only one frame for every chosen number of frames you specify. For example, if you choose to render every 5 frames, then a new image will appear every fifth frame, with each image being held for 5 frames to maintain the timing. |
|
|
Resolution: Lets you select the render size of the project: Full size, half size or quarter size. |
|
|
Generate One Scene: Generates a scene by scene or by selected sequences and panels. |
|
|
Animatic on Top: If you generate scenes based on sequences or acts, this option becomes available. When enabled, the animatic is rendered and placed as the top layer and column in Harmony or Animate. |
|
|
Original Scene |
Exports the storyboard in a project where the vector drawings, layers and camera settings are kept as is. For each shot or scene in your storyboard, a Harmony/Animate scene is created. |
|
Nest Panels in Symbols: Upon export to Harmony or Animate, the panel's content will be nested inside symbols. Instead of having several layers in your root timeline, you will have a single one. You will need to enter the symbol to edit its content. |
|
|
Add Camera Reference Layer: Adds a layer containing the different camera frames on top of the other layers to use as a reference in Harmony and Animate. |
|
|
Apply Transformation on Drawings: Applies transformation on the first and last position of each panel. The in-between animation will be lost. |
|
|
Export Range Tab |
|
|
All |
Exports the entire storyboard. |
|
Selected Scenes |
Select this option and click Select to open the Scenes Picker dialog box in which you can select specific scenes to export. You can also select your scenes per sequences if your project contains sequences. |
|
Current Scene |
Exports only the currently selected scene. |
|
Sounds Tab |
|
|
Keep Original Files |
Keeps and uses all original sound files. |
|
Process Soundtracks Individually |
Creates one audio file per soundtrack. |
|
Merge All Soundtracks |
Creates a single audio file, gathering sounds from every soundtrack of your storyboard |
|
Burn-In Tab |
|
|
Print Time Code |
Prints the project timecode on the video as an overlay on your video. |
|
Print Scene Names and Panel Numbers |
Prints the scene names and panel numbers as an overlay on your video. |
|
Print Additional Duration |
Prints an additional duration on your video, defined by the Units and Repeat menu. |
|
Units |
Displays additional duration information using Time Code or Frames units. |
|
Repeat |
Displays additional duration information per panel, scene or sequence. |
|
Camera Grid Tab |
|
|
Project Safety |
Prints the safe area on your video |
|
4:3 Safety |
Prints the 4:3 safe area on each panel of your storyboard that has a camera movement. |
|
4:3 Reference |
Prints the 4:3 area on each panel of your storyboard that has a camera movement. |
|
Open folder after export |
Opens the folder after export. |
