Layer Transform Tool Properties
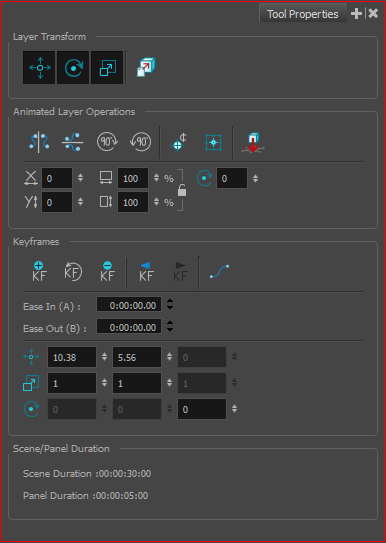
The Layer Transform tool lets you show or hide the translation control, flip, rotate, translate and scale a selected layer. You can also animate layers by setting keyframes and then fine-tune them using the Function Editor.

For tasks related to this tool, seeAnimating Layers.
- In the Tools toolbar, click the Layer Transform
 button.
The tool's properties are displayed in the Tool Properties view.
| Icon | Tool Name | Description |
|
Layer Transform |
||
|
|
Show Translate Controls |
Shows or hides the translation controls in the Stage view when using the Layer Transform tool on a layer. The controls are displayed by default. |
|
|
Show Rotate Controls |
Shows or hides the rotation controls in the Stage view when using the Layer Transform tool on a layer. The controls are displayed by default. |
|
|
Show Scale Controls |
Shows or hides the scale controls in the Stage view when using the Layer Transform tool on a layer. The controls are displayed by default. |
|
|
Snap to 3D Surface |
Lets you snap a 2D layer or 3D model to a 3D surface and manipulate it. |
|
Animated Layer Operations |
||
|
|
Flip Vertical |
Flips the selection vertically. |
|
|
Flip Horizontal |
Flips the selection horizontally. |
|
|
Rotate 90 CW |
Rotates the selection in 90 degree increments clockwise. |
|
|
Rotate 90 CWW |
Rotates the selection in 90 degree increments counter clockwise. |
|
|
Reset Pivot |
The Reset Pivot button resets the current layer’s pivot point to its original position at the centre of the camera frame. You can also select Layer > Pivot > Reset Pivot. |
|
|
Center Pivot on Selection |
By default, the pivot is positioned at the center of the camera frame. Use this button to set the pivot at the centre of the selected layer. You can also select Layer > Pivot > Center Pivot on Selection. |
|
|
Snap to Ground |
Lets you snap a layer to the surface directly below it The angle of the layer is retained and the lowest point of the layer will connect to the surface. |
|
|
Offset X |
Lets you enter a value to reposition the selection along the X-axis. |
|
|
Offset Y |
Lets you enter a value to reposition the selection along the Y-axis. |
|
|
Width |
Lets you enter a value to resize the width of the selection. |
|
|
Height |
Lets you enter a value to resize the height of the selection. |
|
|
Lock |
Locks or unlocks the ratio between the Width and Height values. |
|
|
Angle |
Lets you enter specific values to rotate the selection. A positive value rotates the selection counter clockwise and a negative value rotates the selection clockwise. NOTE: This field is only available when working in 2D mode.
|
|
Keyframes |
||
|
|
Add Keyframe |
Adds a keyframe to the selected layer. |
|
|
Reset Keyframe |
Resets all the position values to their defaults. |
|
|
Delete Keyframe |
Deletes the selected keyframe from the layer. |
|
|
Previous Keyframe |
Displays the previous keyframe. |
|
|
Next Keyframe |
Displays the next keyframe. |
|
|
Function Editor |
Opens the Function Editor where you can edit function curves and parameters. It is a visual graph for adding, removing, and editing keyframes, as well as adjusting the velocity. The Function Editor allows you to display multiple functions in the background as a reference. |
|
-- |
Ease In |
Lets you set the velocity at which the layer movement begins. You can enter the duration of the ease in after the first frame in which the gradual change layer movement begins. For example, if you want to slowly accelerate to the normal layer speed from frame 1 to 10, enter a value of 10. |
| -- |
Ease Out |
Lets you set the velocity at which the layer movement ends. You can enter the duration of the ease out after the first frame in which the gradual change in layer movement begins. Enter the number of frames before the last frame in which the change in layer movement is gradual. |
|
|
Offset |
Lets you position the layer along the X and Y axes. NOTE: This field is only available when working in 2D mode.
|
|
|
Scale |
Lets you scale the selected layer vertically and horizontally. NOTE: This field is only available when working in 2D mode.
|
|
|
Rotation |
Lets you rotate the selected layer clockwise and counter clockwise. |
|
Scene/Panel Duration |
--- |
Displays the length of the selected scene or panel in timecode format. The default length of a panel is 1 second. |