Sound
When you decide that you want to add sound to your storyboard, you must first prepare the sound outside of Storyboard Pro.
To work with sounds in Storyboard Pro, add one or more audio tracks into which you import the sound sequences. You can then organize the sounds by organizing audio tracks, mixing sound levels, and editing the part of the sound sequence you will use.
You can preview your panels with sound at any time by playing back an animatic of the current panel or the entire storyboard using the controls in the Play toolbar.
To import sounds and view audio tracks, display the Timeline workspace.
This section includes the following topics:
| • | Managing Audio Tracks |
| • | Recording a Sound Guide |
| • | Adding and Deleting Sound Clips |
| • | Sound Display |
| • | Sound Scrubbing |
| • | Adjusting the Sound Length and Timing |
Managing Audio Tracks
You can create an audio track in which you can import one or more sounds. You can add an unlimited number of tracks to your project to help you organize your work. For instance, you can have a track for all dialogue or a separate track for each character’s dialogue. You can create a track for ambient sound, music, or significant sound effects.
This section includes the following topics:
| • | Adding an Audio Track |
| • | Muting an Audio Track |
| • | Muting All Other Audio Tracks |
| • | Locking an Audio Track |
| • | Locking All Other Audio Tracks |
| • | Deleting an AudioTrack |
| • | Selecting All Sound Clips Forward |
| • | Marking Sound Clips with Custom Colours |
Adding an Audio Track
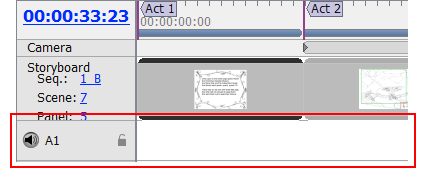
You can add new audio tracks to your project. To do so, you must work in the Timeline view
To add an audio track:
- Display the Timeline view.
- Do one of the following:
| ‣ | Select Sound > New AudioTrack. |
| ‣ | In the Timeline view, right-click the area below the thumbnails and select New AudioTrack. |
| ‣ | In the Sound toolbar, click the New Audio Track Once you add a new audio track, you are ready to import a sound. |
Muting an Audio Track
You can mute all or some of the audio tracks in your project.
To turn the sound on or off for all audio tracks:
| ‣ | In the Playback toolbar, click the Sound |
To turn on the sound of selected audio tracks:
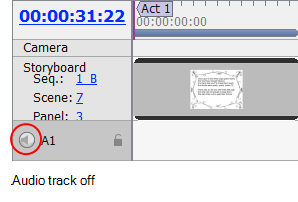
- In the selected audio track, click the Sound On/Off button to turn that track’s sound on or off.

Muting All Other Audio Tracks
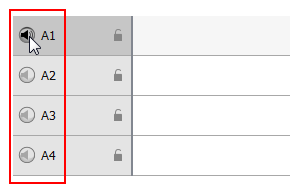
When all audio tracks are enabled, you can quickly isolate one audio track by muting all the others at once.
To mute all other audio tracks:
| ‣ | When all audio tracks are enabled. Click the Sound button on the one audio track you want to leave on while holding down the [Alt] key. All other audio tracks will be muted. Click again while holding the [Alt] key to turn them all back on. |
Locking an Audio Track
By default, an audio track follows the timing changes made to your project. This means that if you extend the duration of a panel, the audio track following this panel will move in consequently. However, you can lock an audio track to prevent it from following the timing change. Locking a track will also prevent you from making unwanted changes to the audio timing. Once it is locked, it is impossible to drag and modify the audio clips or import more sound into this track.
To lock an audio track:
| ‣ | In the Timeline view, click the open lock icon of the audio track you want to lock. |
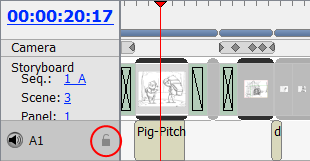
The open lock icon will change to a closed lock icon and the audio track is locked.
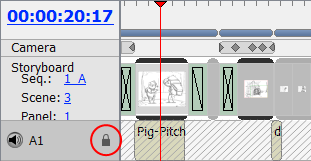
To unlock a locked audio track:
| ‣ | In the Timeline view, click the locked icon of the audio track you want to unlock. |

The locked icon changes to an open lock icon and the audio track is unlocked.

Locking and Unlocking All Audio Tracks
When your project's audio tracks are all unlocked, you can lock them all at the same time using the Lock All Audio Tracks command.
To lock all audio tracks at once:
- In the Timeline view, make sure that all audio tracks are unlocked, or else, the Lock All Audio Tracks command will be unavailable.
- Select Sound > Lock All Audio Tracks.
To unlock all audio tracks at once:
- In the Timeline view, make sure there is at least one locked audio track. Otherwise, the Unlock All Audio Tracks command will be unavailable.
- Select Sound > Unlock All Audio Tracks.
Locking All Other Audio Tracks
When all audio tracks are unlocked, you can quickly decide to lock all but one.
To lock all other audio tracks:
| 1. | In the Timeline view, hold [Alt] and click the open lock icon of the audio track you want to remain unlocked. |
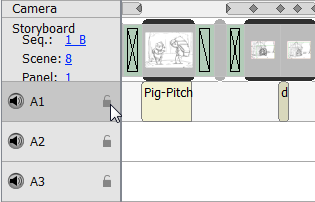
All other audio tracks are locked.
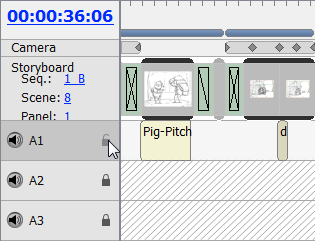
- Click once more on the audio track's open lock icon while holding the [Alt] key to unlock all audio tracks.
Deleting an AudioTrack
You can delete an audio track at any time. When you do so, all the sounds in the audio track are also deleted. You must work in the Timeline view.
To delete an audio track:
- In the Timeline view, select the audio track you want to delete.
- Do one of the following:
| ‣ | Select Sound > Delete Current Audio Track. |
| ‣ | Right-click the audio track and selectDelete Current Audio Track. |
| ‣ | In the Sound toolbar, click the Delete Current Audio Track |
The selected audio track is deleted from the Timeline view.
Selecting All Sound Clips Forward
By using a series of keyboard shortcuts, it is possible to select a sound clip and all the sound clips following it at once. These options are also available on panels
There are four possible options:
| • | Selecting All Sound Clips on the Audio Track Forward |
| • | Selecting All Sound Clips on All Sound Tracks Forward |
| • | Selecting All Sound Clips on the Audio Track Forward |
Selecting All Sound Clips on the Audio Track Forward
To select all sound clips on a single sound track forward:
- In the Timeline view, hold [Ctrl]+[Alt] and click the audio clip from which you want the selection to start.
The audio clip and all the audio clips following it on the same audio track, up until the end of the storyboard project, are selected at once.

Selecting All Sound Clips on All Sound Tracks Forward
To select all sound clips on all sound tracks forward:
- In the Timeline view, hold [Ctrl]+[Shift]+[Alt] and click the audio clip from which you want the selection to start.
The audio clip and all the audio clips following it on all audio tracks, up until the end of the storyboard project, are selected at once.

Selecting All Panels and All Sound Clips Forward
To select all panels and all sound clips forward:
- In the Timeline view, press [Ctrl]+[Alt]+[Shift] (Windows) or [⌘]+[Alt] (Mac OS X) and click the panel from which you want the selection to start.
The panel and all the panels following it, up until the end of the storyboard project, as well as all the sound clips in all audio tracks starting from where the play head is positioned are selected at once and can be moved together.

| ‣ | If you drag the selection forward, the panel preceding the selection will be extended. |
| ‣ | If you drag the selection backward, the panel preceding the selection will be reduced until it reaches the minimum length allowed (one frame), then the second panel preceding it will be reduced. Overlapping audio clips will be overwritten by the ones that are selected. |
Marking Sound Clips with Custom Colours
Marking sound clips with a custom colour allows you manage them and quickly identify them. This option is also available for marking panels
To mark a sound clip with colour:
- In the Timeline view, select one or more sound clips to mark with a colour.

- Right-click on the selection and select one of the following: Set Colour > Red, Orange, Yellow, Green, Blue, Purple or Custom. If you choose custom, the Colour Picker dialog box opens from which you can select a colour.
The selected audio clip changes to the colour you chose.

To reset the sound clip colour:
- In the Timeline view, select the sound clip you want to reset the colour to default. You can also make a multiple selection.

- Right-click on the selection and select Set Colour > Default Colour.
The selected clip colour resets to the default colour.

Recording a Sound Guide
You can record sound directly from Storyboard Pro and insert them in the timeline.
To record sound in Storyboard Pro:
- In the Timeline view, add a new audio track if need be.
- Place the play head at the frame you want your recording to begin and click select the audio track you want to record your sound guide in.
- Select File > Import > Record Sound.
The Record Sound dialog box opens.
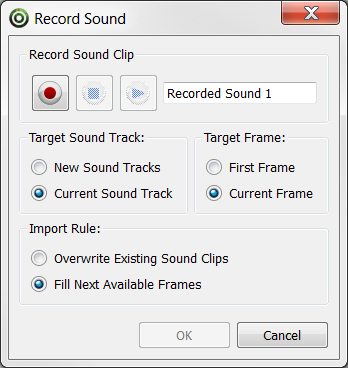
- In the Target Sound Track section:
| ‣ | Select the New Sound Tracks option to create a new audio track for the recording. |
| ‣ | Select the Current Sound Track option to record in the selected audio track. |
- In the Target Frame section:
| ‣ | Select the First Frame option to start the recording on the first frame of the project. |
| ‣ | Select the Current Frame option to start the recording on the current frame. |
- In the Import Rule section:
| ‣ | Select the Overwrite Existing Sound Clips option so that the resulting audio clip will be position in its entire length, overwriting any existing clip positioned in its way. |
| ‣ | Select the Fill Next Available Frames option so that the recording do not overwrite the position of existing audio clips that are on the same audio track. |
- In the Record Sound Clip section:
| ‣ | Name the audio clip. |
| ‣ | Click the Record |
| ‣ | Click the Stop |
| ‣ | Click the Play |
- Click OK.
The recording is imported in the selected audio track of your project.

Adding and Deleting Sound Clips
Once you have created audio tracks, you can now import sound clips. Sound clips are edited bits of sound which are already edited and in digital format, ready for import.
This section includes the following topics:
| • | Importing Sound Clips |
| • | Deleting a Sound Clip |
Importing Sound Clips
You can import sound clips (WAV, AIF, AIFF, or MP3) into an audio track at the first frame or at the current frame. If the sound clip does not already exist in your project, Storyboard Pro copies the file from its present location to the audio folder in your storyboard project folder. You must work in the Timeline view.
To import a sound clip:
- In the Timeline view, select an audio track.
- Do one of the following:
| ‣ | Select File > Import Sound Clips. |
| ‣ | Right-click the audio track and select Import Sound Clips. |
| ‣ | In the Sound toolbar, click Import Sound Files The Import Sound Clips dialog box opens. |
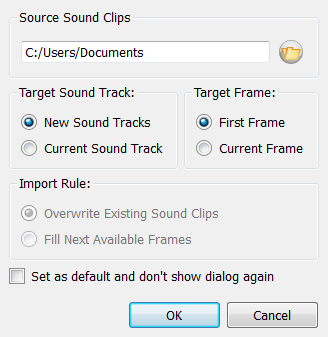
- Select the sound clip you want to import by typing in the file path or using the Browse button to search for the file you want to use.
- In the Target Sound Track section, specify whether you want to create an audio track and import the clip into it or import the clip into the selected audio track.
- In the Target Frame section, indicate the frame at which the sound will begin.
- If you selected the Current Sound Track option, specify the Import Rule:
| ‣ | Overwrite Existing Sound Clips: By default, when you import a sound, it will replace sounds that exist in the target frames. |
| ‣ | Fill Next Available Frames: Import the sound clip into the first available empty frames after any existing sound selection. |
- Select the Set as default and don’t show dialogue again option if you want to use the current settings the next time you import sound and open a browse box to select a sound automatically.
Deleting a Sound Clip
To delete a sound clip:
- In the Timeline view, select the clip you want to delete. You can create a multiselection to delete more than one at the same time.
- Do one of the following:
| ‣ | Right-click the sound clip and select Delete Selected Clips. |
| ‣ | In the Sound toolbar, click Delete Sound Clip |
| ‣ | Press [Delete]. |
Sound Display
These are the different features that will help make things clear while working with sound.
This section includes the following topics:
| • | Displaying the Waveform |
| • | Setting the Soundtrack Size |
| • | Showing or Hiding the Clip Name |
| • | Displaying and Adjusting the Volume Envelope |
Displaying the Waveform
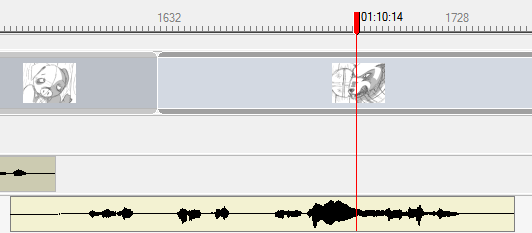
To display the sound clip's waveform:
- Do one of the following:
| ‣ | At the bottom of the Timeline view, click the Menu  |
| ‣ | From the top menu, select Sound > Show Waveform or right-click in the audio track area of the Timeline view and select Show Waveform. |
| ‣ | In the Sound toolbar’s extra buttons, click the Show Waveform |
Setting the Soundtrack Size
By default the size of the soundtracks is set to small, but you can modify the size of the different soundtracks of your project individually to increase or decrease their heights.
To set the soundtrack size:
| ‣ | In the Timeline view, right-click a soundtrack and select Track Size > Mini, Small, Medium or Large. |
The soundtrack is resized.

Showing or Hiding the Clip Name
By default, the clip's file names are displayed on the audio blocks. However, you can hide the names if needed.


To hide the name of each sound in the audio tracks:
- Do one of the following:
| ‣ | At the bottom of the Timeline view, click the menu  |
| ‣ | In the Timeline view, right-click and deselect Show Sound Clip Names. |
- To show the clips names again, re-enable the Show Sound Clip Names option.
Displaying and Adjusting the Volume Envelope
Once the waveform is displayed, you can also display the playback sound level for each sound clip.
To display and adjust the volume levels of a sound clip:
- From the top menu, select Sound > Show Waveform. This option must be set first.
- To enable the Show Volume Envelope option, do one of the following:
| ‣ | At the bottom of the Timeline view, click the menu  |
| ‣ | From the top menu, select Sound > Show Volume Envelope |
| ‣ | In the Timeline view, right-click in the audio track area of the Timeline view and select Show Volume. |
| ‣ | In the Sound toolbar’s extra buttons, click the Show Volume Envelope |
A blue line, indicating the sound level, is displayed for each sound sequence. White squares mark the points at which the sound changes to a new level.
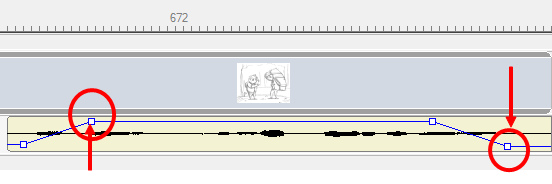
| 2. | Hold down the [Alt] key and click the line to add a new marker. A plus sign (+) on the cursor indicates that a keyframe will be added. You can add an unlimited number of volume keyframes. |

| 3. | Drag an existing marker to adjust the volume at a specific frame. When you drag a volume keyframe, a box appears displaying the current dB level. |

- Hold [Alt] and click an existing volume keyframe to delete it. A minus sign (-) on the cursor indicates that the marker will be deleted.

The slope of the line indicates how quickly the sound changes from one level to another. If the slope is steep, the change is abrupt. If the slope is less inclined, the volume changes at a more gradual rate.
Sound Scrubbing
With Sound Scrubbing, your sound will play forward or backwards as you scrub through the Timeline view.
To turn on sound scrubbing:
| ‣ | Do one of the following: |
| ‣ | At the bottom of the Timeline view, click the Sound Scrubbing |

| ‣ | From the top menu, select Sound > Sound Scrubbing. |
| ‣ | In the Timeline view, right-click and select Sound Scrubbing. |
| ‣ | In the Sound toolbar’s extra buttons, click the Sound Scrubbing |
Adjusting the Sound Length and Timing
Most of the editing must be done to your sound before it is imported into Storyboard Pro. There are however, a few tools to help make minor adjustments.
This section is divided as follows:
| • | Shortening and Extending Sound Clips |
| • | Splitting a Sound Clip at the Current Frame |
| • | Moving Multiple Sound Clips |
Shortening and Extending Sound Clips
You can snip the beginning and/or end of the sound clip.
- Verify that sound is enabled and that the audio track you want to work with is not muted. You may find it easier to edit sound when the waveform is visible.
- Do one of the following:
| ‣ | Click on the starting edge of your clip and drag the cursor right to shorten your clip at the desired timing. This cuts the beginning of the original file from playback. |

| ‣ | Click the ending edge of the clip and drag left to shorten the clip at the desired timing. This cuts the end of the original file from playback. |

You can play back the sound to hear the edited version of the clip. The original sound clip is not modified. You can drag the edges of the edited clip to expand it to its original length.
Splitting a Sound Clip at the Current Frame
You can cut one clip into many pieces if you want to move parts of a sound to another location.
To split a sound clip in two:
- Move the red playhead to the frame at which you want to begin the second sound clip that results from the split.

- From the top menu, select Sound > Split Clip at Current Frame or right-click in the audio track area of the Timeline view and select Split Clip at Current Frame.

The sound clip is split. You can move both parts independently.
Moving Multiple Sound Clips
You can move multiple sound clips from the same audio track or different audio tracks at the same time.
To move multiple sound clips:
- In the Timeline view, draw a selection across the clips you want to select. You can also [Shift] + click to create a contiguous multiple selection or [Ctrl] + click (Windows) or [⌘] + click (Mac OS X) to create a non-contiguous selection.

- Drag the clips to the new position and release.
