
Drawing with the Pencil Tool
The Pencil tool is used to draw and sketch on vector layers.
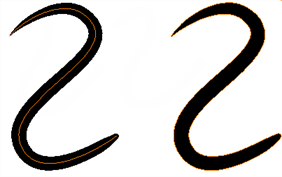
The Pencil tools support pressure sensitivity, allowing you to create lines with variable thickness, producing central vector lines of constant or variable width, making a clean line. This means that a pencil line’s control points (used to deform its shape) are located along the length of the central spine. The Pencil tool is very useful for tracing, clean or final drawings.
You can customize pencils, controlling the line’s colour, size, smoothness, and the minimum and maximum width.
Storyboard Pro allows you to sketch your drawings, forcing disconnected lines to come together automatically, forming a single line from multiple strokes! Once you draw your lines, you can even change sections of them by increasing their thickness or adding joints.
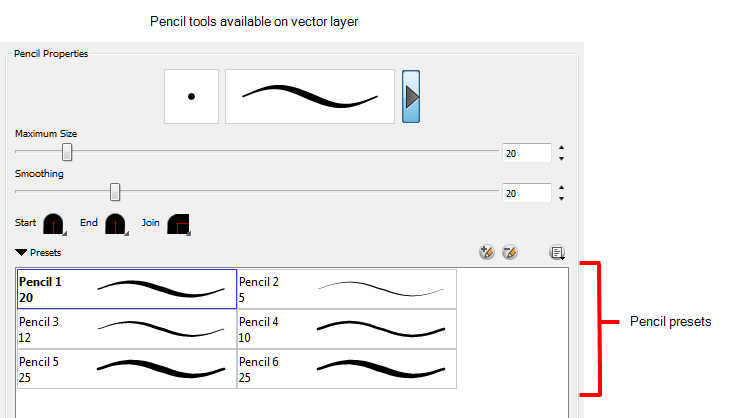
A variety of pencil styles are provided allowing you to create and save your own.This way you can create pencils with precise sizes and parameters and save them.
| • | In the Tool Properties, select a pencil style from the Presets section. |
To draw with the Pencil tool:
- In the Thumbnails or Timeline view, select the panel on which you want to draw.
- In the Thumbnails or the Stage View, select a vector layer to draw on.
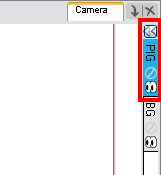

- In the Tools toolbar, select the Pencil
 tool or press [Alt]+[9].
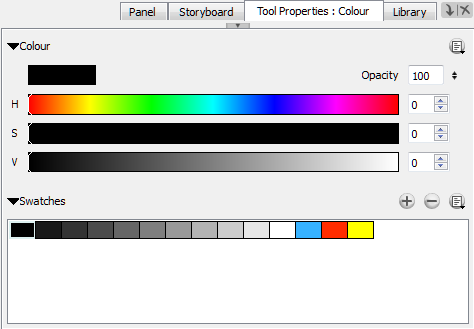
- You can change the current colour by adjusting the sliders in the Colour view, or click a swatch to use that colour. To add colour swatches—see Adding a Colour Swatch.
- In the Stage view, start drawing.
| ‣ | Hold [Alt] to draw a straight line. |
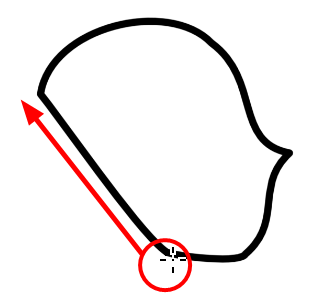
| ‣ | Hold [Ctrl] (Windows) or [z] (Mac OS XMac OS X) to force a line to join the end and start and end of the stroke your shape while drawing. |
Changing the Properties of the Pencil Line
When you select the Pencil tool, its properties and options appear in the Tool Properties view. You can use these properties to change the size of the pencil line, define how the line size responds to pressure on the stylus, how the line acts in relation to other lines in the scene, and how to modify the line’s direction and size after it has been drawn.
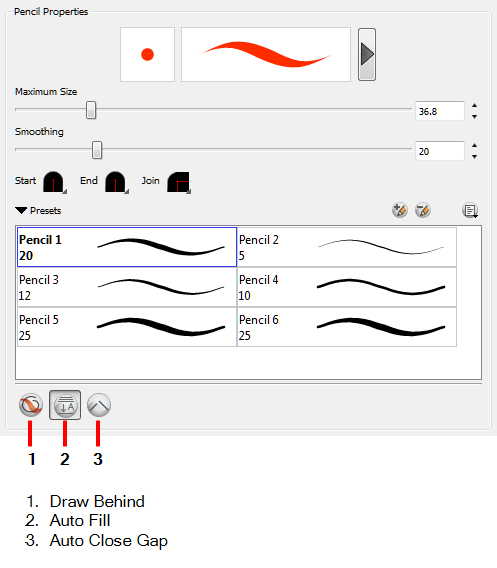
 Draw Behind

![]() mode lets you paint behind existing art. By default, strokes appear over your work until you release the tool.
mode lets you paint behind existing art. By default, strokes appear over your work until you release the tool.
To activate Realistic Preview:
| ‣ | From the top menu, select View > Realistic Preview. |
 Auto Flatten Mode
When drawing on vector layers, lines do not usually become one object. The Auto-Flatten ![]() mode automatically merges lines created with the existing ones into one single object as you draw.
mode automatically merges lines created with the existing ones into one single object as you draw.
When drawing on a bitmap layer, you are laying down the bare pixels, so they are always flattened. You can no longer access the individual stroke after you draw it.
Using the Select tool, you can use select and remove a segment of flattened pencil lines. Overlapping pencil lines drawn with the Auto-Flatten mode enabled are essentially cut into segments by the overlap and can therefore be treated as individual lines.
 Auto Close Gap
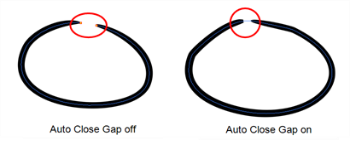
When using the pencil tool, you can automatically close strokes with an invisible stroke.
It is recommended to keep this option enabled when drawing with the Pencil tool.
A variety of pencil styles are provided allowing you to create and save your own.This way you can create pencils with precise sizes and parameters and save them.
| • | In the Tool Properties, select a pencil style from the Presets section. |
The Preview area lets you see a preview of the stroke that will be produced after you customize the different parameters in the Tool Properties view.
- Select a brush style from the Presets section. It's a good idea to choose a brush preset that is closest to the style you want to create.
- Click on the Show Extended Properties arrow to display advanced customization parameters.

Adding a Pencil
To add a pencil:
| ‣ | Click the Add Brush |
Renaming a Pencil
Renaming a pencil can make it easier to identify and access the pencils you use most frequently.

To rename a pen:
- In the Tool Properties view, select a pencil to rename.
- From the Brush menu, select Rename Brush.
- Type in a new name for the pencil.
Deleting a Pencil
You can delete the pencils you no longer use.
To delete a brush:
- In the Tool Properties view, select a pen to delete.
| ‣ | Click the Delete Brush |
| ‣ | From the Brush menu, select Delete Brush. |
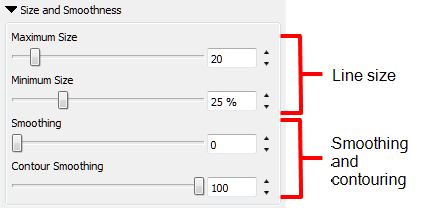
Adjusting the Size, Smoothness and Contour of Lines
The properties available are different depending on whether you are drawing on a vector or bitmap layer.
You can set the minimum and maximum sizes of your tool, which will produce the thick and thin effect on your line. This works with the pressure sensitivity of a pen tablet.
Also, you can optimize the smoothness of the contour of lines. You can modify the central line smoothness of your line using this option. This parameter smoothes the initial movement of your line. Increasing the value will result in a smoother line with fewer less control points.
To adjust the size, smoothness and contour of lines:
- In the Tool Properties view, click the arrow button.
![]()
The Properties window of the tool you are using opens.
- Do the following:
| ‣ | Maximum Size: Defines the maximum width of the line. |
| ‣ | Minimum Size: Defines the minimum width of the line as a percentage of the maximum size. |
| ‣ | Smoothing: Defines the number of control points added to the centre line. |
| ‣ | Contour Smoothing: Defines the number of control points added to the contour boundaries (around the line). |
Lower values mean that the line will appear as you draw it (with more control points along the centre line). Higher values mean that the line will be smoothed out (removing control points from the centre line).
Previewing the Stroke
The Preview area lets you see a preview of the stroke that will be produced after you customize the different parameters in the Tool Properties view.
- Select a brush style from the Presets section. It's a good idea to choose a brush preset that is closest to the style you want to create.
- Click on the Show Extended Properties arrow to display advanced customization parameters.
Changing the Line Shape
There are several line shape to choose from. You can select how the start, end, and joints in the pencil line are drawn.
To change the line shape:
In the Pencil Properties window, click a line shape in the Shape section and select a shape from the menu.
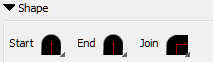
| • | Start: Make the beginning of the line round or flat. |
| • | End: Make the end of the line round or flat. |
| • | Join: Make joints round, mitred, or bevelled. |
Drawing Invisible Lines

Using the Pencil tool, you can draw invisible lines. This can be useful to draw tones and highlights directly on the character.
To draw invisible lines:
- Select the panel and layer on which you want to draw.
- In the Tools toolbar, select the Pencil tool or press [Alt]+[9].
- Select View > Extras > Show Strokes or press [K] to see your strokes.
- In the Tool Properties view, set the size to 0. You can also adjust the smoothness.
- In the Stage view, start drawing.
- You can modify the stroke shape with the Contour Editor
 tool—see Reshaping a Drawing Using the Contour Editor Tool.
Converting Pencil Lines to Brush Strokes
At times, you may want to change pencil lines to brush strokes. This converts a centre line stroke to a contour line stroke. Or you can convert strokes to pencil lines.
To convert pencil lines to brush strokes:
- Select the strokes you want to convert.
- Right-click and Convert > Pencil Lines to Brush Strokes.
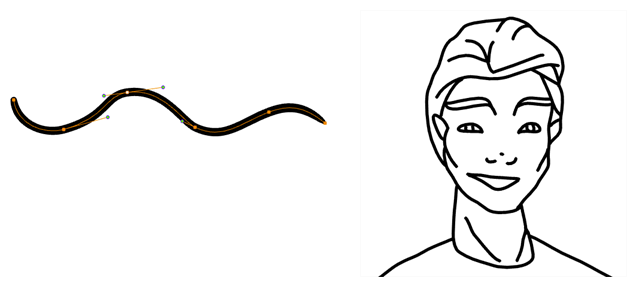
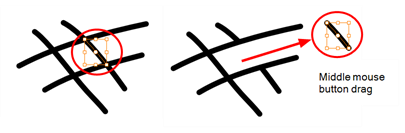
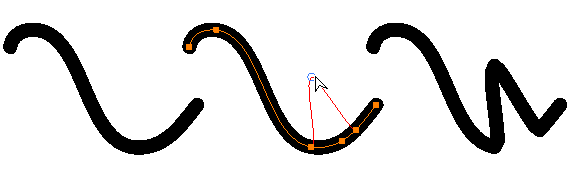
Modifying a Pencil Line using Control Points
Depending on how you draw your pencil line (changing the Smoothness or Contour Optimization), there may be few or many control points on the centre line. Just as you can modify a brush line, you can modify the direction of a pencil line using the Contour Editor to move its control points.
To learn how to create a pencil line with more or fewer control points, see Reshaping a Drawing Using the Contour Editor Tool.
To modify a pencil line using control points:
- Using the Pencil tool, create a line that has control points along its centre line (adjust the Smoothness or Contour Optimization to set the right number of control points).
- From the Tools toolbar, select the Contour Editor tool and select the pencil line.
The selected pencil line will display its centre line along and control points.
To add control points, press [Ctrl] and click to create control points.
- Drag any of the control points along the centre line to change the shape.
At times, you may want to change pencil lines to brush strokes. This converts a centre line stroke to a contour line stroke. Or you can convert strokes to pencil lines.
To convert pencil lines to brush strokes:
- Select the strokes you want to convert.
- Right-click and Convert > Pencil Lines to Brush Strokes.