Harmony 24 Release Notes
Here is the list of changes in Harmony 24 build 24.0.0.22883.
Drawing Tools
Symmetry Drawing Guides
Similarly to the perspective guides, the new symmetry guides are created and managed in the Guides view. The symmetry guides are available for the Pencil, Brush, Stencil Brush, Stamp, Eraser and the shape tools, except for Polyline. One of these tools must be selected in order for the symmetry guides to display.
The symmetry guides split the view and allow for strokes on one side of the guide to be replicated on the other side with a live preview.
The following types of symmetry guides are available in the + dropdown menu.
-
Vertical Symmetry
-
Horizontal Symmetry
-
Dual Axis Symmetry
Select one of the guides from the list to display it in the Stage or Camera view.
To move the guide, hover over the center pivot to activate the move cursor. Click and hold while positioning the guide. Click down and hold while positioning the guide. To rotate the guide, hover over one of the guides to activate the rotate cursor. Click and hold while rotating the guide. Rotating closer to the center pivot will be more sensitive. The rotational angle is displayed in the upper left corner of the view.
A symmetry guide and perspective guide can be used together.
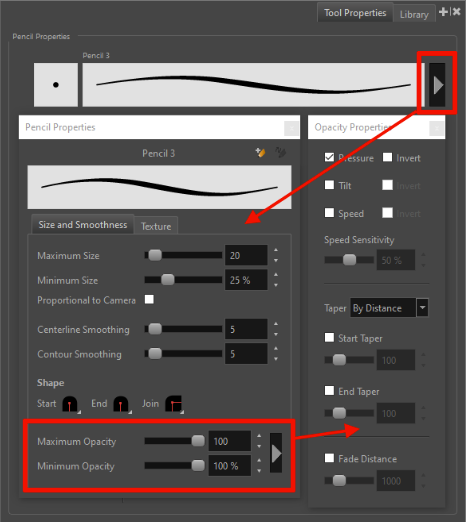
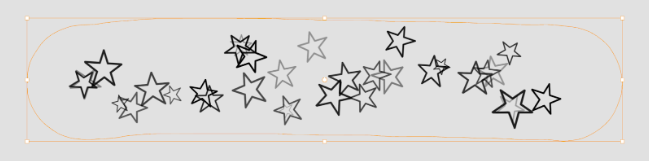
Variable Opacity using the Pencil Tool
The new Opacity Properties provide a more natural feel when drawing and greater control over the look of pencil lines when using a pressure sensitive pen tablet.
-
Maximum Size: Defines the maximum opacity of the stroke.
-
Minimum Size: Defines the minimum opacity of the stroke in relation to and as a percentage of the maximum size.
-
The opacity can be controlled further by clicking on the arrow button to open the Opacity Properties.
-
Pressure: Allows you to use pen pressure to decrease and increase opacity.
-
Tilt: Allows you to tilt the pen closer to the tablet for less opacity. You can check the box to invert this behaviour.
-
Speed: Allows you to reduce the opacity of the stroke by drawing at a faster speed. You can check the box to invert this behaviour.
-
Speed Sensitivity: This is used to control how fast the stroke must be drawn to reach the minimum value.
-
Taper: Allows you to reduce the opacity at the start and end of each stroke. The value can be expressed using Distance or Percentage.
-
Fade Distance: Allows you to fade the opacity value over a given distance.
New Brush Properties
New properties have been added to the vector and bitmap Brush and Stencil Brush Properties allowing randomized distribution of brush stamps along the length and width of the brush stroke. The new properties are available for the Tip and Dual Tip in the extended brush properties.
-
Count (from 1 to 20): Controls the number of stamps that are composited to each step along the brush stroke.

-
Random Count (from 0% to 100%): Varies the number of stamps at each step.
-
If the count value is 4, and the random count of 50%, the count will be chosen at random between the range [2, 6].
-
If the count value is 4, and the random count is 100%, the count will be chosen at random between the range [0, 8].
-
-
Random Offset X (from 0% to 300%): Adds a random offset for each stamp, lengthwise and parallel to the stroke.
-
Random Offset Y (from 0% to 300%): Adds a random offset for each stamp, perpendicular to the stroke.
Edit Pencil Line Properties
The new Edit Pencil Line Properties command (which used to be an external plugin named Stylize Pencil Line) is now available in the Drawing menu. This command opens a window that can be used to change the line width and texture assigned to pencil lines from the selected layers.
The changes can be applied to the pencil lines on the current drawing or all the drawings from the selected nodes/layers. It also has the option to alter pencil lines of specific colours.
The command Edit Pencil Line Properties is available from the Drawing menu when one or more drawing layers are selected.
The Edit Pencil Line Properties has the following options:
Presets: Presets can be used to save and load options.
| Presets | Description |
|---|---|
| Texture |
Apply the selected texture to the pencil lines. The <REMOVE TEXTURE> can be used to remove the textures from the pencil lines. <KEEP TEXTURE AS IS> will not change the assigned texture if any. |
|
Thickness Multiplier |
Changes the thickness of the pencil lines by multiplying the pencil line width using this value. For example, if the current Maximum Size of a pencil line is 2 and that a value of 3 is set to the Thickness Multiplier, the final Maximum Size will be 6. |
| Apply Multiplier to Tips | Preserve the aspect of line ends by applying the thickness multiplier to the tips. |
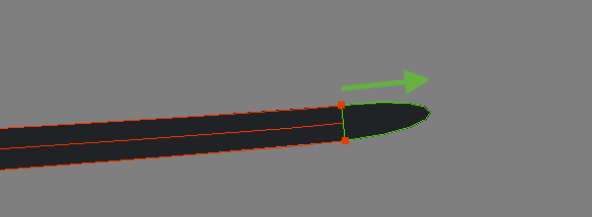
| Additional Top Multiplier |
This value can be used to apply a different scaling factor to the tips in order to make them longer or shorter. Original Line:
After applying a Tip Scale of 5:
|
| Line Thicness | When this mode is selected, the width of all the lines will be set to this specified value. |
| Apply to All Colours | This option is not available if all the pencil lines have the same colour. When enabled, the changes are applied to all the pencil lines from the selected drawing nodes/layers no matter their colour. When unchecked, colours can be selected from the list on the right. Changes will only be applied to the pencil lines that use one of the selected colours. |
| Apply to All Drawings | This option will cause the changes to be applied to all the drawings in the selected nodes/layers. |
| Preview Drawing |
This drop-down can be used to select which Drawing node/layer will be used to preview how the values in the dialog will affect the drawing. NOTE
The drawing is presented as a “fit to screen”. The drawing size may differ from the original scene, but the ratio between the pencil line and the drawing is accurate.
|

The changes from the Stylize Pencil Lines can be applied to a single drawing, a range of drawings or all the drawings in the selected layers, even those that are not exposed.
Animation
Shape Aware Deformation
A new type of deformer has been added to Harmony 24 to provide higher quality and more predictable deformations. As its name implies, the Shape Aware Deformation takes into account the shape of the object when determining the area of influence for each control point. It has three types of manipulators available to deform drawings: points, bones and cages. All three types of manipulators can be used simultaneously on the same drawing.
Like other deformers, Shape Aware Deformers are created using the Rigging tool. Select a drawing in the Camera view, select the Rigging Tool and turn on the Shape Aware Deformation Mode on the Tool Properties view. Click over the drawing where you wish to add the deformation points.
Additionally, points can be linked together to create bones or cages.
Support For Baking All Types of Deformation
In previous versions only Bone and Curve deformations could be baked when using the Animation -> Deformation -> Convert Deformed Drawing to Drawings command. This command now works with Weighted Deformers, Mesh Warp, Free Form Deformers and Shape Aware Deformers.
Master Controllers Keyframes
The preference "Set Keyframes on all Functions with the Transform Tool" now also affects the Master Controller. When the preference is selected a keyframe will be created for all the monitored attributes of the Master Controller even when there is no change in values.
Transformation Selector Available When Selecting Deform Group
The Transformation Selector list is now available when selecting either the Drawing node or the Deformation group connected to the drawing node.
Element Column with Standalone License
It is now possible to change which Column a Drawing layer/node or a Transformation Switch is using when a standalone license of Harmony is used (a license without the database token).
3D
Faster loading, display and manipulation of 3D models
The technology used to load and display 3D models was completely overhauled using Vulkan Scene Graph to provide faster loading, display and manipulation of 3D models within Harmony. Large models can now be visualized and manipulated without any performance issues.
For now, Vulkan scene graph is disabled by default. To use the Vulkan scene graph, the “Enable Vulcan 3D Rendering” must be enabled from the General tab of the preferences. If the graphics card does not support Vulkan it is recommended to leave the preference disabled.
Improved performance when using Maya for external rendering
Rendering of 3D models using external applications such as Maya is now faster and more efficient when working in Harmony. The following improvements were made:
-
Harmony now launches an instance of Maya and keeps it alive for the duration of the session, sending render requests to Maya without restarting it everytime.
-
Rendered images from maya are cached in a folder (maya-renders) inside the element folder, which allows Harmony to reused the rendered frame until a change that affects the model in Harmony.
Please refer to the current documentation for 3D integration to setup the render paths: https://docs.toonboom.com/help/harmony-24/premium/3d-integration/set-3d-renderer-path.html
And how to copy original models in the scene: https://docs.toonboom.com/help/harmony-24/premium/3d-integration/prepare-project-directory.html
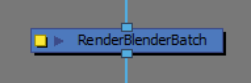
Using Blender as an external renderer
Support for Blender as an external renderer was added to Harmony 24 using the new RenderBlenderBatch node. This node works in a similar way as the RenderMayaBatch node.
Please refer to the current documentation for 3D integration to setup the render paths: https://docs.toonboom.com/help/harmony-22/premium/3d-integration/set-3d-renderer-path.html
And how to copy original models in the scene: https://docs.toonboom.com/help/harmony-22/premium/3d-integration/prepare-project-directory.html
New External Rendering Toolbar
The new “External Rendering” toolbar has been added to help manage renders from external 3D Applications.
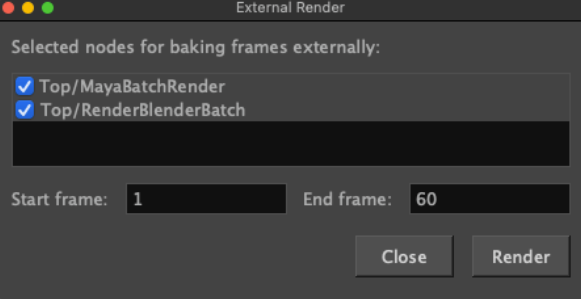
Render Nodes: This button opens a dialog which lists the selected nodes and allows rendering Maya and Blender render nodes to their respective cache.
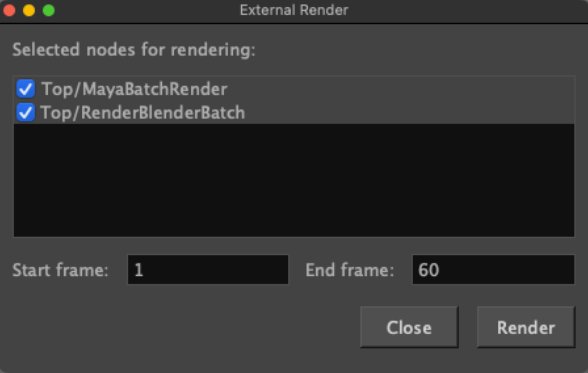
Bake Nodes: This renders the selected nodes, imports the rendered frames in the scene and connects the associated element nodes in the node graph.
Bake to external Project: Non functional for now.
Cancel Renders: Non functional for now.
Improvements to Drawing Tools on 3D Planes
Improvements to the drawing tools allow them to work more predictably on a 3D plane that is rotated up to 60 degrees from the camera view plane.
The tool cursor will automatically change to a "Forbidden cursor" to provide feedback and disallow activity whenever it goes into a region that will introduce instability and poor results.
Posing and animating characters built with deformation rigs
Characters built with bone armatures can now be posed and animated in Harmony by manipulating their bones. Bone armature must be compatible with FBX.
To see and manipulate bones, enable the Bone Selection Mode in the Transform tool properties.

To select bones with the Transform tool, hold the CTRL (command) key and click the bone. Use the manipulator that appears to rotate, scale or offset the bone.
Bones can also be selected directly in the 3D Graph view.
Use a subnode animation node under the FBX’s node to animate the values of the bones.
Toon Shader Effect Node
The new Toon-Shader node can be used to provide a simple Toon Shader render of 3D models that blends in with the style of 2D animation. It draws a line around each of the geometries and can posterize the colours to provide a cel shaded look.
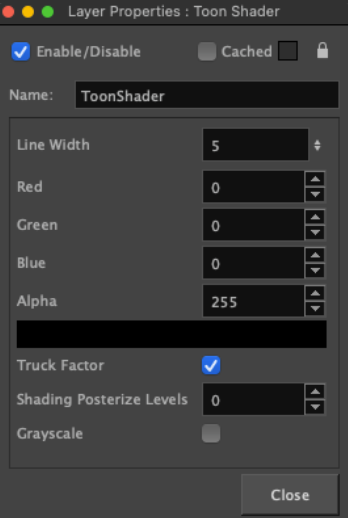
Line Width: Defines the line width of the contour line. This value is scaled to match the corresponding line width of the drawing tools on a default layer at the default camera position.
Red, Green, Blue and Alpha: Defines the colour of the contour line, with RGBA (8 bit) values.
Truck Factor: When enabled, the line weight is applied in relation to the distance of the drawing layer from the camera.
With the Truck Factor on, the line weight will change relative to the view position and the render plane’s position – the line should appear as if it is drawn on the plane of the object’s input matrix. If the object is moved away from the viewed position, the line appears smaller.
With the truck-factor off, the line weight will remain consistent relative to the rendering camera. It should appear as if it is being rendered on the device/viewport. If the object is moved away from the rendering camera, the line does not change in thickness.
Posterize: Applies a posterization effect, limiting the output of colours in the render to the given value. If the value is 0, no posterization is applied.
Greyscale: Converts the output to grayscale, with perceived luminance weighting.
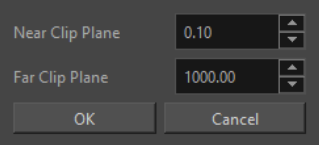
Perspective View Clipping Planes
In the Perspective view View menu the new Clipping Planes dialog allows the near and far clipping plane distances to be changed interactively.
Effects and Compositing
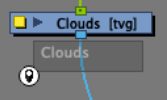
Port Naming and Filtering in the Node View
To simplify Node connections in the Node view, Out Ports on nodes can now be tagged which allows using filters on In Ports downstream in order to request the image coming from those named ports, instead of pulling a cable to access the image.
-
To name an out port, right-click on the node that is to be filtered and select “Port Names > Add Named Out Port” from the menu, then type the desired name.
-
To apply a filter to a downstream node, right-click on the node or the specific in port and select “Port Names > Add Filter to In Ports”, then select or type the name of the port you want to target.
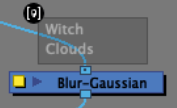
Only the image information coming from the ports added to the list will be received by the node. All other images will be filtered out.
The following addition modes are available when by clicking the icon of the in port filter:
Matte mode: Renders the image in a way that cuts it against all of the other image content that would appear above it.
Inverted: Inverts the filter to match everything but the provided name.
Apply to Matte Port: Generally, the filter is removed through the matte port of a node. This mode will force mattes to match the filter name as well.
Apply to Effects: When disabled, effects above are rendered normally on the requested image. When enabled, effects above will be ignored and will not be rendered.
Reading Cryptomatte IDs from EXRs images
Cryptomattes IDs can be read from an EXR file using the new CryptoMatte node. Once connected under a node reading an EXR file that contains Cryptomattes IDs, the list of all the ID mattes will appear as a list in the Available CryptoMatte IDs section of the CryptoMatte node. ID mattes can be added to the Selected CryptoMatte IDs section using the arrow key, or by using the Eyedropper from the node and selecting the desired matte from the image in the Camera view.
Writing Cryptomatte IDs to EXRs images
CryptoMatte IDs can be written in EXR files by using the CryptoMatte Write node. CryptoMatte named passes are generated based on the named output ports of the nodes that are above in the node graph. This module behaves in the same manner as a Multi-Layer Write node, which allows for multiple named inputs to be added as input of the node. The rightmost port is always used as the overall composite of the resulting EXR file, and subsequent port attachments will be used as custom named-ports in the EXR’s output. The CryptoMatte passes generated using the named ports above the CryptoMatte write node will only be generated through the node’s rightmost port.
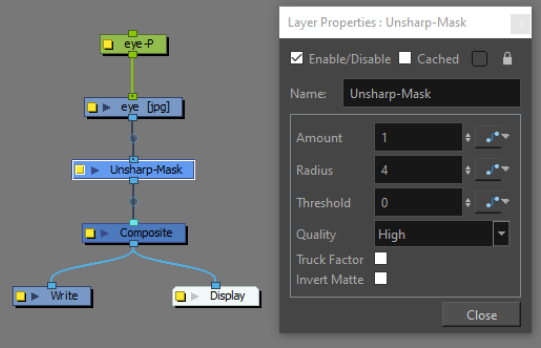
Unsharp Mask Effect Node
The Unsharp Mask name comes from a traditional darkroom technique used to create contrast and sharpen the edges within an image by using a blurred version of the source. The effect in Harmony behaves and creates similar results to the Unsharp Mask filter in Photoshop.
You can find a description of the unsharp masking technique and the node properties on Wikipedia as they are applied in Harmony.
Channel Swap Depth Channel
The Channel Swap node now allows using the Depth information as input values for colour channels. As the values from the Depth channel represent position on the Z axis, the values need to be adjusted to a range that fits between 0 and 1 using either a Colour Levels or Colour Curves effect node.
This effect only works when using 32-bit processing bit depth.
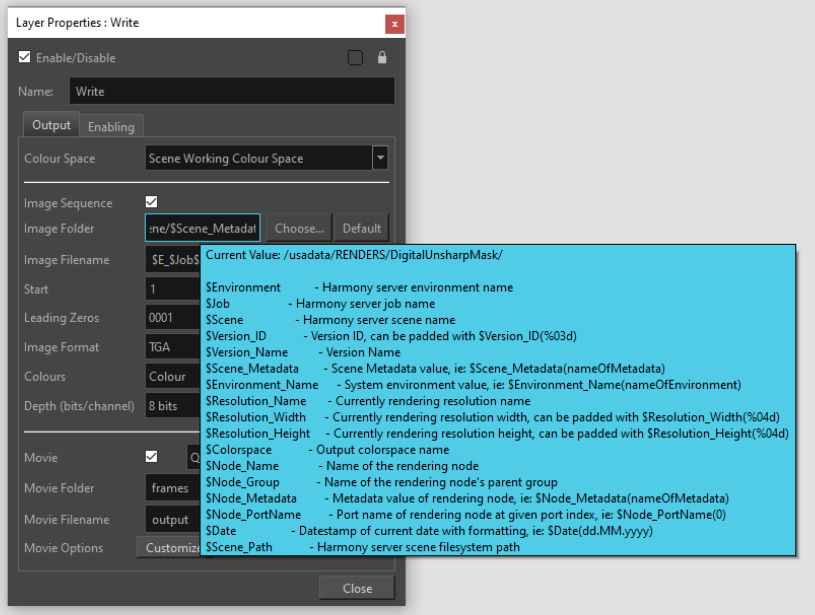
Write Variables to Set Paths and Filenames
The Image Folder and Image Filename, Movie Folder and Movie Filename fields in the Write node can now use variables to set custom paths and filenames when rendering. Hover over the fields to pop up a tooltip with the list of available variables.
| Variables | Description |
|
$Environment |
Harmony server environment name |
|
$Job |
Harmony server job name |
|
$Scene |
Harmony server scene name |
|
$Version_ID |
Version ID, can be padded with $Version_ID(%03d) |
|
$Version_Name |
Version Name |
|
$Scene__Metadata |
Scene Metadata value, i.e: $Scene_Metadata(nameOfMetdata). |
|
$Environment_Name |
System environment value, ie: $Environment_Name(nameOfEnvironment). |
|
$Resolution_Name |
Currently rendering resolution name. |
|
$Resolution_Width |
Currently rendering resolution width, can be padded with $Resolution_Width(%04d) |
|
$Resolution_Height |
Currently rendering resolution height, can be padded with $Resolution_Height(%04d) |
|
$Colorspace |
Output colorspace name |
|
$Node_Name |
Name of the rendering node |
|
$Node_Group |
Name of the rendering node's parent group |
|
$Node_Metadata |
Metadata value of rendering node, ie: $Node_Metadata(nameOfMetadata) |
|
$Node_PortName |
Port name of rendering node at given port index, ie: $Node_PortName(0) |
|
$Date |
Datestamp of current date with formatting, ie: $Date(dd.MM.yyyy). |
|
$Scene_Path
|
Harmony server scene filesystem path. |
In most cases, if the variable is provided in all upper-case or all lower-case, the resulting value will match, i.e. a Scene named "Test", requesting the variable $SCENE will be "TEST", and $scene will be "test".
In the case of variables with options (Scene_Metadata, Environment_Name, Node_Metadata and Node_PortName), if the option requested doesn't exist, a fallback option can be provided in brackets, i.e. $Environment_Name(DoesntExist,Fallback) will result in "Fallback" being used when the DoesntExist isn't defined in the system's environment.
Database and Pipeline Integration
Update to OpenColorIO 2.2.0
The updated version of OpenColorIO in Harmony 24 provides faster conversions between colour spaces and out-of-the-box support for ACES, 4000 nits and other HiDPI colour profiles in the scene, drawing layers, bitmap images, previews in the Camera view and rendered images.
The Display Colour Space preference in the Camera tab of the Preferences dialog has been removed. You should now rely on the colour space selector in the status bar of the Camera OpenGL view.
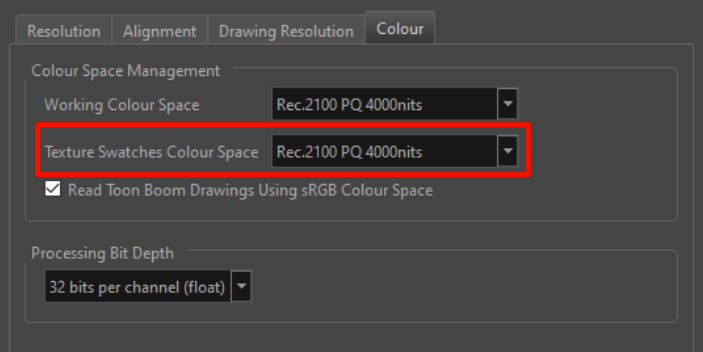
Support HDR colour textures for TVG
Harmony now supports importing 16-bit and 32-bit-float textures in the palette or when vectorizing an image as a texture in a drawing (Colour As Texture).
A new scene setting was added to select which colour space is to be used to read textures from the palette before converting them to the scene’s working colour space.
Importing Multi-layer EXR Files
You can now import a multi-layer EXR file into Harmony using the File -> Import -> Images dialog. This behaves in a similar way as when importing layers from a PSD file. When you import an EXR you are prompted to choose to import as a single layer or multiple layers.
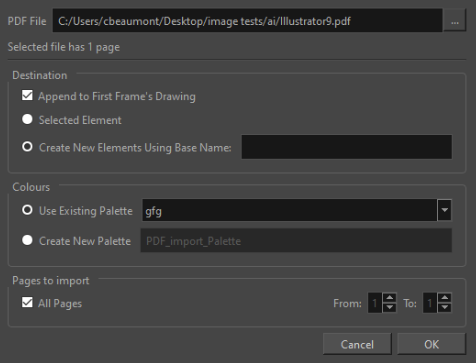
Import Vector Dialog
Importing PDF and AI files in the Library view is no longer available, instead the import options have been moved to the new File > Import > Vector File… dialog.
The SVG file type has also been added to the import dialog.
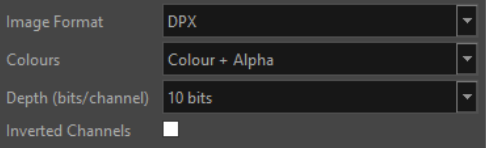
DPX Alpha Channel Support
The DPX image format in the Write node and in File > Export > Export Layout Image dialog now has alpha channel support.
Import as new version option when importing scenes
To avoid overwriting existing scene versions when a scene has been modified offline, an option was added to Control center and WebCC. Importing a scene when this option is enabled, will create new versions of the scene when importing modified versions of the scene in the database.
In Control Center, the option is named “Import as new version” and is available in the Import Scene window.
To use this option with WebCC, the WebCC service must be launched with the “-importNewVersion” option.
General
Support for CentOS Stream 9
Harmony 24 now supports CentOS Stream 9.
Some libraries may be required to be installed such as yum install -y jbigkit-libs.x86_64
Fixes
Drawing Tools
-
Missing refresh in the Camera view and Tool Properties when nudging points with the Pencil Editor. HAR-8829
-
Creating a new color with a drawing tool selected does not change color for other drawing tools. HAR-9132
-
Commands to Flip and Rotate don't transform the selection from the position of the select tool's pivot. HAR-8757
-
Copy & pasting will change the drawing tip end of pencil lines when the parent peg has a transformation. HAR-9434
-
Deformations applied to small brush lines result in straight lines instead of nice curves in soft render. HAR-6579
Effects and Compositing
-
Particles are not rendered at the proper size when the FOV is not set to vertical. HAR-9325
-
Onion skins are not shaded when a combination of cutters and passthrough composite nodes are used if "Enable passthrough for all effects" is enabled. HAR-9583
-
Onion Skins are not rendered properly with some scenes. HAR-8863
-
Copy-paste loses the transformation names on Transformation switches. HAR-9313
-
"Group Selection with Composite" does not keep the cables in the same order. HAR-9329
Timeline
-
Shortcut for Toggle Solo Mode in the Timeline doesn't work. HAR-6827
-
Harmony may hang if the Stop frame is changed during playback. HAR-8994
-
Image Switch layers can not be Tagged. HAR-6516
Library
-
Can't navigate through a Windows Shortcut when browsing to select a folder as a library on Windows. HAR-8807
-
Dropping a bitmap from the Library does not use Harmony's transparency preferences. HAR-9252
Import PSD
-
PSD files cannot be imported as Individual Layers if Transparency Type preference is set to Straight. HAR-9314
Rendering
-
Bitmap Image Quality (small bitmap) resets to default value when changing the position of an image. HAR-9027
-
BMP with transparency/alpha (BMP4) are not written with alpha. HAR-9201
-
Scenes with textures are slower to render when rendering to smaller resolutions. HAR-7194
WebCC
-
WebCC cannot import a package that contains more than 35 scenes. HAR-9477
Xsheet
-
[Mac] Column headers’ text is hard to see in the Xsheet view and invisible in the light theme. HAR-8318
Database
-
Database scenes that have a custom path cannot be copied using Control Center. HAR-6386
-
Version 2 locks for drawings are not listed properly by dblock. HAR-7884