With the Shift and Trace tool, you can temporarily move, rotate and scale drawings. By default, the Shift and Trace tool will work on the drawing at the current frame. However, you can offset another drawing appearing in the Onion Skin, allowing you to shift the drawing you want to trace without having to select it, and you can even select multiple drawings and shift them together.
The simplest way to shift drawings is to shift the current drawing. When you select a drawing in the Timeline or Xsheet view, the Shift and Trace tool is already ready to move and transform this drawing. When using this method, you have to select the drawing you want to shift, shift it, then select the drawing you want to draw on and start tracing.
Another approach is to use the Shift and Trace tool move drawings before or after the current drawing. When using this method, you can start by selecting the drawing you want to draw on, shift the drawing you want to trace over in the right position, and start tracing right away.
At last, if you need to shift several drawings simultaneously, you can select several drawings with the Shift and Trace tool and transform them together.
- Do one of the following to select the Shift and Trace tool:
- In the Tools toolbar, double-click on the Hand
tool to open its pop-up menu and select Shift and Trace
tool.
- In the Shift and Trace toolbar, click on the Shift and Trace Tool
button.
- In the Tools toolbar, double-click on the Hand
-
In the Xsheet or Timeline view, select the drawing you want to shift.

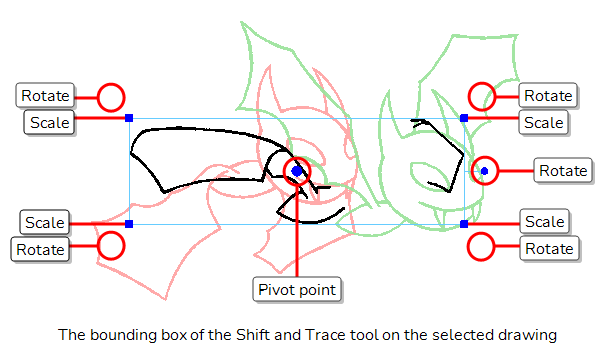
A manipulator box appears around the selected drawing.
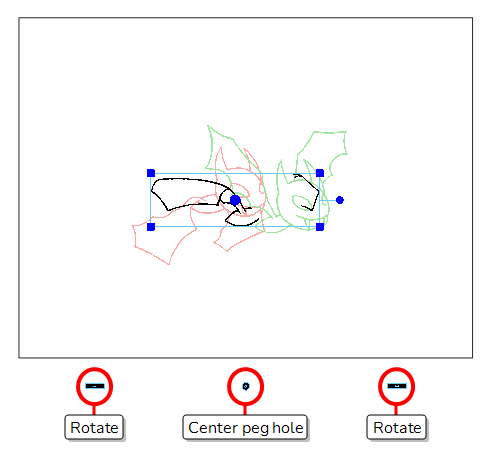
Peg holes also appear below the field of the drawing. The left and right peg holes can be used to rotate the drawing around the centre peg hole.
 TIPS
TIPS- If you do not need the peg holes, you can hide them by toggling the Show/Hide Pegs
button off in the Tool Properties view.
- If you want the peg holes to be displayed on a different side of the camera field, you can select the border where you want the peg holes to be by using the drop-down just right of the Show/Hide Pegs
button in the Tool Properties view.
- If you do not need the peg holes, you can hide them by toggling the Show/Hide Pegs
-
Do one of the following to extend the Onion Skin so as to include the drawings you want to trace over:
-
In the Timeline view, click and drag on the Onion Skin brackets so as to make them include all the required drawings.
.

- In the Camera view toolbar, use the Onion Skid Add One Previous Drawing
, Onion Skid Reduce One Previous Drawing
, Onion Skin Reduce One Next Drawing
and Onion Skin Add One Next Drawing
buttons.
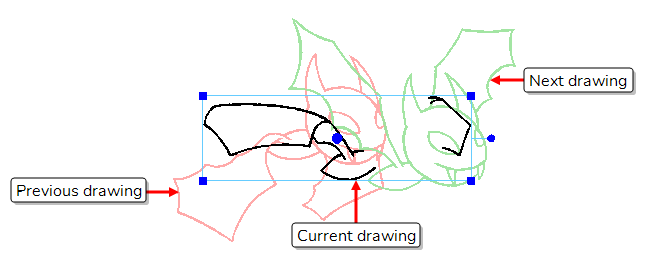
The drawings included in the Onion Skin will appear in the Camera view, in washed down red for previous drawings and washed down green for next drawings.
-
-
If you want to move the drawing, click and drag on it.

-
If you intend to rotate or scale the drawing, but want to do it from a different pivot point than the centre of the artwork, click and drag on the pivot point to reposition it.

-
If you want to rotate the drawing around the pivot point, click on the rotation handle at the right of the bounding box and drag it clockwise or counterclockwise.

You can also rotate the drawing by clicking just outside one of the four corners of the bounding box and dragging clockwise or counterclockwise.

-
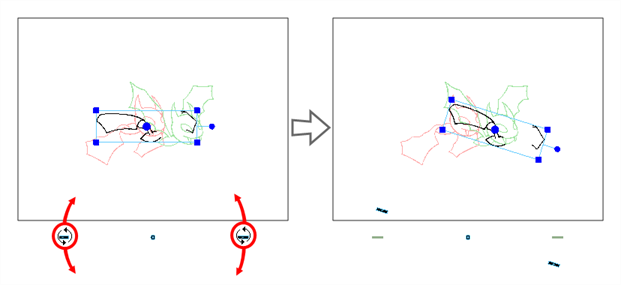
If you want to rotate the drawing around its centre peg hole, click on one of the side peg holes and drag it clockwise or counterclockwise.
-
If you want to scale the drawing, click and drag on one of the four corners of the bounding box.

- Do one of the following to select the Shift and Trace tool:
- In the Tools toolbar, double-click on the Hand
tool to open its pop-up menu and select Shift and Trace
tool.
- In the Shift and Trace toolbar, click on the Shift and Trace Tool
button.
- In the Tools toolbar, double-click on the Hand
-
In the Xsheet or Timeline view, select the drawing in which you want to draw instead of the one you want to shift and trace over.
.

-
Do one of the following to extend the Onion Skin so as to include the drawings you want to trace over:
-
In the Timeline view, click and drag on the Onion Skin brackets so as to make them include all the required drawings.
.

- In the Camera view toolbar, use the Onion Skid Add One Previous Drawing
, Onion Skid Reduce One Previous Drawing
, Onion Skin Reduce One Next Drawing
and Onion Skin Add One Next Drawing
buttons.
The drawings included in the Onion Skin will appear in the Camera view, in washed down red for previous drawings and washed down green for next drawings.

-
-
In the Camera view, while holding down the Ctrl (Windows/Linux) or ⌘ (macOS) key, click on the Onion Skin of the drawing you want to shift
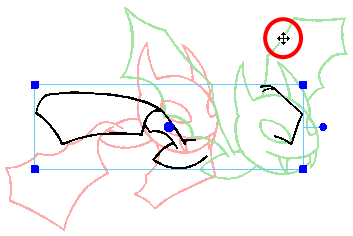
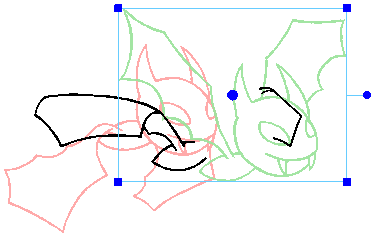
The control box of the Shift and Trace tool will appear around the drawing you just clicked on. From now on, all transformations done with the Shift and Trace tool will be done on that drawing.
-
Using the Shift and Trace control box, move, rotate and scale the selected drawing until it is in the right position, for you to trace over it.
- If you want to select the current drawing again, hold down the Ctrl (Windows/Linux) or ⌘ (macOS) key and click on its artwork in the Camera view.
- You can make the selection of other drawings easier by adding cross hairs to your drawings. Clicking on a drawing's cross hair while holding down the Ctrl (Windows/Linux) or ⌘ (macOS) key will also select that drawing—see Adding Cross Hairs with the Shift and Trace Tool.
- Do one of the following to select the Shift and Trace tool:
- In the Tools toolbar, double-click on the Hand
tool to open its pop-up menu and select Shift and Trace
tool.
- In the Shift and Trace toolbar, click on the Shift and Trace Tool
button.
- In the Tools toolbar, double-click on the Hand
-
In the Xsheet or Timeline view, select one of the drawings in the middle of the series of drawings you want to shift.
.

-
Do one of the following to extend the Onion Skin so as to include at least all of the drawings you want to shift.
-
In the Timeline view, click and drag on the Onion Skin brackets so as to make them include all the required drawings.
.

- In the Camera view toolbar, use the Onion Skid Add One Previous Drawing
, Onion Skid Reduce One Previous Drawing
, Onion Skin Reduce One Next Drawing
and Onion Skin Add One Next Drawing
buttons.
The drawings included in the Onion Skin will appear in the Camera view, in washed down red for previous drawings and washed down green for next drawings.

-
-
In the Camera view, while holding down the Ctrl (Windows/Linux) or ⌘ (macOS) key and the Shift key, click on the each drawing that you want to add to your selection.
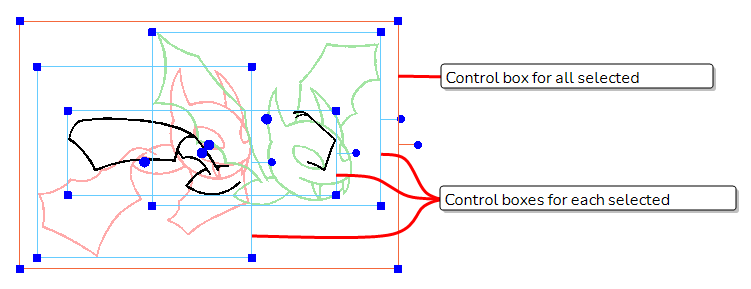
Once your selection includes multiple drawings, a red control box appears around the whole selection, and a blue control box appears around each selected drawing.
-
Using the red control box, move, rotate and scale all the selected drawings until they are in their intended position, angle and size.
TIPS- When multiple drawings are selected, you can still shift individual drawings by manipulating their own blue control box.
- If you want to select a single drawing again, release the Shift key but hold down the Ctrl (Windows/Linux) or ⌘ (macOS) key, then click on its artwork in the Camera view.
- You can make the selection of other drawings easier by adding cross hairs to your drawings. Clicking on a drawing's cross hair while holding down the Ctrl (Windows/Linux) or ⌘ (macOS) key will also select that drawing—see Adding Cross Hairs with the Shift and Trace Tool.