T-LAY-001A-001
Drawing Guides are drawing aids that you can add to your
Harmony supports a variety of drawing guides that are designed for a different kind of drawing task. Most of Harmony's drawing guides work by adding a horizon line and vanishing points to your drawing space. While using a drawing guide, dotted guide lines appear through your mouse cursor. These guide lines are either parallel or perpendicular to the horizon line, or are going from one of the guide's vanishing points to your mouse cursor. When you start drawing a stroke, your drawing tool instantly snap to one of the guide's axes, as if you were drawing against a ruler. You also have the option to use the drawing guide as a visual reference without snapping to the axes of the guides.
In the Guides view, you’ll also notice a Symmetry section. This section is where Symmetry Guides are added. These guides allow you to create drawings with perfect symmetry applied.
Harmony supports the following types of drawing guides:
-
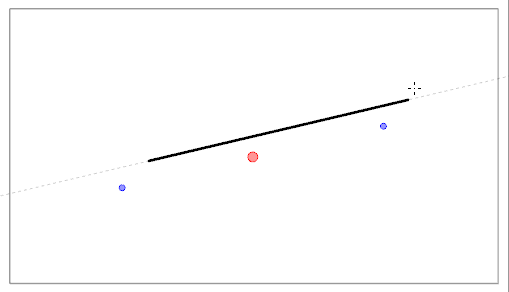
The Ruler allows you to position and rotate a simple axis, then draw a line along that axis, like a regular ruler.
-
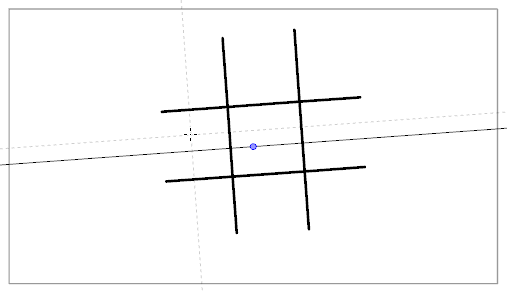
The Square Grid helps you draw lines that are either parallel or perpendicular to a horizon line.
-
The Isometric Perspective guide helps you draw lines that are parallel to one of three axes: The x-axis, the y-axis and the z-axis. The angle of each axis can be customized as needed.
This type of pseudo-perspective can also be referred to as parallel projection., This method is often used in 2D games and computer graphics. In 2D animation, it is often used to draw long tilting backgrounds from a low or high angle. In 3D isometric perspective is used to depict schematics of 3D elements without using perspective, foreshortening or 3D rendering.
-
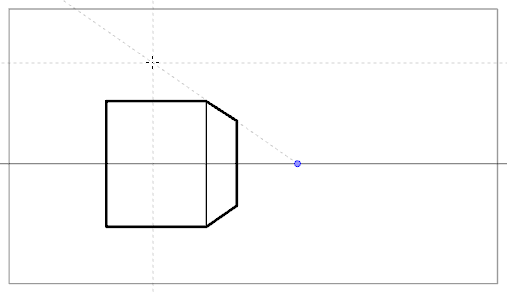
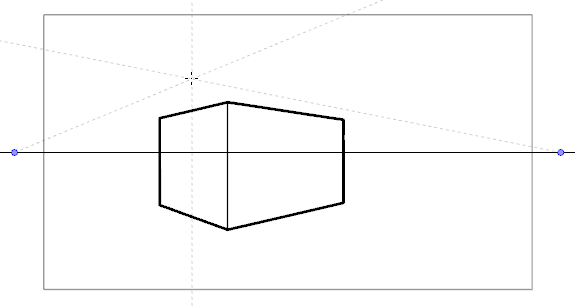
The 1-Point Perspective guide helps you draw lines coming from a single vanishing point on the horizon. It also helps you draw lines that are either parallel or perpendicular to the horizon line.
This is useful for drawing cuboid structures that are facing the camera.
-
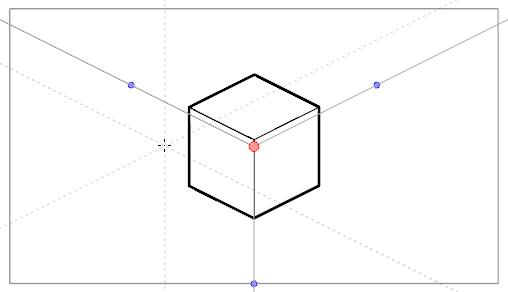
The 2-Point Perspective guide helps you draw lines coming from one of two vanishing points. Typically these points are placed on the horizon line outside the camera field. It also helps you draw lines that are perpendicular to the horizon line.
This is useful for drawing cuboid structures from a specific horizontal angle.
-
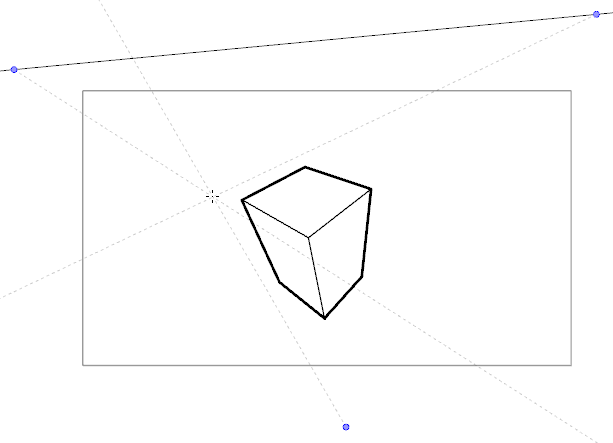
The 3-Point Perspective (Bird's Eye View) guide helps you draw lines coming from one of three vanishing points. Like with the 2-Point Perspective guide, two vanishing points are placed on the horizon line, which are used to draw horizontal lines on either the x-axis or the z-axis. The other vanishing point is placed below the horizon line to help draw lines on the y-axis.
This is useful for drawing cuboid structures from an elevated point of view.
-
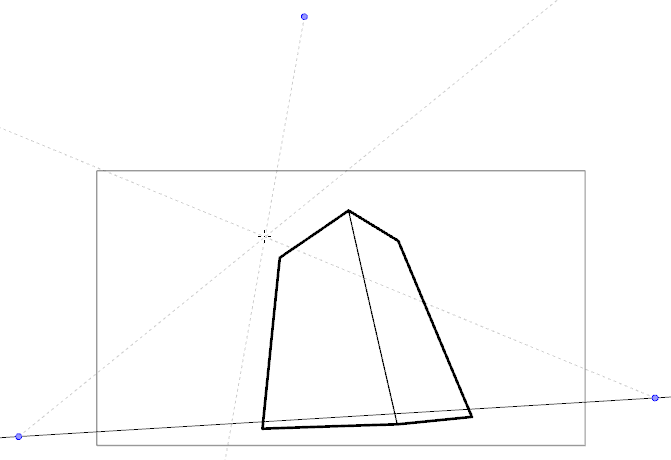
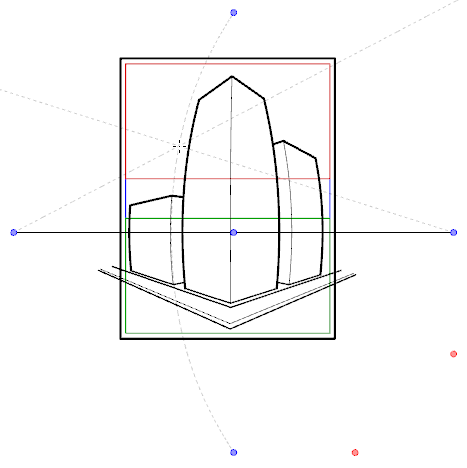
The 3-Point Perspective (Worm's Eye View) guide helps you draw lines coming from one of three vanishing points. Like with the 2-Point Perspective guide, two vanishing points are placed on the horizon line, which are used to draw horizontal lines on either the x-axis or the z-axis. The other vanishing point is placed above the horizon line to help draw lines on the y-axis.
This is useful for drawing cuboid structures from a low point of view.
-
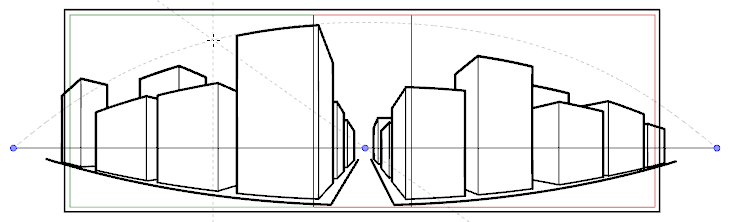
The 3-Point Perspective (Horizontal Pan) guide helps you draw horizontally panoramic backgrounds, with curvilinear horizontal lines. A vanishing point is placed in the middle of the horizon line, to help draw lines on the z-axis, and two vanishing points are placed on the horizon line outside of the camera field, to define the curve of the horizontal lines. Vertical lines are made perpendicular to the horizon line.
This is useful for drawing backgrounds meant to be panned over horizontally. Panning the camera horizontally over a background drawn with a 3-Point Perspective (Horizontal Pan) guide will simulate a rotation of the camera on the y-axis.
-
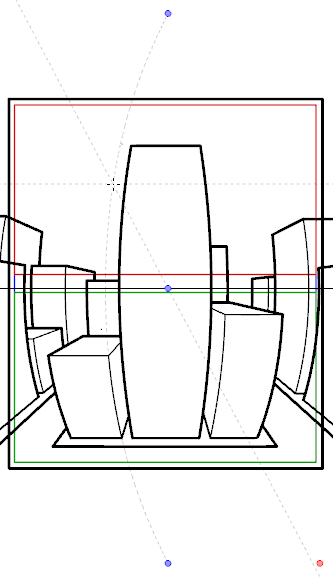
The 3-Point Perspective (Vertical Pan) guide helps you draw vertically panoramic backgrounds, with curvilinear vertical lines. A vanishing point is placed in the middle of the horizon line, to help draw lines on the z-axis, and two vanishing points are placed above and below the horizon line, outside of the camera field, to define the curve of the vertical lines. Horizontal lines are made parallel to the horizon line.
This is useful for drawing background meant to be panned over vertically. Panning the camera vertically over a background drawn with a 3-Point Perspective (Vertical Pan) guide will simulate a vertical rotation of the camera on the x-axis.
-
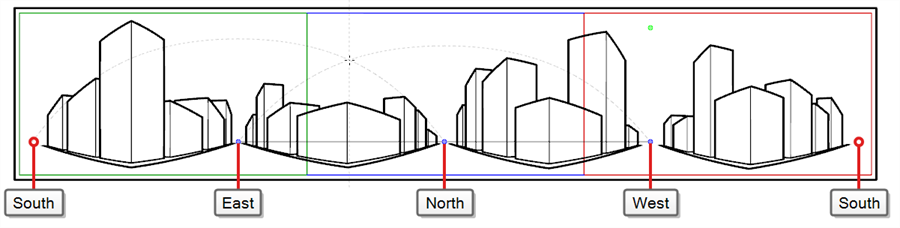
The 4-Point Continuous Perspective guide is very similar to the 3 Point Perspective (Horizontal Pan) guide, except that it is designed to help draw full 360° panoramic backgrounds.
This guide uses 5 vanishing points. When drawing a horizontal line, it is curved by arching over one of the vanishing points and reaching down to the two surrounding vanishing points. This creates a perspective effect where each vanishing point represents one of the cardinal points, except that the leftmost and the rightmost points represent the same cardinal point, effectively creating a looping background. Backgrounds made with the 4-Point Continuous Perspective guide can be looped horizontally to simulate a full rotation of the camera on the y-axis.
-
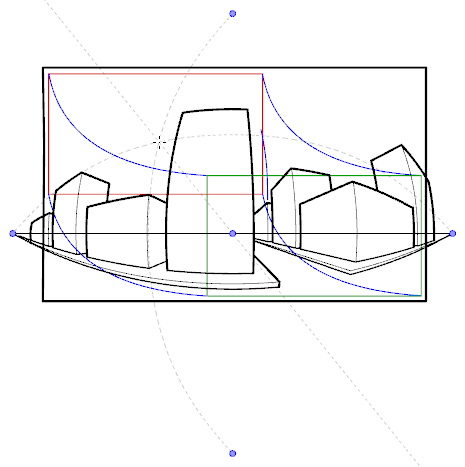
The 4-Point Perspective (Vertical Pan) is a lot like the 2-Point Perspective guide, except that its vertical lines are curvilinear, so it can be used to make vertically panning backgrounds. Two vanishing points are on the horizon line, outside of the camera field, to help draw lines on the x-axis and the z-axis, and two vanishing points are placed above and below the camera field to define the curve of the vertical lines.
This is useful for drawing backgrounds meant to be panned over vertically, in which cuboid objects are seen from an angle.
-
The 5-Point Perspective (Fish Eye) guide helps you draw backgrounds that are curvilinear on both the x-axis and the y-axis. It has one central vanishing point on the horizon line, from which lines on the z-axis are drawn, two vanishing points at the extremities of its horizon line, to define the curve of the horizontal lines, and two vanishing points above and below the horizon line, to define the curve of the vertical lines.
This guide can be used to draw backgrounds with a fisheye-style wide angle lens effect. It can also be used to draw backgrounds that are meant to be panned in various directions.
Guides are made to work with the following tools. To avoid cluttering your drawing space, they are only visible when one of these tools is selected:
-
 Brush
Brush -
 Pencil
 -
 Stroke
 -
 Line
Line
To use a guide, you must add the Guides view to your workspace. Then, you can add the guide you wish to use to your
The Guides view allows you to have as many guides as you want, and each one will preserve the adjustments you make to it. In the Guides view, you can also select which guide you wish to use, rename, delete and reorder guides as needed, as well as cut, copy, paste, export and import guides between different
- The guide list, its guides and their individual parameters are saved with your scene. Hence, you can create a configure a guide specifically for the backgrounds and objects in your scene in one Harmony session, then reuse them exactly as you configured them in a later Harmony session.
- Changes made to a guide or to the guide list can be undone with the Undo command.
Symmetry Guides
Harmony also supports Symmetry Guides. These kinds of guides automatically draw mirror reflections of each stroke you draw. You may add the following types of Symmetry guides.
-
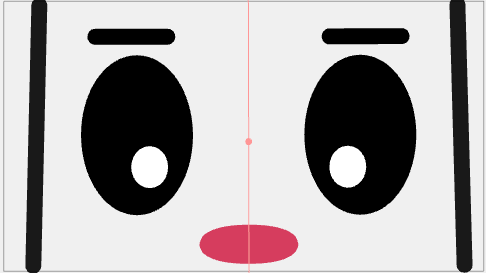
The Vertical Symmetry Guide is a line along the vertical y-axis that automatically draws the horizontal mirror reflection of your drawing strokes. It helps you draw perfectly symmetrical drawings. The symmetry line’s angle can be adjusted by clicking and rotating. It has a point signifying the centre of rotation, and the point can be moved anywhere in the Camera view to set the point the line rotates around.
-
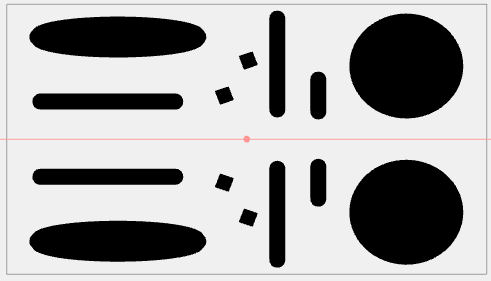
The Horizontal Symmetry Guide is a line along the horizontal x-axis that automatically draws the vertical mirror reflection of your drawing strokes. It helps you draw drawings with perfect vertical symmetry. It has a point signifying the centre of rotation, and the point can be moved anywhere in the Camera view.
-
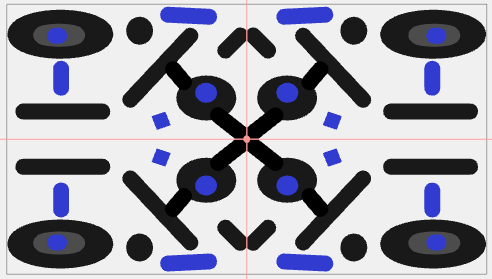
The Dual Axis Symmetry Guides consist of both a horizontal and vertical symmetry line that intersects and a central point and divides the camera into four quarters. A line drawn on one quarter will automatically draw the same line symmetrically on the other three quarters. It has a point signifying the centre of rotation and the point can be moved anywhere in the Camera view.
Symmetry Guides can be used with the following tools:
-
Pencil
-
Brush
-
Stencil Brush
-
Shape
-
Stamp