External Rendering Toolbar
The External Rendering Toolbar contains four actions to allow you to communicate between your source 3D scene and Harmony in real time. These External Rendering actions will allow you to render using an external 3D software, bake the 3D information into your Harmony scene or bake it into an external 3D project file.
The four external rendering actions are as follows:

For information on how to add the External Rendering Toolbar to your Workspace, see: Adding and Removing Toolbars.
Render Nodes 
The Render Nodes action will render your 3D scene through an external 3D software. All the renders made will appear in the cache of the elements folder of your scene. This means that after the initial render, the 3D software will no longer need to re-render materials as you scrub through the frames while in the Render view.
When you click the Render Nodes icon, the External Render dialog box will launch.
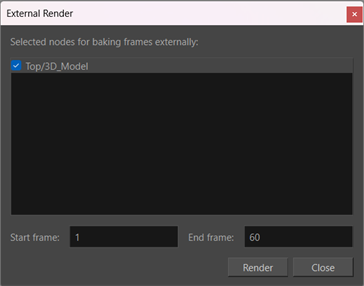
The properties window will display the 3D Model Element nodes available to be rendered. With 3D Model Element nodes selected in the list, a custom frame range can be defined and the selected nodes will be rendered and cached within the defined range of frames.
Bake Nodes 
The Bake Nodes action will allow you to render out a 3D sequence through Autodesk Maya or Blender and save it as a sequence of EXR files. By baking the rendered 3D information into an EXR element node, Harmony will be able to load the rendered images without relaunching the 3D software or re-rendering. The rendered frames will be available as bitmap images and will be available in the camera view and in the soft render preview.
The big advantage to baking the 3D information into your Harmony scene is that it allows you to preview or render the Harmony scene without the need for Autodesk Maya or Blender to be installed on your computer. Once the models have been rendered in the external application and baked to an element node, the rendered images will be available without needing any external applications or subsequent rendering. This makes the Harmony project more shareable in an animation pipeline.
When you click the Bake Nodes icon, the External Render dialog box will launch.
The properties window will display the 3D Model Element nodes available to be rendered. With 3D Model Element nodes selected in the list, a custom frame range can be defined and the selected nodes will be rendered and cached within the defined range of frames.
Bake to External Project 
The Bake to External Project action allows you to create a new project file in the external 3D software containing all the animation and transformations on the 3D model from Harmony. This action allows you to send the keyframe animations, transformations, subnode transformations and camera manipulations made in Harmony back to the original 3D software and saved to a new project file. These changes will be made in the new file, preserving your original 3D project file. This allows the 3D project file to be updated, shared and rendered externally.
When you click the Bake to External Project icon, the Bake to External Render dialog box will launch.
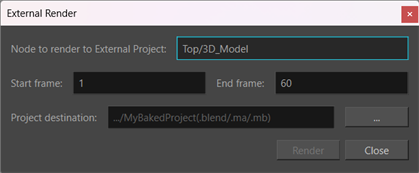
The External Render dialog box will display the 3D Model Element node that will be rendered as well as give you the ability to define the range of frames that will be rendered. Additionally, the Project destination field allows you to define the path to save the new baked file.
Defining the Path to Save Your Duplicate File
You are also able to define the path to save your duplicate file with the attributes box of the Render Maya Batch Node or Render Blender Batch Node.
-
In the Node view, locate the Render Maya Batch Node or Render Blender Batch Node, and click on the yellow square to open the Layer Properties.
The Layer Properties dialog for the Render Maya Batch Node or Render Blender Batch Node appears.
-
In the Attributes tab, in the Output Project field, enter the path you want your project file to follow.
 IMPORTANT Make sure that you are entering the correct extension for the intended software to open.NOTE If no value is set, the 3D project file will only be modified temporarily in order to produce the output frame.
Cache Manager 
The Cache Manager is a utility that allows you to manage the caches generated when the RenderMayaBatch and RenderBlenderBatch nodes are used. When a RenderMayaBatch or RenderBlenderBatch node is selected, all available cache entries for that node will load in the Cache Manager.
This utility is able to show the cached renders of the external 3D project and provide the ability to lock and/or assign frames and delete cache files on disk. The Cache Manager will also allow you to see the size of the cached image and the total size of the folder containing all the cached items.
The cache entries will be listed with the following statuses:
-
Active: When the cached image on the disk matches in both Harmony and the external 3D project, the status will be active and appear green.
-
Stale: When the cached image exists on the disk and is unlinked from the external 3D project, the status will be stale and appear yellow.
-
Missing: When there is no cached image on the disk, the status will be missing and appear red.
When you click the ![]() Cache Manager icon, the Cache Manager dialog box will launch.
Cache Manager icon, the Cache Manager dialog box will launch.
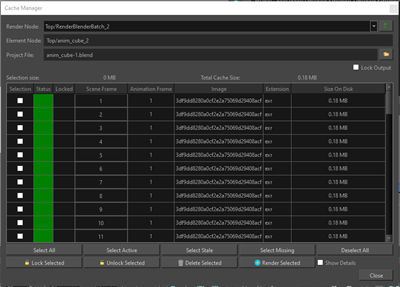
From the Cache Manager, you can select the RenderMayaBatch or RenderBlenderBatch node from the dropdown list. Once selected, the source 3D element that is being rendered in Harmony and the external project path will be displayed.
Locking and Unlocking
Locking a cache entry will modify the behaviour of the RenderMayaBatch or RenderBlenderBatch node. Instead of checking the scene settings and potentially rendering from Maya or Blender, the RenderMayaBatch or RenderBlenderBatch node will provide only the locked cache frames.
By locking frames, you are able to make changes in your scene without affecting the render. This is useful for rendering a scene to create the initial renders in a specific environment. By locking the cached renders at that moment, you can prevent unnecessary rendering when things are slightly changed at a later time or in a different environment. This means you will not need to launch the 3D software every time you open that sequence as your elements will be stored, locked in the cache folder.
-
Select an active (green) or stale (yellow) frame.
-
Click Lock Selected or click in the locked column.
A lock icon will appear next to your selection.
-
Select your locked frame.
-
Click Unlock Selected.
The lock icon will disappear.
TIP The parameters of the locked image will remain unchanged despite changes made to the scene around it. The cached frame will still be used even if the scene is changed.
-
Select the Scene Frame of a stale (yellow) or active (green) render image.
NOTE You cannot select a missing frame as there is no image in the cache. -
Enter a new frame number for Harmony to reference.
-
Hit Enter.
The selected Animation Frame will relocate in the list and combine with the existing Scene Frame number entered. A lock icon will appear next to your selection and the lock output will be enabled.
Because you are changing a parameter, once you hit enter, your new frame will appear stale and the old frame will appear invalid.
NOTE The lock output will also be enabled automatically in the RenderMayaBatch or RenderBlenderBatch node when enabled in the Cache Manager.
Any cached images that are locked will override your selection when rendering a frame in Harmony. When you render, Harmony will look for the nearest locked frame to produce during a soft render. If two frames are locked, Harmony will render the nearest locked frame to that selection.