The Write node is the node that is used by Harmony to render a scene. When rendering a scene, Harmony renders the image information sent to the Write node, and outputs it using the parameters in the Write node's layer properties.
The Node view allows you to branch out and merge elements of your scene in specific ways. By default, a scene has a Write node connected to its main composite, meaning all of the scene's elements are rendered. However, a Write node can be connected to any node in your scene that outputs image information, even a drawing or an effect. A scene's renders are based on the image information that is sent to its Write node, and nothing else. Hence, you can control exactly what gets rendered, which is especially useful if you want to have elements in your scene that are only visible in the Camera view, such as a storyboard overlay or a camera guide, without having them appear in the renders.
You can also set up a scene to create multiple renders by connecting several Write nodes to it. Your Write nodes can be connected to different elements of your scene, which allows you to create separate renders for different parts of your Node view every time your scene is rendered. For example, a scene can have a Write node for rendering the scene without any annotations, so that render can be used in post production, and another one for rendering the scene with its storyboard and annotations for reviewing. A scene can also have multiple Write Nodes connected to the same composite, which can allow you to render the same image in multiple file formats or locations at the same time.
Each Write node can be configured to export individual frames as image files, a video file, or both simultaneously.
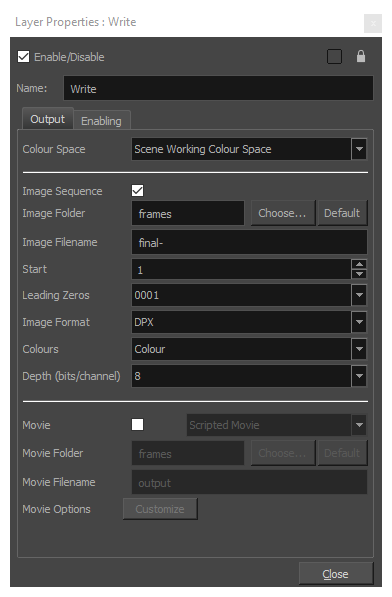
Layer Properties
Output Tab
The output tab can be used to configure whether the Write node creates individual frame images, a movie file, or both. Further more, you can configure the path, file naming pattern and file type of frames exported by the Write node, as well as the path, file name and encoding options of the movie file created by the Write node.
| Parameter | Description | |||||||||||||||||||||||||||||||||||||||||||||||||||||||||||||||||||||||||||||||||||||||||||||||||||||||||||||||||||
|
Image Sequence |
Select this option to create an image sequence. |
|||||||||||||||||||||||||||||||||||||||||||||||||||||||||||||||||||||||||||||||||||||||||||||||||||||||||||||||||||
|
Image Folder |
The path to the folder in which to save the rendered frames. This path can be absolute or relative to the scene's folder. For example, the default path for rendered frames is frames, which means the images are saved in the frames subfolder of the scene folder. If you want to select an absolute path, you can click on the |
|||||||||||||||||||||||||||||||||||||||||||||||||||||||||||||||||||||||||||||||||||||||||||||||||||||||||||||||||||
|
Image Filename |
The prefix for the file name of each exported frame. Frames will be named with this value, followed by the frame number and their image type extension. It is recommended to leave the hyphen (-) at the end of the prefix to separate the prefix from the frame number. |
|||||||||||||||||||||||||||||||||||||||||||||||||||||||||||||||||||||||||||||||||||||||||||||||||||||||||||||||||||
|
Start |
Select the starting number for the image sequence. |
|||||||||||||||||||||||||||||||||||||||||||||||||||||||||||||||||||||||||||||||||||||||||||||||||||||||||||||||||||
|
Leading Zeros |
Allows you to select the number of digits in the number used to identify each frame. |
|||||||||||||||||||||||||||||||||||||||||||||||||||||||||||||||||||||||||||||||||||||||||||||||||||||||||||||||||||
|
Image Format |
The image format in which the exported frames will be saved. The following formats are supported:
|
|||||||||||||||||||||||||||||||||||||||||||||||||||||||||||||||||||||||||||||||||||||||||||||||||||||||||||||||||||
| Colours |
Drop list with colour modes. Available modes depend on the selected file type.
|
|||||||||||||||||||||||||||||||||||||||||||||||||||||||||||||||||||||||||||||||||||||||||||||||||||||||||||||||||||
| Depth (bits/channel) |
Drop list with bit depth value and a label next to it "bits/channel". Available bit depth depends on the selected file type.
|
|||||||||||||||||||||||||||||||||||||||||||||||||||||||||||||||||||||||||||||||||||||||||||||||||||||||||||||||||||
| Movie |
Select this option to create a QuickTime movie. When enabled, the Movie Folder and the Movie Filename fields appear among the Image Folder and Image Filename fields.
|
|||||||||||||||||||||||||||||||||||||||||||||||||||||||||||||||||||||||||||||||||||||||||||||||||||||||||||||||||||
|
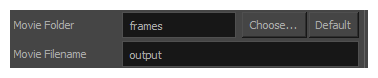
Movie Folder |
Only available when the Movie option is enabled. The folder in which to export the movie file. You can click Choose to the right of the text field to browse for the directory where you want the movie to be exported, or click Default to set the export path to the default value. You can also type a path relative to the scene's directory. For example, the default value is frames, which exports the movie to the scene's frames subdirectory. |
|||||||||||||||||||||||||||||||||||||||||||||||||||||||||||||||||||||||||||||||||||||||||||||||||||||||||||||||||||
|
Movie Filename |
Only available when the Movie option is enabled. The name of the movie file to export. Do not enter the file's extension. |
|||||||||||||||||||||||||||||||||||||||||||||||||||||||||||||||||||||||||||||||||||||||||||||||||||||||||||||||||||
|
Movie Options |
Opens the movie settings dialog box for your selected video format, in which you can set the video and audio compression settings for your video file:
NOTE This button is available on Windows and macOS only.
|
|||||||||||||||||||||||||||||||||||||||||||||||||||||||||||||||||||||||||||||||||||||||||||||||||||||||||||||||||||
| Colour Space |
The colour space in which to render your scene’s frames. When a specific colour space is selected for a Write node, frames rendered by this Write node will be converted from the project’s working colour space to the Write node’s colour space. The following colour spaces are supported in Harmony:
NOTES
|
|||||||||||||||||||||||||||||||||||||||||||||||||||||||||||||||||||||||||||||||||||||||||||||||||||||||||||||||||||
| Compression |
Drop list that appears for EXR and TIF formats only.
|
|||||||||||||||||||||||||||||||||||||||||||||||||||||||||||||||||||||||||||||||||||||||||||||||||||||||||||||||||||
| Inverted Channels | A checkbox that appears for DPX only in 10, 12, 16 bit depths. | |||||||||||||||||||||||||||||||||||||||||||||||||||||||||||||||||||||||||||||||||||||||||||||||||||||||||||||||||||
|
Video Format |
The drop down list to the right of the Movie option. Allows you to select one of the following formats:
|
|||||||||||||||||||||||||||||||||||||||||||||||||||||||||||||||||||||||||||||||||||||||||||||||||||||||||||||||||||
|
Video Options |
Opens the video settings dialog box, which allows you to set the video compression settings for your video file—see OpenQuickTime Video Options Dialog Box (GNU/Linux). NOTE This button is available on GNU/Linux only.
|
|||||||||||||||||||||||||||||||||||||||||||||||||||||||||||||||||||||||||||||||||||||||||||||||||||||||||||||||||||
|
Sound Option |
Opens the audio settings dialog box, which allows you to set the audio compression settings for your video file—see OpenQuickTime Sound Options Dialog Box (GNU/Linux). NOTE This button is available on GNU/Linux only.
|
|||||||||||||||||||||||||||||||||||||||||||||||||||||||||||||||||||||||||||||||||||||||||||||||||||||||||||||||||||
Enabling Tab
You can create several Write nodes for a single scene and, by default, when a scene is rendered, all of its Write nodes will perform their render. However, using the options in the Enabling tab, you can set up some Write nodes to only perform their render if the scene is rendered at a specific resolution. This is mostly useful on Harmony Server, as Harmony Server allows you select the resolution at which to render a scene when sending a scene for rendering by the Harmony database's render farm.
A good example of how this can be useful is if your scene has storyboard thumbnails in the corner, and a Write node connected to a composite that crops the picture to only include the storyboard thumbnail, so that your scene can export both the final animation and the animated storyboard when rendered. You can set up your scene's main Write node to only work when exporting the scene at the scene's original resolution, and the storyboard thumbnails Write node to only work when exporting at the desired resolution for an animated storyboard.
This option allows you to filter with either resolution presets, or by specifying the width and height of the chosen resolution in pixels. You can hence create custom resolution presets named after their Write node's purpose, to make it easier to choose the resolution when rendering a scene.
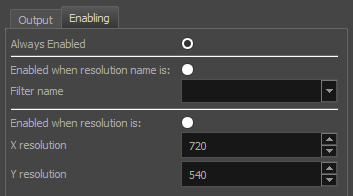
| Parameter | Description |
|
Always Enabled |
Makes this Write node render every time the scene is rendered. This is the default option. |
|
Enabled when Resolution Name is |
Makes this Write node render only when the scene is rendered at the specified resolution preset. |
|
Filter Name |
Select the resolution preset at which to render the scene to activate this Write node. |
|
Enabled when Resolution is |
Make this Write node render only when the scene is rendered at the resolution with the specified width and height, in pixels. |
|
X Resolution |
The width (in pixels) of the resolution at which to render the scene to activate this Write node. |
|
Y Resolution |
The height (in pixels) of the resolution at which to render the scene to activate this Write node. |