Colour Curves Node Properties
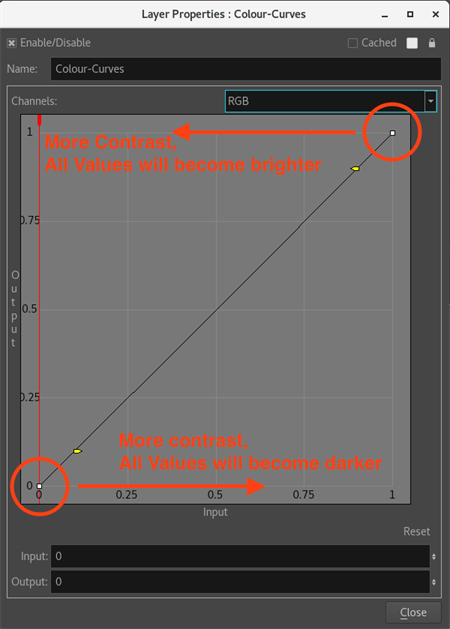
The Colour Curves properties presents a 4x4 grid. Since the Input and Output values are separated within a range of 0 and 1, which 0 represents 0% and 1 represents 100%, each line of the grid represents a graduation of 25%.
By moving the control points and handles of the diagonal line that goes through the 4x4 grid, you can modify the curve and create a more progressive setup. But the main distinction between the Colour Curves node and the Colour Levels node is the possibility to add more control point to the curve, which lets you create a more complex setup that gives you more control over the image.
To learn more about using the Colour Curves node, see Modifying Colour Curves and Adjusting Colour Curves.
|
Parameter |
Description |
|---|---|
|
Enable/Disable |
Allows you to enable or disable the node. When disabled, a node has no visible effect on the rendered image, nor on the preview in the Camera, Perspective, Side, and Top views. |
|
Colour Swatch |
Sets the colour of the layer in the Timeline view and of the node in the Node view. |
|
Name |
Allows you to change the name given to the node. |
|
Channels |
Lets you select which channel you want to modify:
|
|
Input |
Lets you reduce the range of the input colours (by dragging left and right).
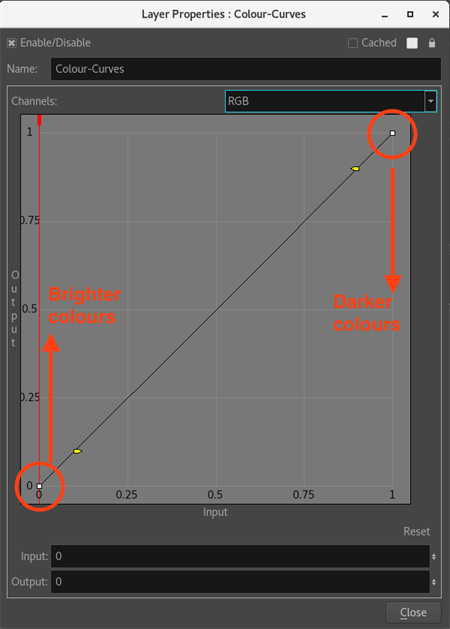
Modifying the first control point to a higher input value will create a more contrasted version of the picture. If the value is set near 1, every medium colour will become darker, extremely light colours will stay visible and white will remain white. Once the input is set to 1, only the white colour will remain. For example, the first control point has an output of 0 and an input of 0.5 instead of 0.
Modifying the last control point to a smaller input value will create a more contrast version of the picture. If the value is set near 0, medium colours will become brighter, extremely dark colours will stay visible and black will remain black. Once the input is set to 0, only the white colour will remain. For example, the first control point has an output of 1 and an input of 0.5 instead of 1.
|
|
Output |
Reducing the range of the output colours (dragging up and down) will reduce the levels in the output image but will not clamp the upper and lower pixels (by interpolating the values to a lower overall range). The perceived contrast might drop, but that’s only because the overall levels in the image have been reduced.
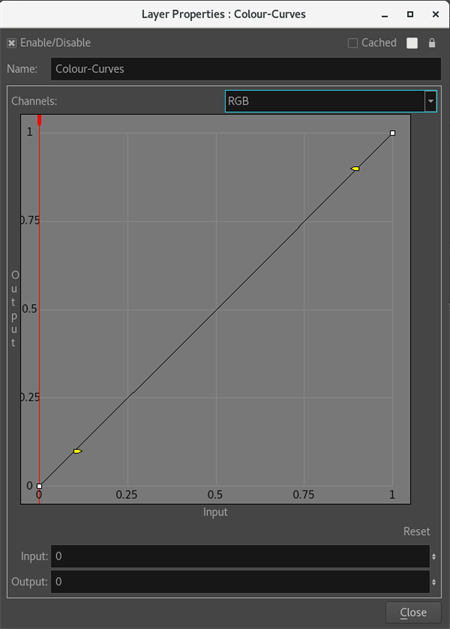
Modifying the first control point to a higher output value lets you transform the image to a brighter version of it. The contrast in the picture will mostly remain the same. For example, the first control point has an output of 0.5 instead of 0 and an input of 0.
Modifying the last control point to a smaller output value lets you transform the image to a darker version of it. The contrast in the picture will mostly remain the same. For example, the last control point has an output of 0.5 instead of 1 and an input of 1.
|
|
Reset |
Lets you reset all values of the first and last control point. It will also remove every added control point. |