When animating for games, depending on the type of game you’re creating, you may need to limit your animation. For example, if you’re creating mobile games and you want to keep the file sizes small and playback fast on all devices, then limit yourself to simple keyframe animation with as few drawing swaps as possible. If you’re creating console games, you have the freedom to create more drawings and have a higher complexity. You can explore with your programmer the limitations of the platforms you’re exporting to, and what your game engine supports.
Here are some tips for efficient, lightweight animation:
- Use mainly transformations, such as move, rotate, scale, and skew.
- Create additional drawing swaps when needed.
- If you use Curve and Envelope deformers or Morphing, you’ll need to bake out the drawings for export. Be careful when doing this, as you may want to keep the number of drawings small. Don’t bake out an entire sequence, just selected drawings. You don't need to bake the Game Bone deformers.
- The bigger the drawings are in the Drawing view, the more pixels they will occupy in the texture size on the sprite sheet. When setting up your rig, make sure to not scale individual layers by using a keyframe with the Transform tool. If you want to scale things up or down, use the Select tool. This will keep things the same relative size on the sprite sheet. When you export the sprite sheets, in the script you can also set the resolution of the sprite sheet so the drawings can be scaled down for smaller devices.
- Only drawings which are exposed in the scene will be exported to the sprite sheet. For example, if you have 10 drawings in your Library view, but only two of them are showing in your scene, only those two will be exported. This keeps the sprite sheet as tight as possible.
Animating Multiple Sequences
You will always have multiple animations for your characters. For example, an idle sequence, a run sequence, an action sequence, and so on. You need to work in a specific structure so you can export all of these animations to a single sprite sheet.
There are two different work flows that you can use:
- Workflow 1: Separate Scenes
- Workflow 2: Separating Using Scene Markers
Workflow 1: Separate Scenes
First, create a scene file with the name of the character, such as Space Duck. This is the file where you can create or import your game rig. In the top menu, select File > Save As New Version, and give this new version the name of the animation. For example, Idle.
Every time you need to do a new animation using the same character, perform a Save As New Version. In the end, you may have something like this:
Scene: Space Duck
Versions:
- Idle
- Run
- Jump
- Shoot
When you run the export script, it will export the drawings from the current scene into the export folder. It will also let you know if there are any other scene versions that were already exported to that folder. If so, then it will recompile the sprite sheet to include all the drawings from all the animations. This allows the maximum possible reuse of drawings.
Workflow 2: Separating Using Scene Markers
You can also create all of your character animations in a single scene, one after the other, such as idle, run, jump and shoot. Then use scene markers to mark and separate the individual animations, see—Creating a Scene Marker.
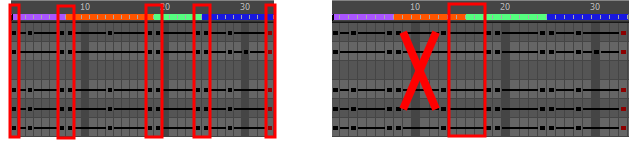
When you are marking individual animation frame ranges, be sure that they start and end with a keyframe. Do not create scene markers for a range of frames that starts or ends in the middle of an interpolated movement.
When exporting your sprite sheet, in the Export To Sprite Sheet dialog box, be sure to check the Use Scene Markers to Export Clips option.
![]()
The animated clips are divided and listed in the stage.xml in the same way that they would appear if you had exported each animated sequence from separate scenes to the same file location.