
Setting Anchors and Props
An anchor is an attachment point you can use to bind one or several props to a specific location that is predefined by the anchor.
A prop is a game item that will be attached to an anchor. It could be a stick held within the character’s hand, a helmet attached to the character’s head...the possibilities are endless. Props are easy to turn on or off, and easily swappable from within Harmony or Unity.
- Create a new Drawing node and rename it according to the anchor you are creating.
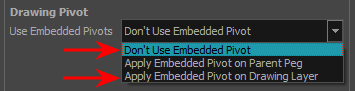
- Inside the Layer Properties of your drawing node, make sure that pivot option is set to Don’t Use Embedded Pivot or Apply Embedded Pivot on Drawing Layer. The Apply Embedded Pivot on Parent Peg does not transition well to Unity and you will lose your pivot information.
- Once this is done, you can use any of the animation tools to reposition the pivot point of your node, such as the Rotate tool in the Advanced Animation toolbar. You should be able to see the pivot coordinates from the Layer Properties of your Drawing node. If the pivot is not repositioned, its default place will be at the centre of your Harmony scene (0,0).
- Once this is set up, select the Drawing node and click the Toggle Anchor
 button in the Game toolbar.
The Drawing node is highlighted in red in the Timeline and Node views. Your anchor can now be used to attach a prop.
- Create a new Drawing node or take an existing prop on which you want to attach an anchor.
- Position the Drawing Pivot of the prop node using a tool on the Advanced Animation toolbar, such as the Rotate tool. The position of the prop’s pivot will align with that of the anchor. Make sure it is positioned accordingly.
- With the prop Drawing Node selected, click the Toggle Prop
 button in the Game toolbar.
The prop Drawing node is highlighted in green in the Timeline and Node views.
- Do one of the following:
| ‣ | Connect the anchor and prop to the parent peg. |

| ‣ | Connect the prop under the anchor to create a parent/child hierarchy. |

| Intro |
|
| Legal Notices |
|
| About this Help System |
|
| About Harmony |
|
| What's New |
|
| Harmony 12.2.1 Release Notes |
|
| Harmony 12.2 Release Notes |
|
| Harmony 12.1.1 Release Notes |
|
| Harmony 12.1 Release Notes |
|
| Harmony 12.0 Release Notes |
|
| System Requirements |
|
| Control Center |
|
| Web Control Center |
|
| Connecting to the Web Control Center |
|
| Web Control Center Interface |
|
| Centralized Data, Checking Out and Global Locking |
|
| Managing Users |
|
| User Types and Restrictions |
|
| Managing Environments, Jobs and Scenes |
|
| Managing Environments |
|
| Managing Jobs |
|
| Managing Scenes |
|
| Checking Out or Checking In a Scene |
|
| Renaming Scenes |
|
| Reordering Scenes |
|
| Clearing Scenes |
|
| Changing the Status of Scenes |
|
| Customizing Scene Status Colours |
|
| Assigning Users to Scenes |
|
| Setting the Scene Priority |
|
| Searching Scenes |
|
| Vectorizing and Unvectorizing Scenes |
|
| Rendering Scenes |
|
| Downloading and Uploading Scenes |
|
| Saving Partial Scenes |
|
| Web Control Center Commands |
|
| Start Project |
|
| Starting Toon Boom Harmony |
|
| Welcome Screen |
|
| Creating and Opening Scenes |
|
| Saving a Scene |
|
| Setting the Scene Length |
|
| Adding a Drawing Layer |
|
| Scene Settings |
|
| Verifying the Project Integrity |
|
| Basic Commands |
|
| Preferences |
|
| How To |
|
| Introduction |
|
| About the Welcome Screen |
|
| How to Create a Scene |
|
| About the Interface |
|
| How to Draw |
|
| How to Paint |
|
| How to Create a Traditional Animation |
|
| How to Morph Drawings |
|
| How to Import Bitmap Images |
|
| How to Build a Cut-out Character |
|
| How to Use Deformers |
|
| How to Animate a Cut-out Character |
|
| How to Create Templates |
|
| How to Set Up a Scene |
|
| How to Animate Objects and the Camera |
|
| How to Create a Multiplane |
|
| How to Set Up Objects in 3D Space |
|
| How to Import Sound and Add Lip-Sync |
|
| How to Add Effects to a Scene |
|
| How to Export a Movie |
|
| Concepts |
|
| Animation Workflow |
|
| Pre-production |
|
| Production |
|
| Post-production |
|
| About the Animation Types |
|
| Traditional Animation |
|
| Paperless Animation |
|
| Cut-out Animation |
|
| Production Steps |
|
| Traditional Animation Workflow |
|
| Paperless Animation Workflow |
|
| Cut-out Animation Workflow |
|
| Animation Principles |
|
| Basic Concepts |
|
| Bitmap and Vector Graphics |
|
| Line and Colour Layers |
|
| Colour Palettes |
|
| Exposure Sheet, Timeline and Timing |
|
| Pegs |
|
| Multiplane |
|
| Network |
|
| Frame Rate and Format |
|
| Scenes |
|
| Project Organization |
|
| File Structure |
|
| Asset Management |
|
| Drawings and Layers |
|
| Libraries and Templates |
|
| Naming Convention |
|
| Production |
|
| Drawing and Design |
|
| Design and Drawing Tools |
|
| Preparation |
|
| Sketching the Model |
|
| Drawing with the Brush or Pencil Tool |
|
| Override Tool |
|
| Relative Size |
|
| Palettes and Colours |
|
| Sketching |
|
| Cleaning and Inking the Model |
|
| Drawing Tasks |
|
| Current Drawing on Top |
|
| Drawing Using the Pencil Tool |
|
| Working with Thickness Stencils |
|
| Pencil Line Texture |
|
| Drawing with the Brush Tool |
|
| Drawing with Textured Brushes on Vector Drawing Layers |
|
| Drawing with Bitmap Brushes |
|
| Creating Bitmap Brushes |
|
| Viewing the Final Lines as you Draw |
|
| Selecting the Current Colour of a Tool |
|
| Selecting Drawing Objects |
|
| Erasing Parts of a Drawing |
|
| Reshaping a Drawing Using the Contour Editor Tool |
|
| Reshaping Pencil Lines with the Pencil Editor Tool |
|
| Drawing with Shapes |
|
| Drawing with the Polyline Tool |
|
| Drawing Using Invisible Lines |
|
| Deforming a Drawing Using the Perspective Tool |
|
| Warping a Drawing Using the Envelope Tool |
|
| Cutting Drawing Parts |
|
| Smoothing Lines |
|
| Working With Text |
|
| Working with Tool Presets |
|
| More Drawing Tools |
|
| Drawing Tools Reference |
|
| Pencil Tool Options |
|
| Brush Tool Options |
|
| Bitmap Brush Options |
|
| Select Tool Properties |
|
| Eraser Tool Options |
|
| Bitmap Eraser Tool Options |
|
| Contour Editor Tool Properties |
|
| Pencil Editor Properties |
|
| Shape Tool Options |
|
| Polyline Tool Options |
|
| Stroke Tool Options |
|
| Perspective Tool Properties |
|
| Envelope Tool Options |
|
| Cutter Tool Options |
|
| Smooth Editor Tool Options |
|
| Text Tool Options |
|
| Drawing Pivot Tool |
|
| Colour Styling |
|
| Preparation |
|
| Working with Palettes |
|
| Palette Lists |
|
| Palette File Storage |
|
| Creating a Colour Palette |
|
| Duplicating a Colour Palette |
|
| Cloning a Colour Palette |
|
| Importing and Linking Palettes |
|
| Colours |
|
| Adding a Colour Swatch |
|
| Editing Gradients and Textures |
|
| Colour Display Modes |
|
| Copying and Pasting Colours |
|
| Mixing the Colours |
|
| Painting the Model |
|
| Sharing the Colour Model |
|
| Character Building |
|
| Importing a Model |
|
| Relative Sizes |
|
| Studying the Model |
|
| Setting the Default Separate Position Preference |
|
| Naming Conventions |
|
| Disabling the Animation on Drawing Layers |
|
| Art Layers |
|
| Breaking Down the Character |
|
| Tracing the Model |
|
| Articulations |
|
| Ordering the Layers |
|
| Rigging |
|
| About Rigging |
|
| Adding Pegs |
|
| Rigging the Head |
|
| Rigging the Body |
|
| Creating a Hierarchy |
|
| Adding the Master Peg |
|
| Creating the Keyframes |
|
| Setting Properties for Many Layers |
|
| Masking |
|
| Adding Extra Drawings |
|
| Setting the Pivots |
|
| Metadata Editor View |
|
| Skeleton Optimization |
|
| Storing the Character in the Library |
|
| Appendix |
|
| Break Down: Cutting the Character in Pieces |
|
| Break Down: Distribute to Layers |
|
| Converting the Layers into Symbols |
|
| Patch Articulation |
|
| Setting Different Pivots for a Puppet Using Symbols |
|
| Setting Pivots on a Frame Range |
|
| Adding the New Drawings to an Existing Template in the Library |
|
| Deformation |
|
| Adding Basic Deformation Chains |
|
| Setting Up the Resting Position |
|
| Regions of Influence |
|
| Displaying the Deformation Controls |
|
| Assembling Pieces |
|
| Animating Deformations |
|
| Deformation Poses |
|
| Creating New Deformation Chains |
|
| Converting Deformation to Drawings |
|
| Handling Legacy Deformers |
|
| Deformation Toolbar |
|
| Rigging Tool Properties |
|
| Deformation Nodes |
|
| Library |
|
| Understanding the Library Concept |
|
| Library View |
|
| Structuring the Library |
|
| Templates |
|
| Symbols |
|
| Importing Symbols and Templates |
|
| Importing Files Through the Library |
|
| Using Paste Special |
|
| Animation |
|
| Timing |
|
| Preparation |
|
| Frames |
|
| Creating Drawing Elements |
|
| Layer and Column Concepts |
|
| Layer and Column Types |
|
| Adding New Drawing Elements |
|
| Deleting Layers and Columns |
|
| Layer and Column Properties |
|
| Modifying Layers and Columns |
|
| Duplicating Layers and Columns |
|
| Cloning Layers and Columns |
|
| Adding an Annotation Column |
|
| Linking External Files with Timing Columns |
|
| Filling Exposure |
|
| Filling Exposure Mode |
|
| Typing Exposure |
|
| Holding Exposure |
|
| Extending a Single Exposure |
|
| Extending an Exposure Sequence |
|
| Extending the Exposure of Previous Drawings |
|
| Dragging Cells |
|
| Increasing and Decreasing Exposure |
|
| Deleting Exposure |
|
| Inserting Blank Cells |
|
| Setting the Exposure |
|
| Filling a Selection with a Single Exposure |
|
| Filling a Selection with a Sequence |
|
| Filling a Selection Randomly |
|
| Filling Empty Cells |
|
| Creating Cycles |
|
| Overwriting Exposures and Keyframes |
|
| Managing Key Exposures |
|
| Navigating between Frames and Columns |
|
| Managing Drawings |
|
| Renaming a Drawing |
|
| Deleting a Drawing |
|
| Duplicating a Drawing |
|
| Copying and Pasting Drawings |
|
| Merging Drawings |
|
| Modifying the Layer and Column Display |
|
| Expanding and Collapsing Layers and Columns |
|
| Showing and Hiding Layers |
|
| Showing and Hiding Columns |
|
| Modifying the Look of the Column |
|
| Drawing Identification |
|
| Xsheet Thumbnails |
|
| Changing the Colour of a Layer or Column |
|
| Setting Scene Markers |
|
| Setting Tempo Markers |
|
| Printing the Xsheet |
|
| Modifying Paste Presets |
|
| Paperless Animation |
|
| Preparation |
|
| Rough Animation |
|
| Secondary Animation |
|
| Bringing On Model |
|
| Animation Clean Up |
|
| Tools |
|
| Advanced Tools |
|
| Flip and Easy Flipping Toolbars |
|
| Onion Skin Toolbar |
|
| Drawing Identification |
|
| Drawing Desk |
|
| Shift and Trace |
|
| Art Layers |
|
| Previewing Drawings |
|
| Ink and Paint |
|
| Preparation |
|
| Dirt Clean Up |
|
| Art Layers |
|
| Painting |
|
| Painting Using the Paint Tool |
|
| Advanced Painting Features |
|
| Selecting a Colour in a Drawing |
|
| Importing Models |
|
| Editing Gradients and Textures |
|
| Closing Gaps |
|
| Protecting Colours |
|
| Highlighting the Selected Colour |
|
| Inverting a Colour Selection |
|
| Inking the Lines |
|
| Verifying Zones are Painted |
|
| Ink and Paint Tool Properties |
|
| Ink Tool Properties |
|
| Paint Tool Properties |
|
| Morphing |
|
| Understanding Morphing |
|
| Source and Destination Drawings |
|
| Morphing Rules |
|
| Creating a Basic Morphing Sequence |
|
| Tool Properties View |
|
| Adjusting the Velocity and Timing |
|
| Morphing Tool and Hints |
|
| Using the Morphing Tool |
|
| Hints |
|
| Copying Hint Points from One Drawing to Another |
|
| Morphing Layers |
|
| Morphing Two Sequences in a Row |
|
| Inserting a Morphing Key Drawing |
|
| Converting Morphing In-betweens to Drawings |
|
| Morphing Holes and Transparencies |
|
| Adjusting the Morphing Quality |
|
| Tips and Tricks |
|
| Cut-out Animation |
|
| Getting the Character |
|
| Keyframes and Drawing Blocks |
|
| Creating a Simple Cut-out Animation |
|
| Selecting Layers to Animate or Position |
|
| Navigating the Hierarchy |
|
| Animating using the Transform Tool |
|
| Animating using Inverse Kinematics |
|
| IK Hierarchy Chains |
|
| Where to Start with Inverse Kinematics? |
|
| Inverse Kinematics Tool Properties |
|
| Setting up the Character to use IK |
|
| Nails |
|
| Minimum and Maximum Angle |
|
| IK Keyframes |
|
| When to use the Inverse Kinematics Tool |
|
| Animating in Stop-motion |
|
| Animating using Computer Generated Interpolation |
|
| Adjusting the Velocity |
|
| Marking the Timeline |
|
| Flipping Through Poses |
|
| Using the Onion Skin in Cut-out Animation |
|
| Flipping Parts |
|
| Using Action Templates |
|
| Swapping Images |
|
| Animating Lip-Sync |
|
| Adding a New Drawing |
|
| Reposition Drawing Tool |
|
| Ordering Layers Over Time |
|
| Resetting a Transformation |
|
| Creating Cycles |
|
| Copying and Pasting Animation |
|
| Adding Pegs |
|
| Offsetting Part of an Animation |
|
| Gaming Guidelines |
|
| About Gaming in Harmony |
|
| Guidelines and Resources |
|
| Orthographic Camera |
|
| Export Harmony Animations to Unity |
|
| Harmony Game Previewer |
|
| Opening the Sample Unity Project |
|
| Working in Unity |
|
| Placing a Target in an Imported Animation |
|
| Export to Sprite Sheets |
|
| Export to Easel JS |
|
| Troubleshooting |
|
| Import and Export |
|
| Scanning |
|
| Scan Process |
|
| Scanning and Importing Drawings |
|
| Custom Vectorization Parameters |
|
| Creating a Vectorization Style |
|
| Setting the VectOptions.conf File |
|
| Import |
|
| Importing Bitmap Images |
|
| Importing a Bitmap Image without Vectorization |
|
| Adding Images to a Bitmap Layer |
|
| Bitmap Image Quality |
|
| Importing and Vectorizing Images |
|
| Linking your Layer to an External Image |
|
| Importing PSD Files as Separate Layers |
|
| Exporting and Reimporting a PSD Layout |
|
| Exporting a Layout |
|
| Importing a Layout |
|
| Scanning Images |
|
| Importing AI and PDF Files |
|
| Importing Adobe Flash Files |
|
| Importing SWF Files |
|
| Importing FLA Files |
|
| Guidelines for Creating a Good Flash File Before Exporting to Harmony |
|
| Importing QuickTime Movies |
|
| Custom Vectorization Parameters |
|
| Creating a Vectorization Style |
|
| Setting the VectOptions.conf File |
|
| Export |
|
| Exporting a QuickTime Movie |
|
| Exporting an SWF Movie |
|
| Exporting OpenGL Frames |
|
| Exporting a Sound File |
|
| Advanced Export |
|
| Multiple Renders |
|
| Rendering Images and Movies from the Network |
|
| Scene Planning |
|
| Setting the Scene |
|
| Importing the Scene Components |
|
| Setting the Camera Frame |
|
| Positioning the Scene Components |
|
| Animate Mode |
|
| Selecting a Layer |
|
| Locking Layers in the Timeline View |
|
| Positioning an Element using the Transform Tool |
|
| Positioning an Element Using the Advanced Animation Tools |
|
| Positioning an Element Using the Layer Properties |
|
| Layer Properties Reference |
|
| Setting Properties for Many Layers |
|
| Auto-Apply Option |
|
| Resetting a Transformation |
|
| Cloning and Duplicating Layers |
|
| Setting Up the Node Structure |
|
| Node View |
|
| About Nodes |
|
| Input and Output Ports |
|
| Working with the Node View |
|
| Composite Node |
|
| Working with Backdrops |
|
| Enabling and Disabling Nodes |
|
| Node Thumbnails |
|
| Grouping Node |
|
| Display Concepts |
|
| Timeline View Modes |
|
| Creating a Multiplane |
|
| Top View |
|
| Side View |
|
| Perspective View |
|
| Orthographic Camera |
|
| 3D Space |
|
| Enabling the 3D Option |
|
| 3D Parameters |
|
| 3D Tools |
|
| 3D Translate Tool |
|
| 3D Rotate Tool |
|
| 3D Scale Tool |
|
| 3D Transform Tool |
|
| Positioning Elements in 3D Space |
|
| Planning Your Pieces |
|
| Using Complex Sets in Production Scenes |
|
| Positioning the Layers |
|
| 3D Camera Motion |
|
| Locking Flat Drawings to the Camera Angle |
|
| Managing a Network with a 3D Scene Setup |
|
| Managing a Node System with a 3D Scene Setup |
|
| How to Organize your 3D Composite Modules |
|
| 2D-3D Integration |
|
| How 2D-3D Integration Works |
|
| Exporting a 3D Object for Harmony Using Autodesk Maya |
|
| Importing a 3D Object |
|
| Manipulating the 3D Object |
|
| Rendering 3D Models with Autodesk Maya |
|
| Setting Up the Node View |
|
| Animation Paths |
|
| Animating a Layer |
|
| Differences between Pegs and Animated Layers |
|
| Layer Parameters |
|
| Adding and Deleting Keyframes |
|
| Motion and Stop-motion Keyframes |
|
| Constant Z |
|
| Animating the Camera |
|
| Animating a Camera Shake using the Quake Module |
|
| Camera Truck-ins and Line Thickness |
|
| Modifying a Path in the Camera View |
|
| Offsetting a Trajectory |
|
| Modifying a Path in the Timeline View |
|
| Modifying a Path in the Function View |
|
| Function View |
|
| Modifying a Path in the Xsheet View |
|
| Function Curves |
|
| Copying and Pasting a Motion |
|
| Adjusting the Velocity |
|
| Expression Columns |
|
| Sound |
|
| Importing a Sound File |
|
| Sound Layer Properties |
|
| Sound Displays |
|
| Sound Playback |
|
| Sound Scrubbing |
|
| Analog Sound Scrubbing |
|
| Editing a Sound File |
|
| Changing the Start or End Frame of a Sound |
|
| Trimming the Start and End of a Sound File |
|
| Looping a Sound |
|
| Mixing the Sound Volume |
|
| Customizing the Playback Range |
|
| Adding an Empty Sound Layer |
|
| Lip-sync |
|
| Generating a Lip-sync Detection |
|
| Mapping the Lip-Sync Detection |
|
| Modifying the Lip-sync |
|
| Manual Lip-sync |
|
| Exporting a Sound File |
|
| Effects |
|
| Filter Effects |
|
| Adding Effects |
|
| Node View |
|
| Node Library View |
|
| Connecting Effects |
|
| Previewing Effects |
|
| Animating an Effect Over Time |
|
| How Does an Effect Work? |
|
| Exposure Fill Using Render Change |
|
| Using Effects |
|
| Anti-Flicker |
|
| Apply Peg Transformation |
|
| Advanced Apply Peg Transformation |
|
| Apply Image Transformation |
|
| Auto Patch |
|
| Blending |
|
| Bloom |
|
| Blur - Box |
|
| Blur-Directional Directional-Blur |
|
| Blur - Gaussian |
|
| Blur - Radial |
|
| Blur - Radial Zoom |
|
| Brightness and Contrast |
|
| Burn-In |
|
| Blur-Variable |
|
| Channel Selector |
|
| Channel Swap |
|
| Chroma-Keying |
|
| Colour-Art |
|
| Colour Banding |
|
| Colour-Card |
|
| Colour-Override |
|
| Colour-Override Editor Interface |
|
| Overriding a Colour |
|
| Overriding a Colour With a Texture |
|
| Modifying a Texture Fill's Transformation |
|
| Overriding a Colour with a Bitmap Image Sequence |
|
| Overriding a Texture on a Pencil Line |
|
| Colour-Scale |
|
| Composite-Generic |
|
| Contrast |
|
| Cutter |
|
| Dither |
|
| External |
|
| Field Chart |
|
| Flatten |
|
| Focus |
|
| Focus Multiplier |
|
| Glow |
|
| Glue |
|
| Gradient |
|
| Grain |
|
| Greyscale |
|
| Grid |
|
| Highlight |
|
| Hue-Saturation |
|
| Image Switch |
|
| Layer Selector |
|
| Lens Flare |
|
| Line Art |
|
| Luminance Threshold |
|
| Matte-Blur |
|
| Matte-Resize |
|
| Median |
|
| Mesh Warp |
|
| Motion-Blur |
|
| Multi-Port-In |
|
| Multi-Port-Out |
|
| Negate |
|
| Note |
|
| Overlay Layer |
|
| Pixelate |
|
| Quake |
|
| Quadmap |
|
| Refract |
|
| Remove Transparency |
|
| Shadow |
|
| Sparkle |
|
| Tone |
|
| Transparency |
|
| Turbulence |
|
| Turbulent Noise |
|
| Underlay Layer |
|
| Visibility |
|
| Extra Commands |
|
| Particles |
|
| Basic Structure |
|
| Accessing Default Particle Templates |
|
| Particle Nodes |
|
| 3D Region |
|
| Baker |
|
| Baker Composite |
|
| Bounce |
|
| Explosion |
|
| Gravity |
|
| Image Fracture |
|
| Kill |
|
| Move Particles |
|
| Orbit Properties |
|
| Planar Region |
|
| Random |
|
| Region Composite |
|
| Repulse |
|
| Rotation Velocity |
|
| Sink |
|
| Size |
|
| Sprite Emitter |
|
| System Composite |
|
| Velocity |
|
| Visualizer |
|
| Visibility |
|
| Vortex |
|
| Wind-Friction |
|
| Light Shading |
|
| About Light Shading |
|
| Light Shading Nodes |
|
| Light Shading Setup |
|
| Light Shading Properties |
|
| OpenFX |
|
| Interface |
|
| Menus |
|
| Managing the Views |
|
| Managing the Toolbars |
|
| Managing the Workspace |
|
| View References |
|
| Camera View |
|
| Colour View |
|
| Coordinates and Control Points View |
|
| Drawing View |
|
| Function View |
|
| Layer Properties View |
|
| Library View |
|
| Message Log View |
|
| Model View |
|
| Node Library View |
|
| Node View |
|
| Perspective View |
|
| Script Editor View |
|
| Side View |
|
| Timeline View |
|
| Tool Properties View |
|
| Top View |
|
| Xsheet View |
|
| Toolbar References |
|
| Interface Navigation |
|
| Zoom Tool |
|
| Shortcuts |
|
| Other |
|
| Play Module |
|
| Launching Toon Boom Play |
|
| About Toon Boom Play |
|
| Loading an Image Sequence |
|
| Toon Boom Play Playback Toolbar |
|
| Toon Boom Play Commands |
|
| Preferences |
|
| Interface |
|
| Shortcut |
|
| General |
|
| Camera |
|
| Node View |
|
| Exposure Sheet |
|
| Drawing |
|
| Template |
|
| Timeline |
|
| Sound |
|
| OpenGL |
|
| Render |
|
| Advanced |
|
| Deformation |
|
| Particle |
|
| Scripting |
|
| Introduction |
|
| Scripting Overview |
|
| Creating a Qt Script |
|
| Using an External Script Editor |
|
| Importing Scripts |
|
| Linking a Script to a Toolbar Button |
|
| Utilities |
|
| Introduction to Utilities |
|
| Running a Utility |
|
| Utilities |
|
| Pdfimport Utility |
|
| Pix2vec Utility |
|
| Vectorization |
|
| How to Vectorize With Bubbles |
|
| Swf2tvg Utility |
|
| Swfimport Utility |
|
| tvg2xml Utility |
|
| uinfo Utility |
|
| utransform Utility |
|
| Output a Layout to a Bitmap Format |
|
| As Is |
|
| Glossary |
|