
Download Documentation
Export to YouTube and Facebook

Toon Boom Studio simplifies the upload of your animated projects to these two popular websites: YouTube and Facebook. Using the Export Movie command, you can choose an option to export your movie directly to one of these sites. Toon Boom Studio automatically redirects you to your YouTube or Facebook profile where your video will automatically be uploaded.
You require an active account on YouTube or Facebook before you can upload your videos.
Exporting to YouTube
To export your movie to YouTube, you must already have a YouTube account. If you do not have an account, create one at www.youtube.com.
To export your movie to your YouTube account:
|
1.
|
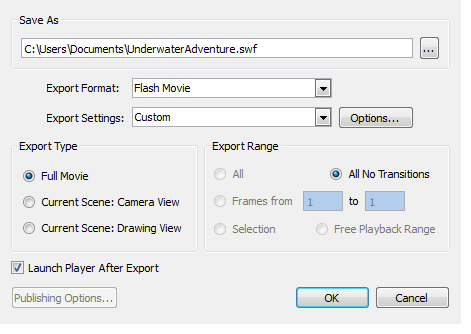
Select File > Export to Movie. |
The Export dialog box opens.
|
2.
|
In the Save As section, click the Browse button at the end of the path field and browse for the location where your render will be saved. |
|
3.
|
From the Export Format list, select YouTube. |

|
4.
|
In the Export Type section, choose from the following options: |
|
‣
|
Full Movie: Renders all scenes and all layers that are enabled, from the first to last frame, including all effects. |
|
‣
|
Current Scene: Camera View: Renders all layers that are enabled in that specific scene that can be seen in the Camera view with the option to choose a frame range. |
|
‣
|
Current Scene: Drawing View: Renders only what exists on a single layer in that specific scene. |
|
5.
|
From the Export Range Section, choose from the following options: |
|
‣
|
All: Renders the entire project. |
|
‣
|
All No Transitions: Renders the entire project without transitions. |
|
‣
|
Frame Range: Allows you to select a specific section of your project to render by frame number. |
|
‣
|
Selector: Renders whichever layer or element that you selected prior to launching the export process. |
|
‣
|
Free Playback Range: In the Timeline view, right-click on the timeline ruler (top) and select Playback Range > Free. |
Two black diamonds appear at the start and finish of your project. Drag these markers to select a range.
A progress bar appears, showing you the rendering process, followed by the YouTube upload information dialog box.
|
7.
|
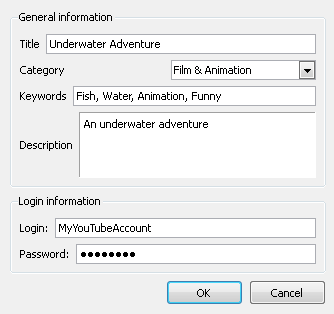
Fill in the information. |
General Information: The information that appears on your YouTube account.
|
•
|
Title: Type in the name of your video |
|
•
|
Category: Use the drop-down menu to select the category that best fits your video. |
|
•
|
Description: Type in a description of your video. |
Login Information: Fill in this information to automatically login to your YouTube account.
|
•
|
Login: Type in your YouTube account username. |
|
•
|
Password: Type in your YouTube account password. |
A progress bar appears, showing you the uploading process, followed by a dialog box notifying you that your video has been successfully uploaded.

Exporting to Facebook
To export your movie to Facebook, you must already have a Facebook profile. If you do not have a profile, create one at www.facebook.com. Once it is done, upload your creations to your profile to share with your friends on Facebook.
To export your movie to your Facebook profile:
|
1.
|
Select File > Export to Movie. |
The Export dialog box opens.
|
2.
|
In the Save As section, click the Browse button at the end of the path field and browse for the location where your render will be saved. |
|
3.
|
In the Export Format drop-down menu, select Facebook. |

|
4.
|
In the Export Type section, choose from the following options: |
|
‣
|
Full Movie: Renders all scenes and all layers that are enabled, from the first to last frame, including all effects. |
|
‣
|
Current Scene: Camera View - Renders all layers that are enabled in that specific scene that can be seen in the Camera view with the option to choose a frame range. |
|
‣
|
Current Scene: Drawing View - Renders only what exists on a single layer in that specific scene. |
|
5.
|
From the Export Range Section, choose from the following options: |
|
‣
|
All - Renders the entire project. |
|
‣
|
Frame Range - Allows you to select a specific section of your project to render by frame number. |
|
‣
|
Selector - Renders out whichever layer or element that you selected prior to launching the export process. |
|
‣
|
Free Playback Range - In the Timeline view, Right-click on the timeline ruler (top) and from the pop-up menu select Playback Range > Free. Two black diamonds appear at the start and finish of your project. Drag these markers to select the range that you desire. |
A progress bar appears, showing you the rendering process, followed by the Facebook upload information dialog box.
|
7.
|
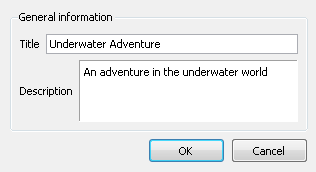
Fill in the information that appears on your Facebook account. |
|
‣
|
Title: Type in the name of your video |
|
‣
|
Description: Type in a description of your video. |
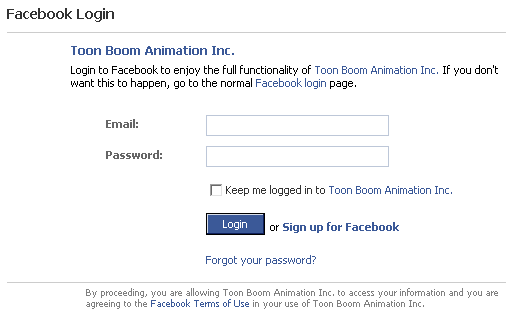
The Facebook wizard dialog box opens and your internet browser is launched and automatically directed on the Facebook login page.
|
9.
|
In your internet browser, log into your Facebook account.
|
Although you are not on the Facebook website you are now logged into Facebook. To log out you need to go onto your account on the Facebook website.
|
10.
|
In the Facebook wizard, click Next. |
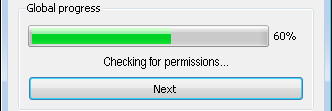
The Facebook wizard checks for permissions.
|
11.
|
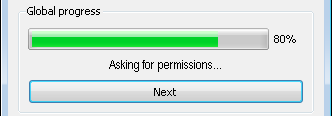
The first time you go through these steps, when the Facebook wizard asks for permissions, the internet browser is automatically directed to the Facebook confirmation page, where you need to give your authorization.
The next time you export a video to your Facebook account, the wizard automatically uploads the video to your account. |
|
•
|
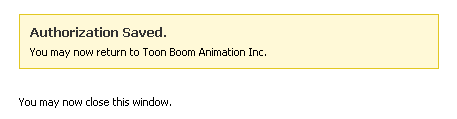
In the Internet browser, click Allow Video Uploads.
The Facebook page notifies you that the permissions have been saved. |
|
•
|
In the Facebook wizard dialog box, click Next. |
The wizard finishes the upload and a dialog box opens notifying you that your video has been successfully uploaded
