With the Shake effect, an animated drawing or static element, such as a character or landscape, can be made to shake. This effect can be used to imitate earthquakes, camera shakes, or a character who is freezing on a cold winter day.
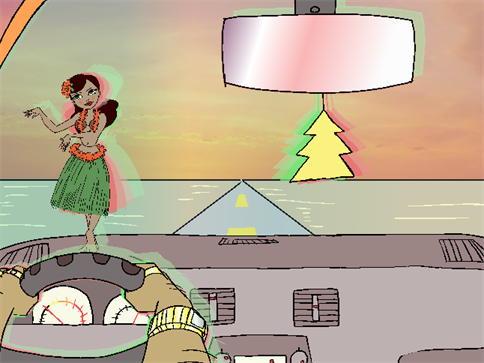
In the image above, the hula girl and air freshener were animated in the cut-out style because their shaking involves rotating from a pivot. However, the entire car, including the dashboard, windshield, hula girl and air freshener, all shake up and down and side to side together, due to the bumps on the road.
To create a Shake effect:
| 1. | In the Effects toolbar, click the Shake  button. button. |
| 2. | In the Timeline view, select the Drawing or Peg layer that you would like to attach to the Shake effect and drag it onto the Shake effect layer. |
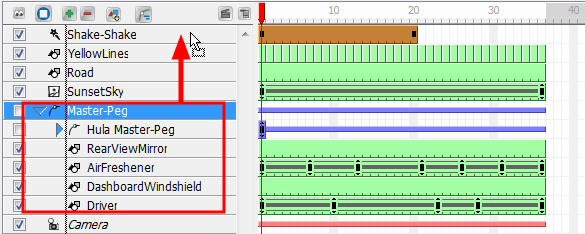
| 3. | Double-click on your Shake effect layer to rename in accordance with the Drawing or Peg layer that is attached to it. This is good practice, as you may want to add more than one Shake effect to your timeline. You may want to add more than one Shake effect in order to have a shake occur on the x-axis and another on the y-axis. In order to create different timing sequences, you need multiple versions of the same effect. |
| 4. | If you do not want the Shake effect to start at the first frame, you can select the effect's cells and drag them to the starting frame that you prefer. |

You can also right-click anywhere on the effect's cells and select Change Start Frame.
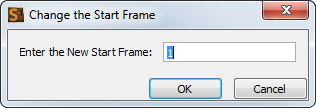
Enter the start frame that you would like into the Enter the New Start Frame field and click OK. The entire row of effect cells will be shifted down the Timeline.
| 5. | If you want the transition to be shorter or longer, select the end of the group of frames, wait until you get the double arrow cursor and then pull towards the left or right. |

You can also right-click anywhere on the effect's cells and select Change Duration.

Enter the duration that you would like the effect to last for in the Enter the New Duration field and click OK. The exposure of the effect will be extended or shortened depending on the value entered.
| 6. | In the Timeline view, drag the red playhead to a frame on your effect layer where you would like to add a keyframe. |

In the Tool Properties panel for the Shake effect, in the Dynamic Parameters tab, click the Add Keyframe  button.

A new keyframe is added to the chosen location.
| 7. | In the Timeline view, drag the red playhead to a frame on your effect layer where you would like to delete a keyframe. |

In the Tool Properties panel for the Shake effect, in the Dynamic Parameters tab, click the Delete Keyframe  button.

The keyframe is deleted from the chosen location.
| 8. | In the Timeline view, go to the frame containing your first keyframe and select the Shake effect layer. |

| 9. | In the Properties view, adjust some of the following parameters, according to your preferences. |
Shake effect icon (drop-down menu)
| • | Mini Shake: Default Amplitude is 0.1 |
| • | Great Earthquake: Default Amplitude is 2. |
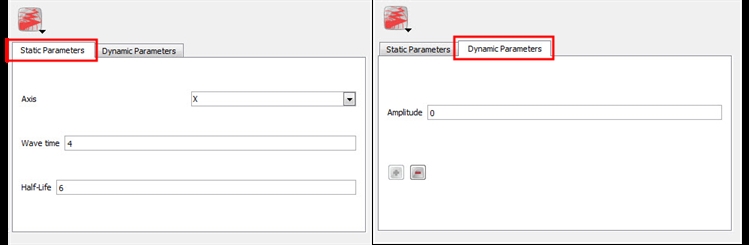
Static Parameters
| • | Axis: Decide whether you want your object to shake from left to right (X), up and down (Y) or forward and backward (Z). You can parent an X-axis Shake effect, along with its Drawing/Peg layer, to another Shake effect whose Axis is set to Y. This way, your object can shake both side to side and up and down. |
| • | Wave Time: This indicates the length of a cycle. The smaller the number, the shakier the effect will be, as the effect needs to reach a certain amplitude in a smaller time frame, but could reach this amplitude more often as its cycle length is so short. |
| • | Half Life: This refers to the number of frames for the movement to be half its amplitude. If you enter a value of 0, the amplitude is cut to half right away and the shake is less intense. If you want to keep the full intensity of the shake for the complete duration of the effect, make the half-life the duration of the Shake effect. This way, the amplitude drops to half when the effect is finished. If you want the shake to gradually taper off, make the half-life smaller than half the duration (in number of frames) that your shake effect lasts in the Timeline. For example, if your Shake effect lasts for 30 frames, make the half-life less than 15 frames. |
Dynamic Parameters
| • | Amplitude: The maximum displacement from a zero value during one shake cycle. This value is measured in fields. |