To set your animation timing, you will work mostly with the Timeline and Exposure Sheet views. This section will help you become familiar with these views, how they work and the differences between them.
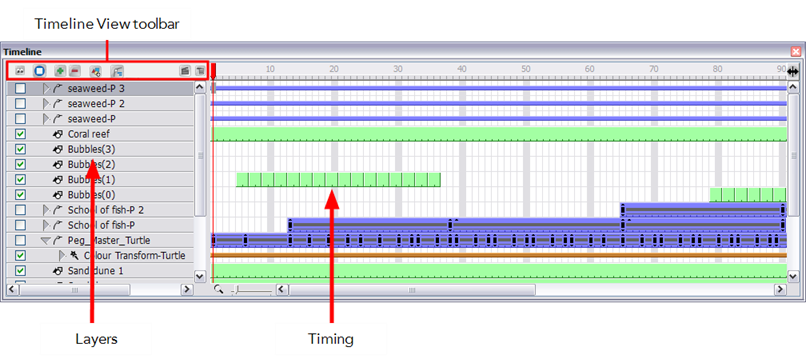
The Timeline view allows you to read your drawings and timing from left to right. It represents the scene's elements in their simplest form.
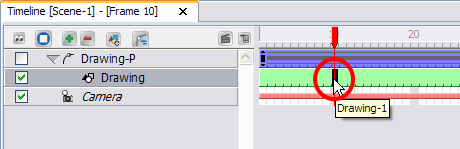
In the Timeline view, you can see layers and their names, as well as the drawing timing. The drawing name is displayed when you place your cursor above the drawing's exposure.
The Timeline view has three main sections:
| • | Timeline View Toolbar |
| • | Layer Section |
| • | Timing Section |
The Timeline View toolbar contains eight different buttons allowing you to add, enable and disable layers as well as switch between the different scenes of a same project.
| • |
 Show/Hide All: Shows or hides all the layers in the timeline. Show/Hide All: Shows or hides all the layers in the timeline. |
| • |
 Solo Mode: Turns the Solo mode on Solo Mode: Turns the Solo mode on  or off . The Solo mode lets you see only the currently selected layer, as well as the layer that was selected when you enabled the Solo Mode to use it as a reference without having to disable all the other layers. or off . The Solo mode lets you see only the currently selected layer, as well as the layer that was selected when you enabled the Solo Mode to use it as a reference without having to disable all the other layers. |
| • |
 Add New Elements: Adds a new element (layer) to your timeline. When you click this button, the New Element dialog box opens and lets you choose which type of element you want, how many and how you want to name it. Add New Elements: Adds a new element (layer) to your timeline. When you click this button, the New Element dialog box opens and lets you choose which type of element you want, how many and how you want to name it. |
| • |
 Delete Element: Deletes the selected layers in your timeline. Note that if you delete a layer with other layers connected to it, all the layers connected will be deleted at the same time. Also, if you only have one layer in your timeline, you are not able to delete it. Toon Boom Studio's Timeline view must always have at least one drawing layer in it. Delete Element: Deletes the selected layers in your timeline. Note that if you delete a layer with other layers connected to it, all the layers connected will be deleted at the same time. Also, if you only have one layer in your timeline, you are not able to delete it. Toon Boom Studio's Timeline view must always have at least one drawing layer in it. |
| • |
 Add Drawing Element: Adds a drawing layer in your timeline without having to go through the Add New Element dialog box. Simply click on the button and a new drawing layer appears in the Timeline view. You can then double-click on the new layer to rename it. Add Drawing Element: Adds a drawing layer in your timeline without having to go through the Add New Element dialog box. Simply click on the button and a new drawing layer appears in the Timeline view. You can then double-click on the new layer to rename it. |
| • |
 Add Parent Peg: Adds a peg layer in your timeline and connect it to any selected layer without having to go through the Add New Element dialog box. Simply click on the button and a new peg layer appears in the Timeline view and the selected layer is connected to it. You can then double-click on the new layer to rename it. Add Parent Peg: Adds a peg layer in your timeline and connect it to any selected layer without having to go through the Add New Element dialog box. Simply click on the button and a new peg layer appears in the Timeline view and the selected layer is connected to it. You can then double-click on the new layer to rename it. |
| • |
 Scene Menu: Lets you move between the different scenes in your project. Scene Menu: Lets you move between the different scenes in your project. |
| • |
 Timeline View Contextual Menu: Displays a drop-down menu with commands related only to the Timeline view. Timeline View Contextual Menu: Displays a drop-down menu with commands related only to the Timeline view. |
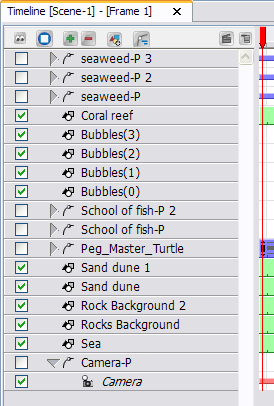
The Layer section is on the left side of the Timeline view. This is where you can add, delete, rename, reorder and attach layers.
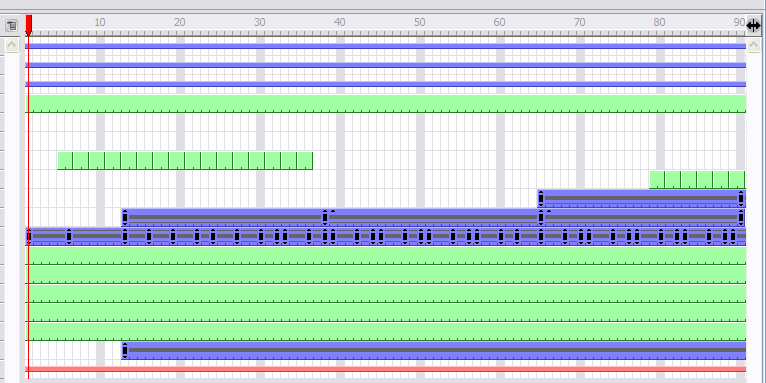
The Timing section is on the right side of the Timeline view. This is where you can increase and decrease a drawing's exposure, duplicate drawings, add blank cells, etc. Any operation you do that affects a drawing or its timing is done in this section.
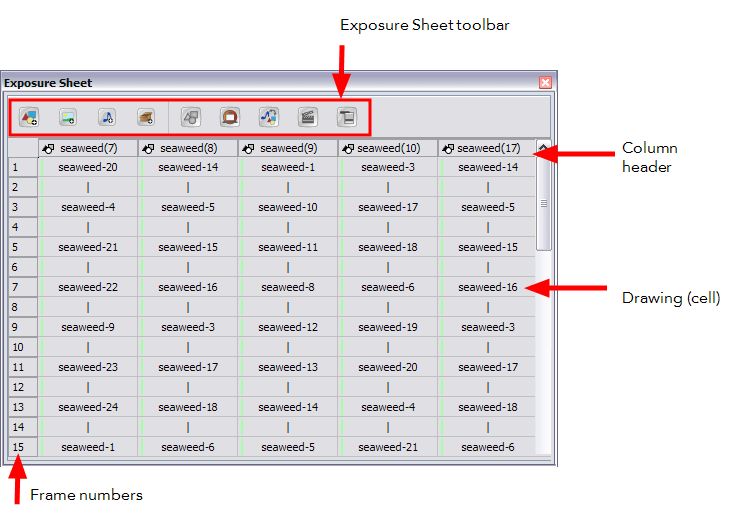
The Exposure Sheet view lets you read your timing vertically where the columns represent drawing layers.
The Exposure Sheet view has two main sections and several other components:
| • | Main Section |
| • | Element List Section |
| • | Exposure Sheet Toolbar |
| • | Column Header |
| • | Drawing |
| • | Frame Numbers |
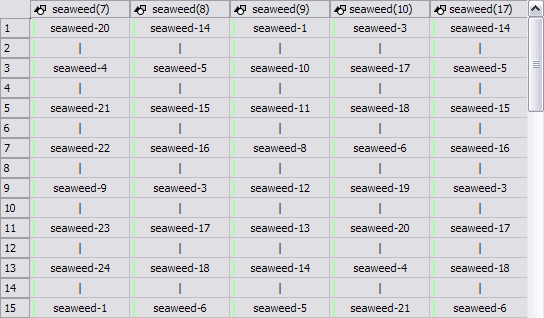
The Main section shows the Drawing, Image, Sound and Media columns. You can see the drawing timing and names.
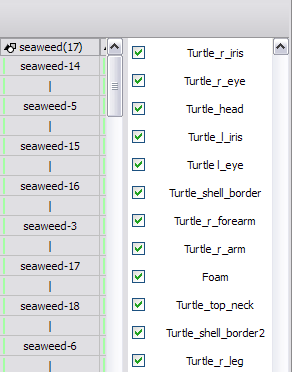
The Element List section allows you to show and hide columns from your Exposure Sheet view. When you hide a column using your Exposure Sheet view, it is NOT disabled in the Timeline view. When you hide a column in your Exposure Sheet, the artwork is hidden from the Drawing view, but NOT from the Camera view. To hide elements in the Camera view, disable the layers in the Timeline view.
To display the Element List section:
| 1. | In the Exposure Sheet toolbar, click the Toggle Element List  button. button. |

The Exposure Sheet view has its own toolbar where you can find the most common features. This toolbar is displayed by default. If you do not see it, select Windows > Toolbar > Exposure Sheet. The Exposure Sheet view must be part of your workspace in order to display its toolbar.
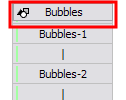 Each column available in the Exposure Sheet view has a header displaying the column's name. The column's name is the same as the corresponding timeline layer. If you rename one or the other, they will both be renamed.
A quick access menu is available when you right-click. This menu contains the command that affects an entire column such as renaming, changing the default colour or deleting a column.
 When you see a cell containing a name or number, it represents the drawing you created in the Drawing or Camera view.
 The frame numbers are located on the left side of the Exposure Sheet view. They read vertically instead of left to right, as in the Timeline view.
| • | To go to a particular frame, you click on the frame number. |

| • | If you click and drag a selection downwards, you select an entire frame range. |

In the Xsheet view, you can remove any selected frame range by pressing the [Del] key.
To delete a frame range:
| 1. | In the Exposure Sheet view, select a frame range by clicking on the first frame's number to delete and dragging down to the last frame to delete. |
| 2. | Press [Del] to delete the selection. |