As you start your project in Toon Boom Studio, you need to understand the format and the frame rate you will use.
| • | What are Frame Rates and Formats? |
| • | Creating a New Project from the Welcome Screen |
| • | Creating a New Project from the File Menu |
| • | Opening a Project File from Another Toon Boom Product |
When you create an animation, the images you animate must move fluidly to produce the correct effect. If they don't, you will have a jumpy animation which won't look good. To get a fluid movement between the drawings you need several images per second. You need a minimum of 12 images per second, any slower than that and the animation becomes jumpy. An image can also be called a frame, therefore the frame rate is the number of frames you play per second in your animation.
The format of your project is the size of your camera frame in pixels. You may not be familiar with the term pixel, but you have probably seen it when you magnify a digital photograph. A pixel is the smallest element of an image displayed on a monitor or TV screen. Pixel, short for Picture Element, is a single point in a graphic image. It is a small sample of an image, a dot, a square or a very small section made out of smooth filtering. If you zoom in close enough on a digital image, you will see the pixels; they look like small squares of different colours and intensity.
Depending on the type of project you want to do, you will need a different image size. For example, if you want to put your project on the web, you will probably export your movie as a small size so that it is light to play back once it is on the web. The larger the images are, the heavier the project is, but also, the better the quality. If you want to export your project for the theatre, you will need to create your project using a large format so the image is of a high quality and looks good on the big screen.
Also, some display media such as iPod, TV or theatre have an exact format requirement. For example, one TV format that has been a standard for the past decades is a 4:3 size ratio, meaning that the width of your scene has to be an equivalent of 4 units compared to 3 units for the height.
In recent years, a new TV standard has been defined with the advent of Blu-ray and high-definition technologies. It is the 16:9 format, which is often referred to as HDTV (High Definition Television). The most common 16:9 format in pixel is 1920x1080.
You can find most of the formats in the presets list provided in the Welcome Screen.
To recap, the format is the size of your camera frame in pixels, and it matches the width and height required for the medium in which you want to show your final movie.
Using the Welcome Screen, you can create new projects and open existing ones.
This section is divided as follows:
| • | Creating a New Project from the Welcome Screen |
| • | Opening a Project from the Welcome Screen |
To create a project from the Welcome Screen:
| 1. | In the Name field, type a name for your new project. Make sure to give it a name which easily identifies the project, such as JumpingFrog. That way, when you have several projects, you can locate specific ones more easily. |

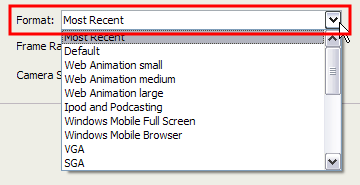
| 2. | In the Format list, select the format in which you want to produce your project. |
You can choose from a wide variety of presets such as Web, iPod and DV. By default, the option selected is Most Recent. This means that it will use the last setting you chose when creating your last project.
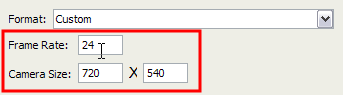
When you create a project for the first time, it will use the settings marked in the Frame Rate and Camera Size field. By selecting any of the presets, the Frame Rate and Camera Size fields will be automatically populated with the corresponding values.
| 3. | If you prefer to use your own settings, you can type the Frame Rate and the Camera Size directly in the fields. |
| 4. | Once the information is in place, click Create to make your project. |
The new project opens.
Now that you have created a new project, the next step is to save it to the correct location.
It is a good idea to follow a structure when saving your work, so that your files are not scattered all over your computer.
To save your project for the first time:
| 1. | Select File > Save As or press [Ctrl] + [Shift] + [S] (Windows) or [⌘] + [Shift] + [S] (Mac OS X). |
The Save As dialog box opens.
| 2. | In the Save As window, browse to the location where you want to save your project. If needed, rename it in the File Name field. Remember to give the project a name you can identify easily. |
| 3. | Click on the Save button to complete the operation. |
When you already have a project you may find that you want to reopen it to work on it some more or to make some adjustments. You can do that by using the Welcome Screen.
To open a project from the Welcome screen:
| 1. | In the Open Recent section, click on the Browse option. |
The Open window displays.
| 2. | Browse and select the file for the project you want to open. |
| ‣ | *.tbp (Toon Boom Project) (Windows) |
OR
| ‣ | *.tbpd (Toon Boom Studio Document) (Mac OS X) |
project1.tbp, project2.tbp and project3.tbp, it would be difficult to remember what was in each. | 3. | Click Open. |
If your project is already open and you want to work on a specific scene in that project, you can also do that from the Welcome screen.
To open a recent project from the Welcome screen:
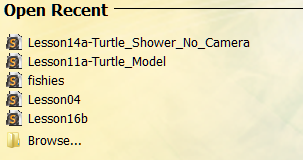
| 1. | In the Open Recent section, select a project from the list. |
If a project is already open and you want to create a new one, you can use the File menu.
This section is divided as follows:
| • | Creating a New Project from the File Menu |
| • | Opening a Project from the File Menu |
To create a project from the File menu:
| 1. | Do one of the following: |
| ‣ | Select File > New. |
| ‣ | In the Main toolbar , click the New  button. button. |
| ‣ | Press [Ctrl] + [N] (Windows) or [⌘] + [N] (Mac OS X). |
A new project is created from the currently open project's settings.
To open a project from the File menu:
| 1. | Do one of the following: |
| ‣ | Select File > Open. |
| ‣ | In the Main toolbar, click the Open  button. button. |
| ‣ | Press [Ctrl] + [O] (Windows) or [⌘] + [O] (Mac OS X) |
The Open Project browser opens.
| 2. | Browse and select the *.tbp or *.tbpd file you want to open. |
| 3. | Click Open. |
To open a recent project from the File menu:
| 1. | Select File > Open Recent. |
| 2. | In the Open Recent list, select the project you want to open. |
| 3. | Click the project name to open the project. |
| ‣ | Select the Clear Menu command to remove all projects from the Open Recent list. |
It is possible to open a Flip Boom (*.fbp / *.fbpd) (Flip Boom Classic, Flip Boom Cartoon, Flip Boom Doodle), Flip Boom All-Star (*.fba), Comic Boom (*.cbp,*.cbpd), Garfield's Comic Boom (*.cbg) and Animation-ish (*.ish1,*.ish2*.ish3) projects in Toon Boom Studio.
If you have another project open, you will be prompted to save it, and it will close after you confirm your choice.
To open an existing Flip Boom, Animation-ish or Comic Boom Project:
| 1. | Start Toon Boom Studioto display the Welcome screen. |
| 2. | Click the Browse button to display the Open window. |
The Open dialog box appears.
| 3. | Browse to the folder where your project is located. |
| 4. | Select the file to open and click Open. |
The project opens in Toon Boom Studio.