
Download Documentation
Chapter 13: Animating in Stop-motion
Depending on whether you want a 2D or 3D environment, you have to set up your background accordingly. If you prefer a 3D background, then you would treat the elements in the same manner that you treat your stop-motion characters. If you would like a 2D cartoon background, then you need to set up what is known as either a blue or green screen.
A blue or green screen is a solid-coloured piece of fabric that you can easily select and block out in the software. This process is known as colour keying. You can then superimpose another background, such as a 2D drawing created in Studio or a 3D photograph or a piece of video footage.
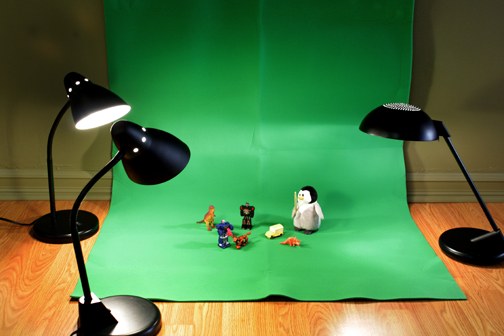
An important element to consider when setting up either a green screen backdrop or a stop-motion setting, is the lighting. In the case of a green screen, soft, flat lighting can be the key to making the material look smooth and shadowless. The fewer variations in tone, the easier it is to key out the colour later on. Lighting does not necessarily mean a multi-lamp setup; a well-lit room with natural daylight is often best.
This section is divided as follows:
Camera Settings
To set up for image capture:
|
1.
|
From the File menu, select Acquire > From Capture Device. |
The Image Capture window appears.
|
2.
|
In the Options section, select the Source tab. Find and select your recording device from the Device list. |
|
3.
|
From the Source list, select Full-Resolution Photo if it is available for your recording device (some devices, such as webcams may not allow for this option). Otherwise, select Live Preview if you prefer to take faster, lighter images for a rough test. |
The Capture window can be used to capture more than just live physical models with a recording device. You can also "capture" hand-drawn images with the use of a scanner.
To learn more about scanning from TWAIN, see Importing Artwork.
|
4.
|
If you are using a scanner with a WIA driver (Windows Image Acquisition), the Resolution list will be enabled. From the list, select the resolution at which you want to scan your images. |
|
5.
|
If you want to smooth out some of your colours, select the Noise Reduction option. If you want to capture more detail, leave this option deselected. |
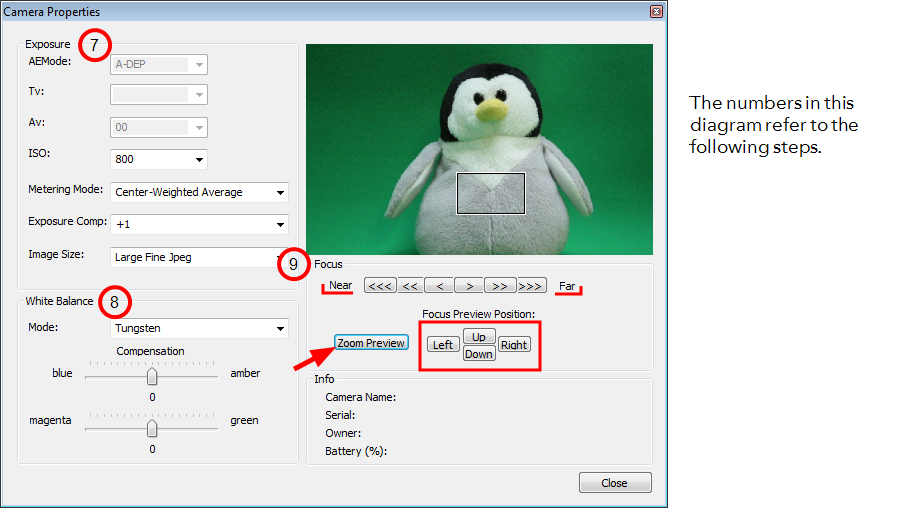
The Camera Properties window appears.
This is an example of a typical Camera Properties window.
The Camera Properties page is different for every capture device. The information displayed on that page comes from the device itself and therefore contains different options for each device.
|
7.
|
Most of the settings that you see in the Exposure section are set manually on your camera. If you change a setting in the software, such as the ISO, it is changed on your camera. If you change a setting on your camera, it is also changed in the software. |
|
8.
|
In the White Balance section, play with the options from the Mode list and select the one relating to your lighting set up, or until the colours in the preview window displays evenly balanced colours. Make fine adjustments with the colour sliders. |
|
9.
|
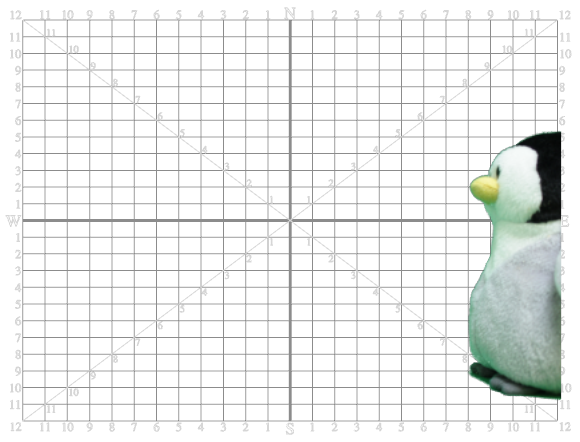
In the Focus section, use the Near and Far increments to bring the preview image into focus. For greater focal detail, use the Left, Right, Up and Down buttons to move around the Zoom Preview rectangle in the preview window. When you find a good section to examine, such as an area of high contrast, click Zoom Preview to view that section in detail. Use the Near and Far increments to make finer adjustments. |
Colour Keying
To key out your coloured background:
|
1.
|
If it is not already open, from the File menu, select Acquire > From Capture Device to open the Image Capture window. |
|
2.
|
Select the Keying tab. |
|
3.
|
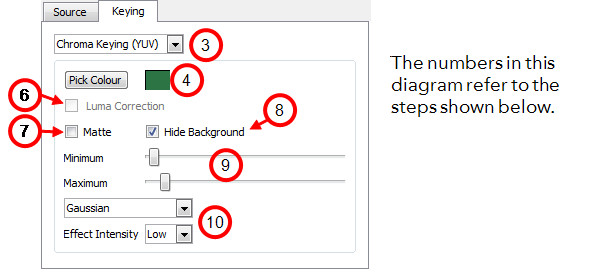
From the first list, select a Keying type. It is recommended that you select the type that shows the most sensitivity to your background. This might not be obvious until you pick the colour that you want to key out. You can gauge sensitivity by the amount of dancing pixels seen in the preview window. |
|
‣
|
Chroma Keying (YUV): YUV is a colour model (like RGB or CMYK) that encodes a colour image or video taking human perception into consideration. It allows transmission and compression errors to be more efficiently masked by human perception than when using an RGB representation. Choose YUV if your recording device conforms to certain YUV standards. |
|
‣
|
Chroma Keying (RGB): The RGB colour model is an additive colour model in which red, green, and blue light are added together in various ways to reproduce a broad array of colours. RGB is a device-dependent color space: different devices detect or reproduce a given RGB value differently. Thus an RGB value does not define the same color across devices without some kind of colour management. |
|
‣
|
Luma Keying: Luma corresponds to the brightness in an image, the "black and white" portion. Luma is typically paired with chroma. Luma represents the achromatic image without any colour, while the chroma represents the colour information. Converting the output of a camera into luma and chroma allows a video system to optimize its performance for the human visual system, since human vision is more sensitive to luminance ("black and white") detail than colour detail. |
|
5.
|
Use the eye dropper to select your background in the preview window. If there are some unavoidable highlights and shadows on your green screen, try to select a mid-tone area. The selected colour appears in the swatch area beside the Pick Colour button. |
Your preview window comes alive with dancing pixels.
|
6.
|
If you selected Luma Keying as the keying type, you can also select Luma correction to help even out the image so it is easier to extract a drawing from the background. |
|
7.
|
If you selected one of the chroma keying types, select the Matte option if you want to render the preview window achromatic. This option makes the keying process visually easier by seeing the selected portion being reduced to black and the keyed out portion being reduced to white. |
|
8.
|
Select the Hide Background option, if you want to see which part of the image is rendered transparent. |
|
9.
|
Play with the Minimum and Maximum sliders until your background disappears into a solid white (or transparent depending on which options were selected). |
|
10.
|
If there are still green areas remaining, try selecting one of the effects from the drop-down menu and chose the degree of Effect Intensity until you see a clean white or near clean white background in the preview field. |
You are now ready to capture images for you stop-motion animation.
Capturing
To perform an image capture:
|
1.
|
If it is not already open, select Acquire > From Capture Device from the File menu to open the Image Capture window. |
|
2.
|
Set up your first pose. Use the preview window and the recording device viewfinder to make sure that it is correctly framed. |
|
3.
|
When you are ready, click Capture. |
|
4.
|
Reposition your character and/or other elements on the stage. The smaller the movement, the smoother the animation. |
At this point, the Timeline view looks something like this. Each frame represents an image capture.

|
6.
|
Repeat this process until you have completed your motion sequence. |
|
7.
|
When you are finished, click Close. |