
Animating the Camera
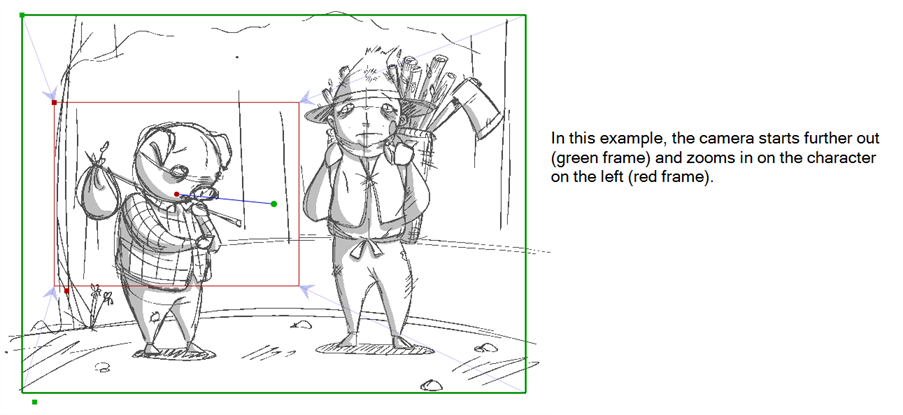
In Storyboard Pro, you can enhance your animatics by adding camera movements to the scenes. You can restrict camera movements to one panel, or spread it out across an entire scene/shot. An example of a camera movement would be if you wanted the camera to go from a wide shot and then zoom in to a close up.
Camera movements are created in much in the same way as setting the Static Camera frame, but you will work with keyframes in the Timeline view to set the different camera positions over time. Once again you will use the Camera tool to animate the camera.
An example of a camera movement would be if you wanted the camera to go from a wide shot and then zoom in to a close up.
This section is divided as follows:
| • | Camera Tool Properties |
| • | Camera Keyframes |
Camera Tool Properties
When the Camera tool is selected, its properties and options are displayed in the Tool Properties view, which you will use to animate the camera.

 Add Keyframe at the Beginning of Current Panel
This button adds a keyframe to the beginning of the currently selected panel. This button is also available from the Camera toolbar.
 Add Keyframe at Current Panel
This button adds a keyframe to the current frame. The current frame is determined by the position of the red playhead on the Timeline. This button is also available from the Camera toolbar.
 Add Keyframe at the End of Current Panel
This button adds a keyframe at the end of the currently selected panel. This button is also available from the Camera toolbar.
 Reset Camera
This button deletes all keyframes in the currently selected scene.
 Copy Camera from Selected Panels
This button copies a selected camera keyframe from a selected panel. This button is also available from the Camera toolbar—see To use the Copy and Paste commands to add keyframes:
 Paste and Fit Camera on Selected Panels
This button pastes a copied camera keyframe in a selected panel. This button is also available from the Camera toolbar—see To use the Copy and Paste commands to add keyframes:.
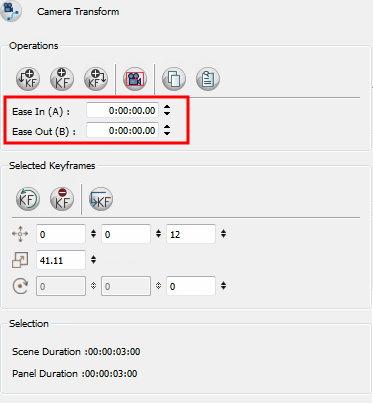
Ease In/Ease Out
Use these operations to set or change the easing properties of your camera animation—see Easing In or Out.
 Reset Selected Keyframe
This button resets the selected camera keyframe.
 Delete Selected Keyframe
This button deletes the selected camera keyframe.
 Align Camera Key with Stage View Position
This button fits the camera frame to the current space available in the Stage view while retaining its original ratio, which is very useful in 3D scenes. This command is also available from the top menu, Camera > Align Camera Key with Stage View Position.
 Go to Selected Keyframe
This button moves the red playhead to the selected keyframe in the Timeline view. When working in 3D and used in combination with the Camera view, this option comes in very handy for properly frame a shot—see Working in a 3D Space
Offset

Using these fields, you can set the position of the camera frame centre point. The fields represent, respectively, the X position, Y position, and Z position (enabling you to animate a truck in or truck out movement). You can also use the Camera ![]() tool to position the camera frame from the Stage or Camera view—see Setting the Camera Frame
tool to position the camera frame from the Stage or Camera view—see Setting the Camera Frame
Field of View and Focal Length

Using these fields, you can set the camera field of view and focal length value . By default the field of view value is set to 41 degrees and the focal length value is set to 36 millimiters. The field of view lets you animate a zoom in or zoom out movement as the focal length determines the angle value of the shot.
Rotation

Using this field, you can set the camera rotation value. When working in a 2D project, only the last field is active, letting you rotate the camera only on the Z-axis (right and left). When working in a 3D project, the three fields become active and respectively represent the rotation value of the X, Y, and Z axis. You can also use the Camera tool to rotate the camera frame from the Stage or Camera view—see Setting the Camera Frame and Working in a 3D Space
Scene Duration
The scene duration displays the selected scene’s length in timecode format.
Panel Duration
The Panel duration displays the selected panel’s length in timecode format; the default length of a panel is 1 second.
Camera Keyframes
Camera keyframes enable you to modify the position of your camera and have it change over time. The camera keyframes are coordinates indicating the position of your camera on a particular frame. In order to create any camera movements, you must set at least two camera keyframes.
With Camera keyframes, you set the camera to go from one position in the frame to another, over a defined number of frames. You will also be able to control the velocity at which the camera attains its final position.
This section includes the following topics:
| • | Keyframes in the Timeline View |
| • | Keyframes in the Stage View |
| • | Creating Camera Keyframes |
| • | Moving Keyframes in the Stage View |
| • | Modifying the Trajectory with Control Points |
| • | Moving Keyframes on the Timeline |
| • | Keyframe Syncing |
| • | Easing In or Out |
| • | Deleting Keyframes |
| • | Resetting the Camera Animation |
Keyframes in the Timeline View
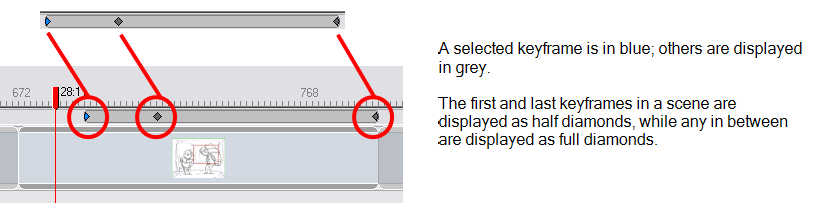
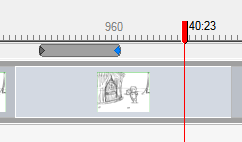
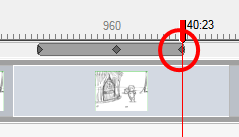
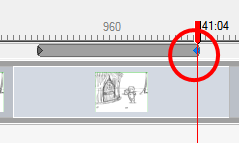
Keyframes appear as grey diamonds (or half diamonds) in the Timeline view. The space between the keyframes in the Timeline view is the number of frames takes the camera to move from one keyframe to the next, determining the speed.
A keyframe that is selected in the Timeline view is displayed in blue. Camera keyframes are displayed in the Timeline view only, in a strip above the panel thumbnails.
Keyframes in the Stage View
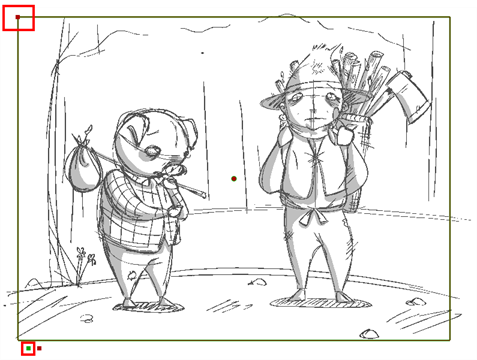
When you have created a first keyframe in the Stage view, your camera frame will turn green and there will be a green dot on the bottom to indicate the keyframe.
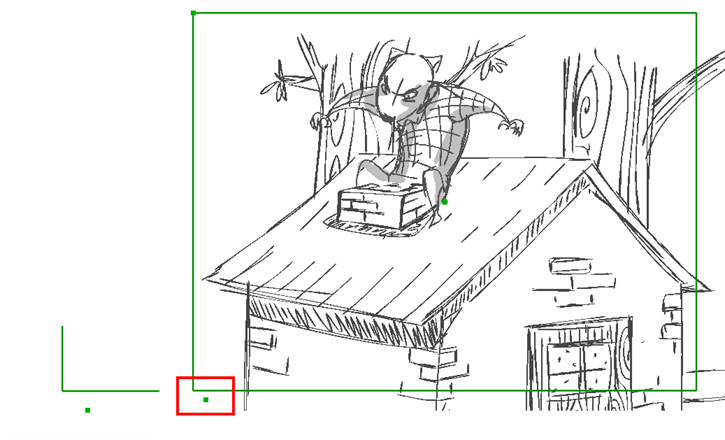
If you have more than one keyframe within a scene, you will see a red dot indicating the last keyframe and more blue dots for the ones in between. Use these dots to select the desired keyframe when moving the frame in the Stage View. If you did not modify the position of the camera frame for those keyframes, the order is ascending from left to right
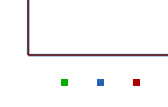
These are the default camera keyframes colours. You can use the Preferences dialog box to choose your own camera keyframe colours. These will be the new colours use in the Camera and Stage views display as well as in the different export formats of your storyboard—see Colours.
Creating Camera Keyframes
In order to create any animated camera for a scene, you will need at least two keyframes. Create these keyframes before you change the position of your camera if you plan to move it. Below are four methods to add keyframes to the Timeline view.
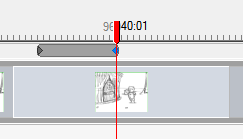
To add a keyframe at the current frame:
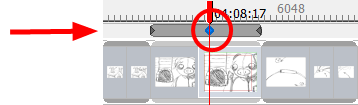
- In the Timeline view, drag the red playhead to the frame on which you want add a keyframe.
- From the Tools toolbar or the Tools menu, select the Camera
 tool.
tool.
- Do one of the following:
| ‣ | From the top menu, select Camera > Add Camera Keyframe at Current Frame. |
| ‣ | In the Tool Properties view, click the Add Keyframe |
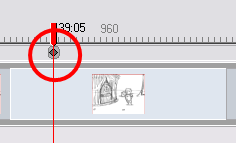
A keyframe is added in the Timeline view at the exact position of the red playhead.
To add a keyframe at the beginning of the current panel:
- In the Timeline view, select the panel on which you want to add a keyframe.
- From the Tools toolbar or the Tools menu, select the Camera tool.
- Do one of the following:
| ‣ | From the top menu, select Camera > Add Camera Keyframe at Beginning of panel. |
| ‣ | In the Tool Properties view, click the Add Keyframe at Beginning of Current Panel |
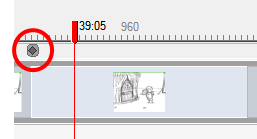
A keyframe is added in the Timeline view at the beginning of the current panel.
To add a keyframe at the end of the current panel:
- In the Timeline view, select the panel on which you want to add a keyframe.
- From the Cameratoolbar or the Tools menu, select the Camera tool.
- Do one of the following:
| ‣ | From the top menu, select Camera > Add Camera Keyframe at the End of Panel. |
| ‣ | In the Tool Properties view, click the Add Keyframe at the End of Current Panel |
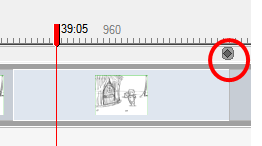
A keyframe is added in the Timeline view, at the end of the current panel.
To use the Copy and Paste commands to add keyframes:
- In the Timeline view, click to select a camera keyframe. It will become blue when selected.
In the Stage view, click the camera keyframe.
- From the top menu, select Edit > Copy Camera Keyframes or press [Ctrl]+[C] (Windows) or [⌘]+[C] (Mac OS X).
| ‣ | Select the Camera |
- Move the red playhead to the position within the same scene where you want to paste the keyframe.
- From the top menu, select Edit > Paste Camera Keyframes or press [Ctrl]+[V] (Windows) or [⌘]+[V] (Mac OS X).
| ‣ | Select the Camera |
Moving Keyframes in the Stage View
The position of the camera keyframes are set in much the same way as the Static Camera; using the Camera tool in the Stage view. You will do this for every keyframe you have created, so your camera moves from one keyframe to the next when played back.

To position camera keyframes in a 2D project:
- To display the Camera Status toolbar, select Edit > Preferences (Windows) or Storyboard Pro > Preferences (Mac OS X).
The Preferences dialog box opens.
- Select the Camera tab.
- In the Options section, select the Show Status Bar option.
- Click OK.
- From the Tools toolbar or the Tools menu, select the Camera tool.
- In the Stage view, click to select the camera keyframe you want to modify. If you have more than one keyframe within a scene, you will see more dots here. Use these dots to select the desired keyframe when moving the frame in Stage view. The order is ascending from left to right.
- Use one of the following methods to modify the camera keyframe:
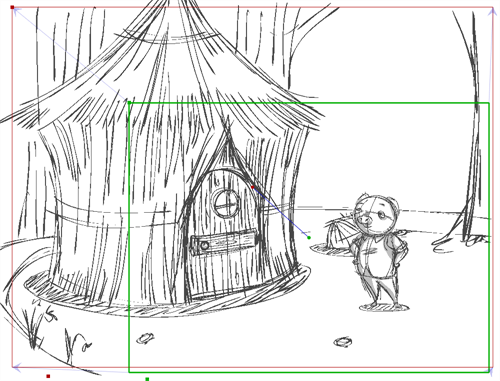
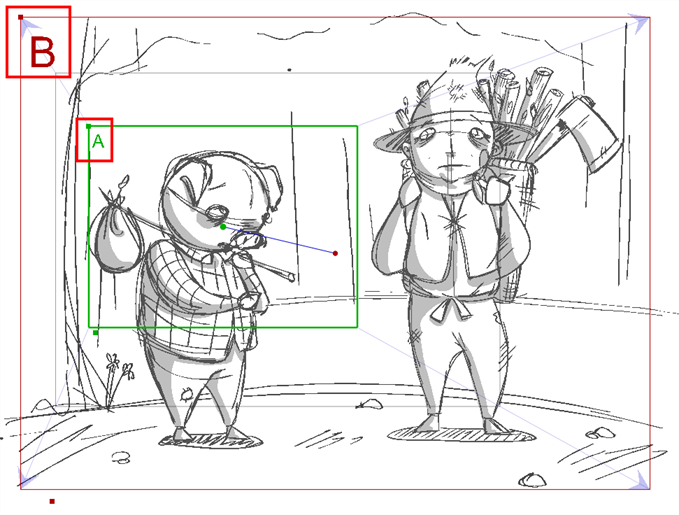
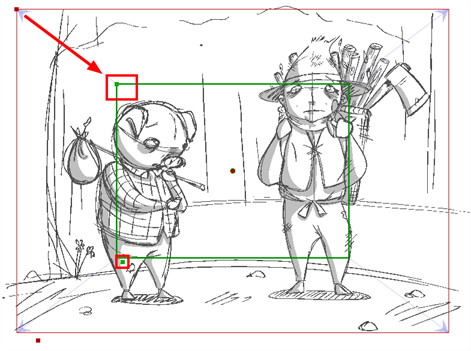
| ‣ | To position the selected keyframe along the Z axis, creating a truck in or truck out movement, drag the top-left corner of the frame when you see the Truck  icon. If you want to modify the Zoom level, use the Field of View field in the Tool Properties view. icon. If you want to modify the Zoom level, use the Field of View field in the Tool Properties view. |
When you release the mouse, the keyframe is set, and blue arrows appear to indicate the direction of the camera movement. In this case, it would be zooming out from position A to position B.
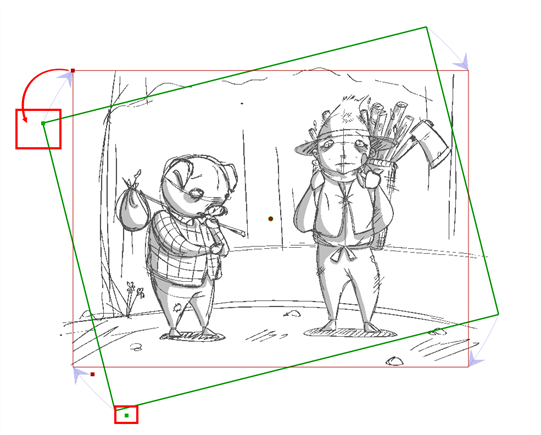
| ‣ | To rotate the selected keyframe, drag the top-left corner of the frame when you see the Rotate  icon. icon. |
| ‣ | To move the selected keyframe, drag the frame from the centre pivot point or the outer edge of the camera frame when you see the Drag  icon. icon. |
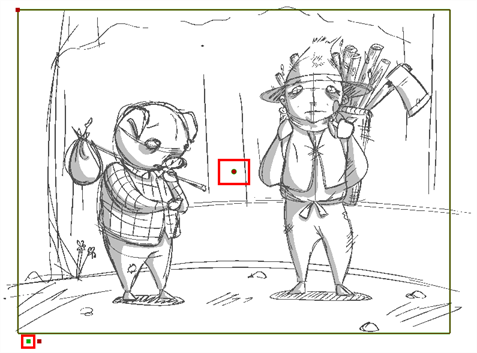
| ‣ | You can also nudge the selected keyframe by pressing [Up], [Down], [Left] and [Right] on the keyboard. |
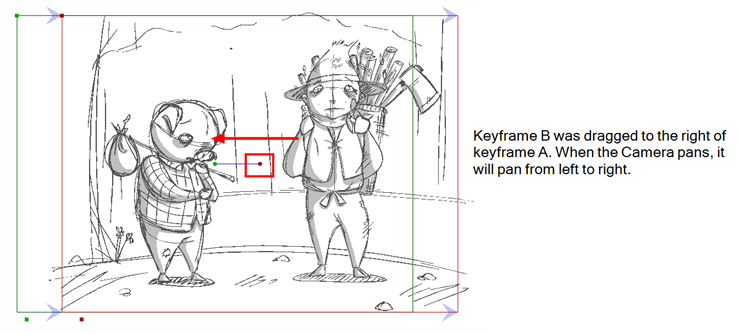
At this point, if you wanted to, you could select the B position keyframe and move it to a new location. The scene, when played back, will contain a camera that moves from position A to position B.
Modifying the Trajectory with Control Points
You can change the camera path from one keyframe to the next by adding control points to the trajectory.
To add control points to a trajectory:
- In the Timeline view, select the scene on which you want to modify the camera trajectory.
- From the Tools toolbar or the Tools menu, select the Camera tool.
- In the Stage view, place the cursor over the trajectory between two keyframes.
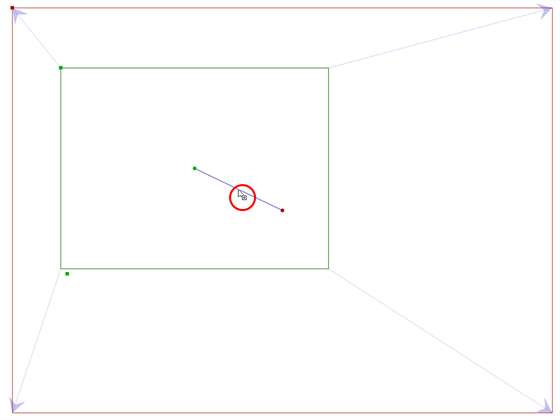
- When you see this icon
 , click and drag the trajectory to reshape it.
- A control point is added when you let go of the mouse button.
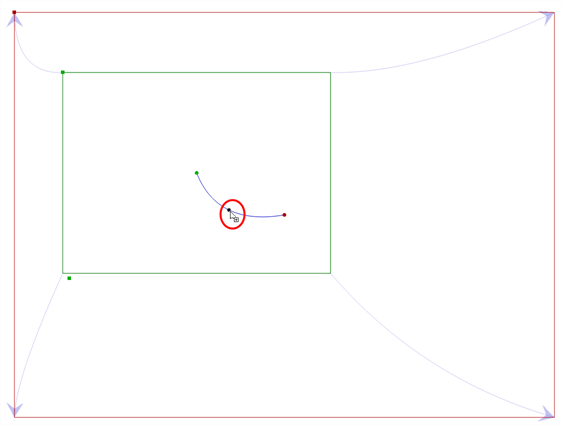
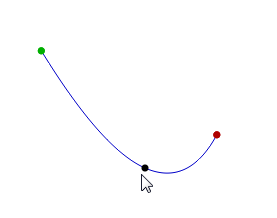
Now, instead of the camera going from A to B in a linear fashion, there is a slight curve to the trajectory.
- Click the control point to move it and to reshape the trajectory if desired. You can also select the control point in the Stage view, Top view or Side view and click Delete. You do not have to go to the Timeline.
Deleting a Control Point
Control points are visible in the Timeline, but you can only move them in the Stage view. To delete a control point, you must go to the Timeline.
To delete a control point:
- In the Timeline view, select the control point, represented by a small dot between keyframes.
The control point turned blue.
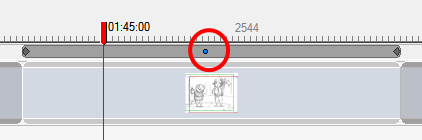
- Press [Delete] to remove the selected point.
The trajectory reverts to its original shape after you delete the control point.
Moving Keyframes on the Timeline
If you need to change the position of a keyframe in the Timeline view, there are a couple different ways to do this. Note that camera keyframes can only be moved to a new location within the same scene. The following two methods are useful when you want to move a keyframe to a new location, or cut and paste a keyframe.
| • | Adjusting the Continuity, Tension and Bias between Keyframes |
| • | Snapping |
| • | Spreading Camera Motion Across Panels of a Scene |
To drag camera keyframes to a new location in the Timeline view:
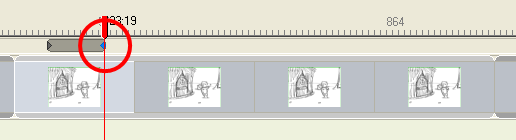
- In the Timeline view, select a keyframe.
The keyframe turns blue.
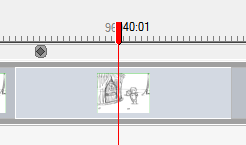
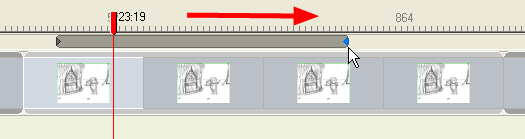
- Drag the selected keyframe left or right to choose a new position in time. You can only drag it to a new location within your current scene.
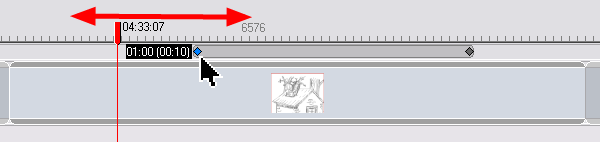
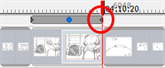
While you drag the keyframe, its position relative to the scene is displayed in a black box. Also displayed is the number of frames from the original position the new keyframe will be located.

To using the Cut and Paste commands to move keyframes:
- In the Timeline view, select a keyframe.
The keyframe turns blue.
| 1. | From the top menu, select Edit > Cut Camera Keyframes or press [Ctrl]+[X] (Windows) or [⌘]+[X] (Mac OS X). |
The keyframe is removed from the Timeline view, and copied to the Clipboard.
- Move the red playhead to the position within the same scene on which you want to paste the keyframe.
- From the top menu, select Edit > Paste Camera Keyframes or press [Ctrl]+[V] (Windows) or [⌘]+[V] (Mac OS X).
Adjusting the Continuity, Tension and Bias between Keyframes
You can adjust the Tension, Bias, and Continuity parameters on keyframes and control points by selecting the point in the Timeline view and using the Keyframes and Control Points toolbar.
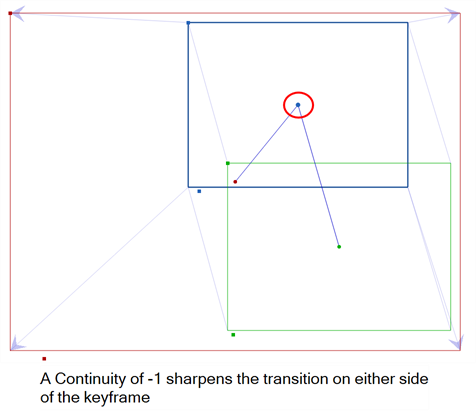
| • | Continuity controls the smoothness of a transition between the segments joined by a point. |
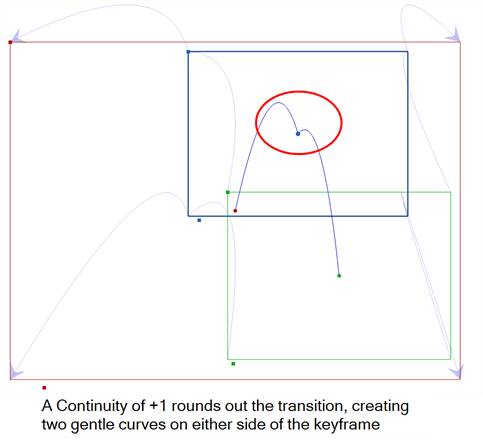
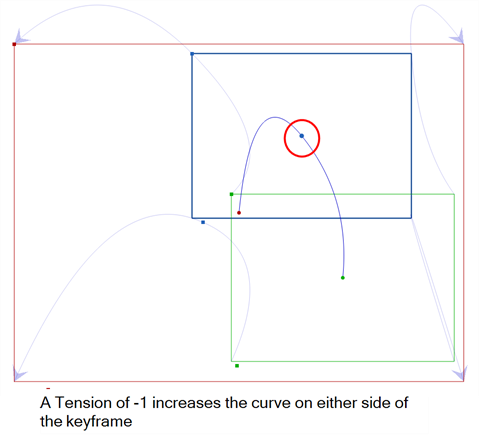
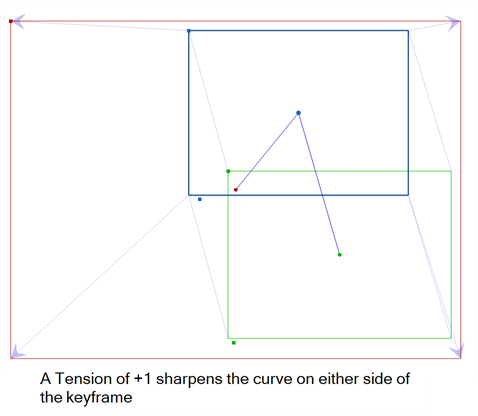
| • | Tension controls how sharply the path bends as it passes through a control point or keyframe. |
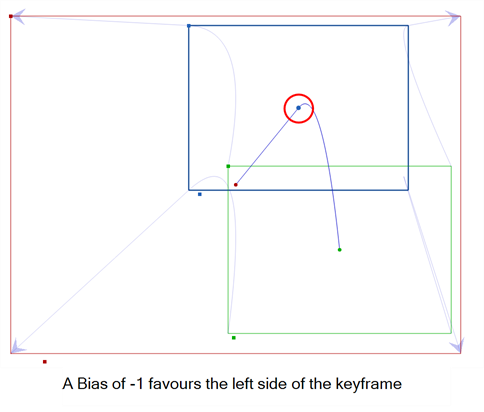
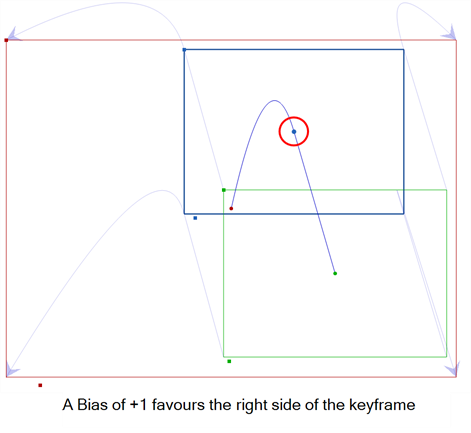
| • | Bias controls the slope of the path so that it flows towards one side of the motion point or the other. |
To adjust the Continuity, Tension and Bias parameters:
- In the Tools toolbar, select the Camera tool.
- In the Timeline view, select the keyframe or control point you want to adjust.
- In the Keyframes and Control Points toolbar, adjust the Continuity, Tension, and Bias parameters.

If the Keyframes and Control Points toolbar is not visible, from the top menu, select Windows > Toolbars > Keyframes and Control Points.
If you find that you are using the same Continuity, Tension and Bias settings, you can set a preference to remember your settings.
To adjust the Keyframes and Control Points default preferences:
- From the top menu, select Edit > Preferences (Windows) orStoryboard Pro> Preferences (Mac OS X).
The Preferences dialog box opens.
- Select the Camera tab.
- In the Keyframes and Controls Points section, type in the defaults for Tension, Continuity and Bias, based on your preferred settings.

Snapping
If you turn on snapping, camera keyframes, panels and sound tracks snap to the beginning and end of each panel, each sound track, or the red playhead when dragging.
To turn snapping on/off, do one of the following:
| ‣ | At the bottom of the Timeline view, click the Snapping |
| ‣ | Right-click the Timeline view and select Snapping. |
Spreading Camera Motion Across Panels of a Scene
A camera movement is not restricted to a panel. Keyframes for a particular camera movement can span multiple panels within the same scene.
To modifying a camera movement to span across panels of a scene:
- In the Timeline view, select the panel that contains the camera movement you want to span over multiple panels.
- Select the keyframe you want to move to a new panel.
- Drag the selected keyframe to another panel within the scene.
Keyframe Syncing
When you change the duration of your panels, add, delete or drag-and-drop scenes and panels, it affects the placement of keyframes. There are three keyframe syncing options that affect keyframes when changing the duration of panels. Depending on what option you have set, your keyframes will be repositioned accordingly. The following examples demonstrate resizing panels by dragging, but the options will affect your keyframes in the same way, regardless of the method you use to change the duration of your panel.
The three options for keyframe synching are:
| • | Setting Keyframe Synching to None |
| • | Setting Keyframe Synching to Relative to Panels |
| • | Setting Keyframe Synching to Relative to Scene |
Setting Keyframe Synching Options
To change keyframe synching settings:
| ‣ | In the Timeline view, right-click the area with the camera keyframes and select Keyframes Sync Mode > None, Relative to Panel or Relative to Scene. |
Setting Keyframe Synching to None
Setting your keyframe synching to None makes your keyframes remain exactly where they are when you change the panel duration. You will lose keyframes that are not within the range of the scene.


Setting Keyframe Synching to Relative to Panels
When you have the Relative to Panels option selected, all the keyframes within the selected panel will be repositioned, relative to where they were placed in the panel. When a panel is deleted, all keyframes within the deleted panel will also be deleted.


Setting Keyframe Synching to Relative to Scene
When you have the Relative to Scene option selected, all the keyframes within the selected scene will be repositioned, relative to where they were placed.


Easing In or Out
For effect, you can adjust your camera movements so they ease in or ease out of the keyframes.
With the Camera ![]() tool selected, the Ease In/ Ease Out parameters become available in the Tool Properties view.
tool selected, the Ease In/ Ease Out parameters become available in the Tool Properties view.
To set ease in or ease out for a keyframe:
- In the Timeline view, select a keyframe.
- From the Tools toolbar or the Tools menu, select the Camera tool.
- Do one of the following:
| ‣ | Ease In: In the Ease In section of the Tool Properties view, enter the duration of the ease in after the first frame in which the gradual change in camera or layer movement begins. For example, if you want to slowly accelerate to the normal camera or layer speed from frame 1-10, enter a value of 10. |
| ‣ | Ease Out: In the Ease Out section of the Tool Properties view, enter the duration of the ease out after the first frame in which the gradual change in camera or layer movement begins. Enter the number of frames before the last frame in which the change in camera or layer movement is gradual. |
Deleting Keyframes
To delete keyframes from the Timeline view:
- Select the keyframe(s) you want to delete.
- Do one of the following:
| ‣ | From the top menu, select Edit > Delete Selected Camera Keyframes. |
| ‣ | Select the Camera |
| ‣ | Press [Delete]. |
To delete the keyframe at the current frame:
- Place the red playhead at the frame on which you want to delete a keyframe.
- From the top menu, select Camera > Remove Camera Keyframe at Current Frame.
Resetting the Camera Animation
If necessary, you can remove all the keyframes in your scene, and revert back to the original Static Camera.
To reset camera animation:
- In the Timeline view, select the scene on which you want to reset the camera animation.
- Do one of the following:
| ‣ | Select the Camera |
| ‣ | From the top menu, select Camera > Reset Camera. |
All camera keyframes for the selected scene are deleted and the scene’s Static Camera is reset.
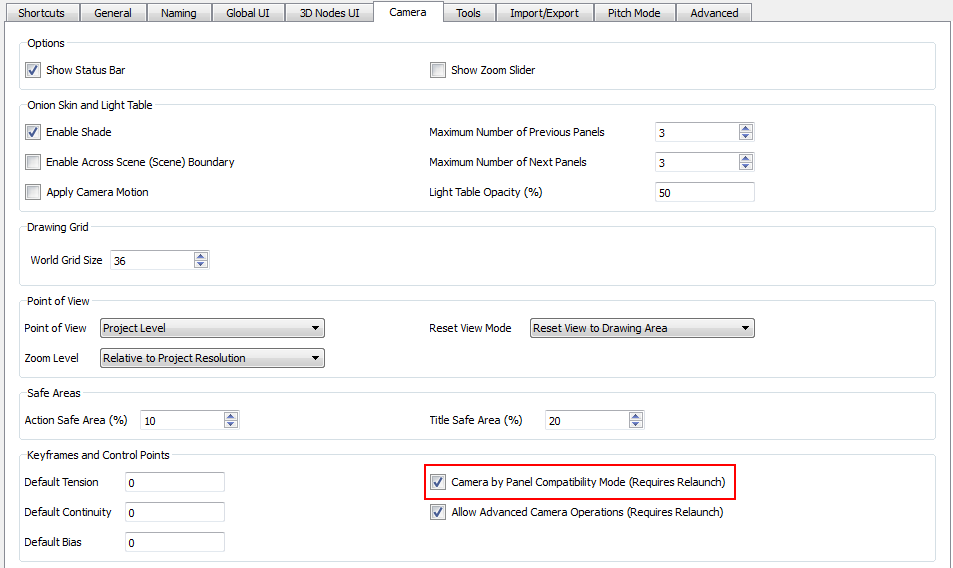
Camera by Panel Compatibility Mode Preferences
If you were working with a copy of Storyboard Pro v1.6 and you upgraded to the current version, it is possible that you may want to keep working with the camera keyframes settings as you did before you upgraded. You can do this by enabling the Camera by Panel Compatibility Mode option.
This section includes the following topics:
| • | Enabling the Camera by Panel Compatibility Mode Option |
| • | Allow Advanced Camera Operations Option |
Enabling the Camera by Panel Compatibility Mode Option
To Enable the Camera by Panel Compatibility Mode option:
- Open the Preferences dialog box:
| ‣ | Select Edit > Preferences (Windows) or Storyboard Pro > Preferences (Mac OS X). |
| ‣ | Press [Ctrl]+[U] (Windows) or [⌘]+[U] (Mac OS X). |
- In the Preferences dialog box, select the Camera tab.
- In the Keyframes and Control Points section, select the Camera by Panel Compatibility Mode option.
Once the software is relaunched, you will notice some important changes with how the camera keyframes and panels are handled:
| • | When a new panel is created, camera keyframes are added at the beginning and end of the panel automatically. |
| • | When creating a new panel, the camera frame will be placed to match the camera of the previous panel. |
| • | The reset camera button changes behavior. Instead of deleting all camera keyframes from the selected scene, it will reset the start and end camera of the selected panel. |
| • | The Static Camera |
Also, alternative commands become available in the Camera menu:
| • | Paste and Repeat Camera on Selected Panels: Pastes the copied keyframes and fits them into the selected panel. If multiple panels are selected, the keyframes repeated in each of them. |
| • | Paste and Spread Camera on Selected Panels: Pastes the copied keyframes and spread them across all the panels of the selected scene. |
| • | Reset Camera on Selected Panels: Resets the start and end camera of the selected panels. |
Allow Advanced Camera Operations Option
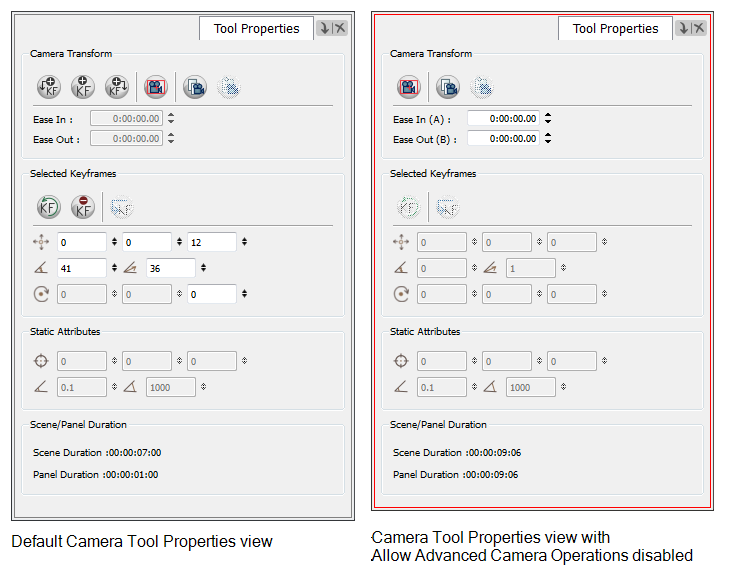
This preference is enabled by default and it is not possible to deactivate it unless you enable the Camera by Panel Compatibility Mode option first. Disabling the Allow Advanced Camera Operations preference will hide some of the options that are normally available in the Camera Tool Properties view.
To disable the Allow Advanced Camera Operations option:
- Open the Preferences dialog box:
| ‣ | Select Edit > Preferences (Windows) or Storyboard Pro > Preferences (Mac OS X). |
| ‣ | Press [Ctrl] + [U] (Windows) or [⌘] + [U] (Mac OS X). |
- In the Preferences dialog box, select the Camera tab.
- In the Keyframes and Control Points section, select the Camera by Panel Compatibility Mode preference.
- Deselect the Allow Advanced Camera Operation option.

Once the software is relaunched, notice that some buttons are hidden from the Camera’s Tool properties view:
Previewing the Panel with the Camera View
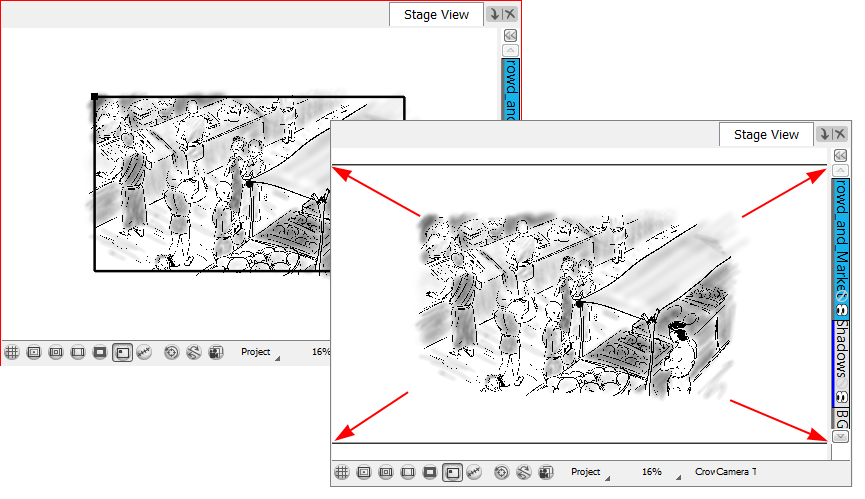
In the Stage view, the perspective is from a fixed point in space, which is where the camera is placed by default.
If you switch to Camera view and preview the scene, the perspective is from the camera, so you can see exactly what the camera captures as it moves from one keyframe to another.
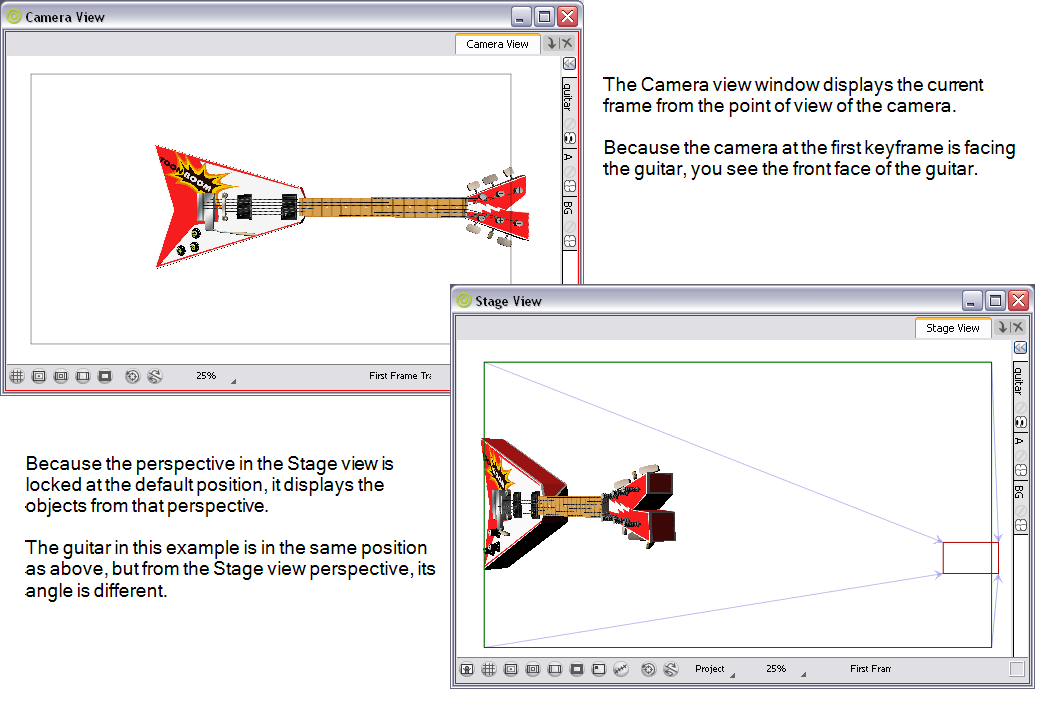
Therefore, if you make changes to the camera position, especially if you change the camera’s focus, use the Camera view to preview the camera move accurately.
To display the Camera view:
| ‣ | Select Windows > Camera View or right-click the tab area and select Camera View. |