
Preferences
An important feature of Storyboard Pro is the Preferences dialog box which allows you to customize the interface, tools behaviour, and shortcuts.
To open the Preferences dialog box:
- Do one of the following:
| ‣ | Select Edit > Preferences (Windows) or Storyboard Pro > Preferences (Mac OS X). |
| ‣ | Press [Ctrl] + [U] (Windows) or [⌘] + [,] (Mac OS X). |
User Interface Preferences - General Tab
To customize your interface, you will use some of the preferences located in the General , Terminology Style and Touch Interface categories in the General tab.

Forbid Drawing on Panel Thumbnails
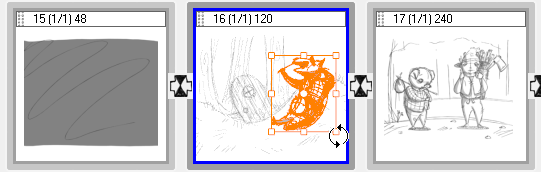
By default, this preference is enabled, meaning that it is not possible to draw on the panels in the Thumbnails view. You can disable this preference to make it possible to use all of the Drawing tools directly in the Thumbnails view.
Refer to the Drawing chapter to learn more about drawing tools.
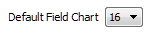
Default Field Chart
By default, the field chart is set to 12 in Storyboard Pro. However, you can change the field guide to 16 or 24 to suit your project needs.
Focus on Mouse Enter
In order for an operation or keyboard shortcut to work in the view in which you are working, the focus must be on that view. That is, when the focus is on a particular view, a red rectangle appears around its frame. Then you must click in the view or on the view’s header to set the focus on that view .
If you enable the Focus on Mouse Enter preference, you will not need to click in the view to obtain the focus. It will be done as soon as your mouse enters the view.
This preference is deselected by default.
Automatically Save Workspace
This preference is enabled by default. This means that workspace modifications are automatically saved. You can disable this option to prevent this. When this preference is disabled, you can still save the workspace manually by selecting Windows > Workspace > Save Workspace.
You can restore the default workspaces by selecting Windows > Restore Default Workspace from the top menu.
Refer to the section Managing the Workspace to learn how to customize your workspace.
Terminology Style
By default, Storyboard Pro is set to use Animation terminology style. This means it will use the word Scene as opposed to Shot which is more commonly used in live action projects. You can change this preference, so the project and interface uses live action terminology.
To switch terminology styles:
| ‣ | Live Action: To use terminology that includes, act, scene, shot, and panel. |
| ‣ | Animation: To use terminology that includes, act, sequence, scene, and panel. |
Touch Interface
This preference is disabled by default. When enabled,you can use the main gestures to navigate in the interface using a supported touch device.
| • | Support Gesture: Enables touch gesture. |
| • | Invert Scroll Direction: Inverts the touch motion used to scroll up and down. |
| • | Gesture Sensitivity: Defines the level of sensitivity recognized. |
Refer to Interface Navigation to learn more about using touch gesture to navigate in the interface.
User Interface Preferences - Global UI tab
To customize your interface, adjust the preferences on the Global UI tab.

Customize Interface Colours
You can customize some of the colours displayed in the user interface. The colour swatch beside each of the elements listed represents its current colour.
You can modify any of the colours from the list. Some of the changes may require you to restart the application or close the view and reopen it to see them.
| • | Click a colour swatch and select a new colour from the Colour Picker window. |
| • | To restore all of the default interface’s colours, click Restore All Defaults. |
Display Duration in Time Code Format
In the user interface, the durations are either displayed in time code format or frames. You can use this section of the Global UI tab to decide when to use which format.
| • | Enabled options use Time Code as the duration format. |
| • | Disabled options use Frames as the duration format. |
User Interface Preferences - Advanced Tab
To customize your interface, you will use some of the preferences in the Memory category.
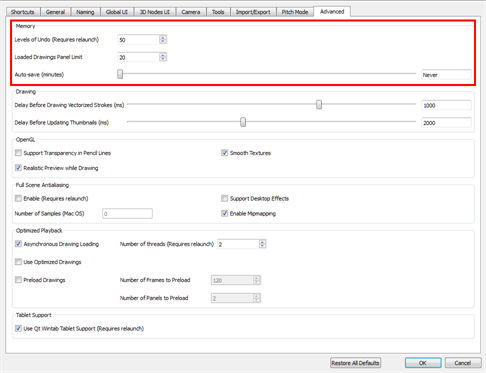
Levels of Undo
The Levels of Undo preference determines the number of actions retained by the Undo list. By default, the system stores 50 actions in the list. You can alter the number if needed.
This preference requires you to restart the application.
Auto-save (minutes)
By default the Auto-save preference is disabled, so it will never auto-save your work. You can enable the Auto-save preference by using the slider to select the interval of time (in minutes) at which your work will be automatically saved.
User Interface Preferences - Camera Tab
To customize your interface, use the preferences in these sections:
| • | Options |
| • | Point of View |
| • | Safe Areas |
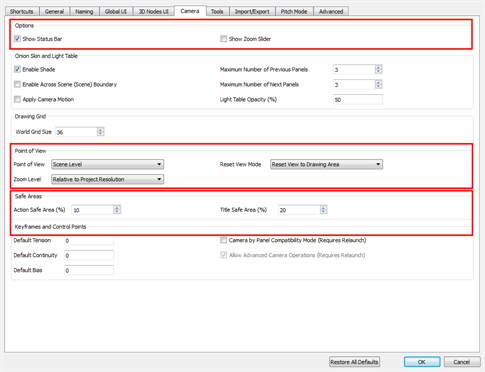
Show Status Bar
To display the status bar at the bottom of the Stage view, enable it in the Options section of the Camera tab. The status bar is not displayed by default.
| • | Show Status Bar: Displays the status bar in the Stage view. |
| • | Show Zoom Slider: Adds the zoom slider to the status bar in the Stage view. |
Refer to the Stage View topic to learn more about the options available in the status bar.
Point of View Menu
The Point of View menu lets you determines at which level the current position of the Stage view (zoom, pan and rotation) is remembered when you are flipping through panels.
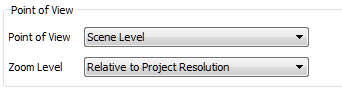
| • | Project: Uses the same zoom, pan and rotation value of the Stage view for all panels of the project. |
| • | Scene: Uses the zoom, pan and rotation value of the Stage view only for panels that are part of the current scene. |
| • | Panel: Every panel of the project has its own zoom, pan and rotation value. |
You can also set the Point of View mode using the top menu or the Status Bar options. Select View > Point of View Mode > Project Level, Scene Level or Panel Level.
Refer to Point of View Menu to learn how to set it using the status bar.
Reset View Mode Menu
Use the Reset View Mode menu to define the behaviour of the Reset View command. By default it is set to Reset View to Drawing Area.
| • | Reset View to Drawing Area: Resets the Stage view to show the default drawing area, which is the space inside the default camera frame (before the camera is modified). |
| • | Reset View to Camera Overview: Resets the Stage view to show an overview of the Camera frames. If a Camera movement was created in the selected panel, it will show the entire space within the camera movement. |
| • | Reset View to Start Camera: Resets the Stage view to focus on the starting camera position of the camera movement on the current panel. |
| • | Reset View to End Camera: Resets the Stage view to focus on the ending camera position of the camera movement on the current panel. |
| • | Reset View to Current Panel Overview: Resets the Stage view to to fit the camera, regardless of the point of view mode. |
You can also use similar commands from the top menu to reset the view to the desired behaviour once, without modifying the default behaviour of the Reset View command. Select View > Reset View to > desired option.
Refer to the Interface Navigation topic to learn more.
Zoom Level Drop-down Menu
Use the Zoom Level drop-down menu to set the behaviour of the zoom in the Stage view.
| • | Relative to Project Resolution: Makes the zoom information and settings dependent on the project resolution. |
| • | Relative to View: Makes the zoom information and settings adjust relative to the size of the Stage view on your screen. |
Safety Areas
You can set your own Stage view safety area limits using these two fields. These two values are expressed using a percentage of the view.
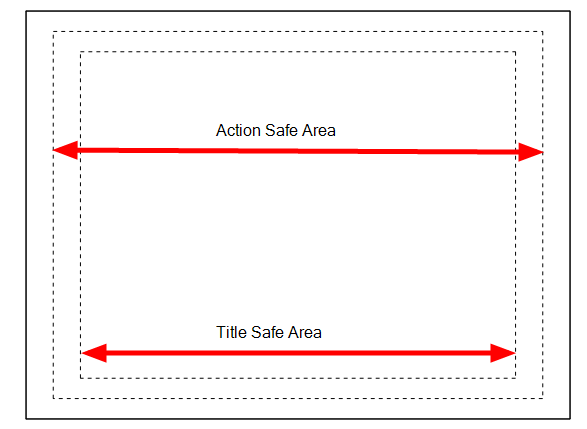
You can display the Safety Area in the Stage view using the Safety Area button from the status bar.
Refer to Stage View to learn how to show the status bar.
Keyboard Shortcuts
To speed up your work, all of Storyboard Pro’s keyboard shortcuts can be customized and you can even choose other software keyboard shortcut sets.
This section covers the following topics:
| • | Selecting a Keyboard Shortcut Set |
| • | Customizing a Keyboard Shortcut |
Selecting a Keyboard Shortcut Set
In Storyboard Pro, you can choose a set of default keyboard shortcuts you are familiar with. You can choose between the following:
| • | Toon Boom Storyboard Pro (Default) |
| • | Toon Boom Harmony |
To switch keyboard shortcut sets:
- Open the Preferences dialog box by pressing [Ctrl] + [U] (Windows) or [⌘] + [,] (Mac OS X).
- In the Preferences dialog box, select the Shortcuts tab.
- In the Shortcut Set drop-down menu, select the desired set.

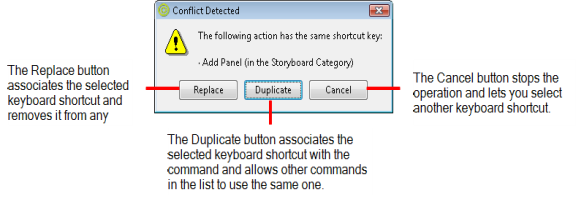
Customizing a Keyboard Shortcut
You can also customize most of the shortcuts by opening the Preferences dialog box and selecting the Shortcuts tab.
To set a shortcut:
- Open the Preferences dialog box by pressing [Ctrl] + [U] (Windows) or [⌘] + [,] (Mac OS X).
- In the Preferences dialog box, select the Shortcuts tab.
- In the left window, click the triangle beside a command to expand the list of commands. Select a command to modify.
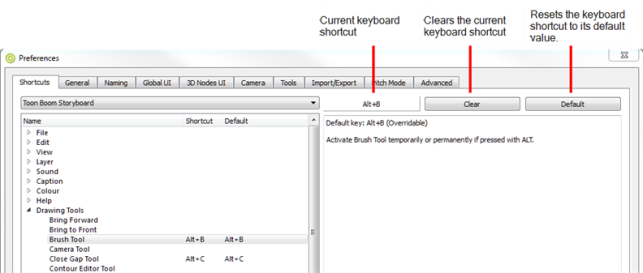
- On your keyboard, do any of the following:
| ‣ | To create a new keyboard shortcut, press the desired keys on your keyboard. |
| ‣ | To reset a command’s default keyboard shortcut, click Default. |
| ‣ | To remove any keyboard shortcut associated to a command, click Clear. |
To restore the default keyboard shortcuts:
- Open the Preferences dialog box by pressing [Ctrl] + [U] (Windows) or [⌘] + [,] (Mac OS X).
- In the Shortcuts tab, click Restore All Defaults.