The Ellipse tool allows you to quickly draw an ellipse or a circle.
- In the Tools toolbar, select the Ellipse
 tool.
tool.
The tool's properties are displayed in the Tool Properties view.
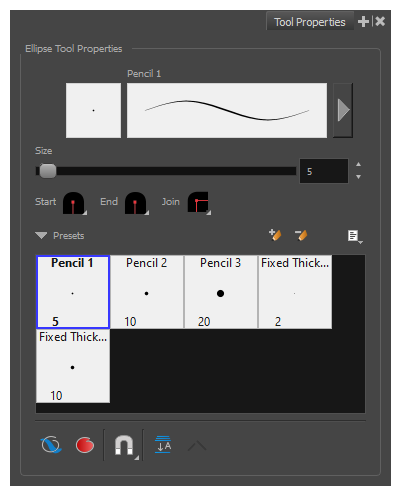
Pencil Properties
Just like other shape tools, this tool creates pencil lines. Hence, its tool properties are similar to the ones of the Pencil tool and it can be used with pencil presets.
| Property | Description |
|---|---|
| Preview Area |
The Preview area lets you see a preview of the stroke your drawing tool will make.
|
| Pencil Properties Dialog |
The arrow button right of the preview area opens the Pencil Properties dialog.
While the Tool Properties view only gives you access to a few of the pencil properties, a list of pencil presets and other drawing options, the Pencil Properties dialog gives you access to all the available options for your pencil's shape and texture. For more information on the Pencil Properties dialog, see the Pencil Properties Dialog section below. |
| Size |
Defines the width of the pencil line used to draw the shape. |
| Shape |
You can adjust the start, end, and join style of a pencil line.
|


Pencil Presets
These options allow you to select, create and manage pencil presets.
| Icon | Property | Description |
|---|---|---|
| Presets list |
Storyboard Pro provides a You can export the pencil presets that you have created and import those that others have created. This is a good way for you and project collaborators to keep a consistent look for the project. |
|
|
|
New Brush Preset |
Creates a new preset based on the current tool properties. |
|
|
Delete Brush Preset |
Deletes the currently selected preset. |
|
|
Brush Presets Menu |
Open a menu that contains the following options:
|
Drawing Options
These options affect the way your shape is added to your artwork.
| Icon | Property | Description |
|---|---|---|
|
|
Draw Behind |
When enabled, your brush strokes will appear behind the existing artwork.
NOTE Your brush stroke will temporarily appear over your artwork as you draw it, until you release the mouse cursor or tablet pen.
|
|
|
Auto Fill |
When enabled, the shape you draw is automatically filled with the selected colour. By default, drawing a shape only creates its outlines.
|
|
|
Snapping |
Allows you to enable or disable snapping for this tool and all other animation and drawing tools that support snapping, as well as to select which types of snapping are enabled. If you double-click or long-click on this button, it will open a pop-up menu in which you can toggle different snapping modes. You can also click on this button to toggle it off, which will disable all snapping modes, and click on it again and toggle it on to re-enable the snapping modes which were previously enabled. This tool supports the following snapping modes:
|
|
|
Auto Flatten Mode |
By default, when drawing
NOTE
Using the Select tool, you can use select and remove a segment of flattened pencil lines. Overlapping pencil lines drawn with the Auto-Flatten mode are essentially cut into segments by the overlap and can be treated as individual lines. |
Pencil Properties Dialog
The Ellipse tool draws the same type of line as the Pencil tool. Hence, you can configure the Ellipse tool's lines using the Pencil Properties dialog, which you can open by clicking on the arrow button right of the stroke display area in the Tool Properties view.

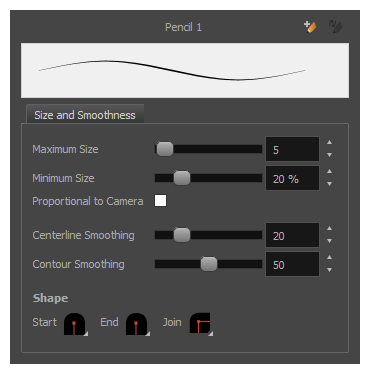
| Property | Description |
|---|---|
| Maximum Size | Defines the maximum size of the pencil line. If the tool is used with a pressure sensitive pen tablet, the width of the stroke will vary between its maximum size and minimum size depending on the amount of pressure used. If used with a mouse, the width of the stroke will always be its maximum size. |
| Minimum Size |
Defines the minimum size of your stroke as a percentage of the maximum size. If you do not have pressure sensitivity from a pen table, the minimum size value will be ignored. |
| Centerline Smoothing | Defines the amount of smoothing Storyboard Pro should perform on the central line of the pencil stroke. A higher setting will prevent your line from being shaky and will reduce the amount of control points it has, making it easier to tweak, but is liable to reduce drawing precision and turn sharp angles into curves. |
| Contour Smoothing |
Defines the amount of smoothing Storyboard Pro should perform on the outer contour of the pencil stroke. A pencil line is defined by its centreline and its variations in thickness, rather than its apparent shape. When drawing a pencil line with a mouse, its thickness is uniform. Therefore, its outer contour does not have any control point, except at its extremities, and no smoothing is required for its contour. However, when drawing a pencil line with a pressure sensitive tablet, its contour will have control points and Bezier curves to define the line's variations in thickness, and thus smoothing must be performed on its contour. An increased contour smoothing will reduce the amount of control points on the line's thickness and smoothen its curves, but may affect the precision of the variations in line thickness. |
| Shape |
You can adjust the start, end, and join style of a pencil line.
|