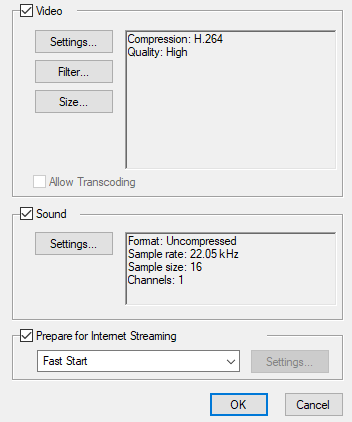
If you are exporting in QuickTime Movie (.mov) format, you can configure the video and audio settings for your exported movies using the configuration interface provided by QuickTime.
- In the Movie Settings dialog box, select whether you want your movie to include Video and Sound data, as well as if the video should be optimized for Internet streaming.

- In the Video section, click Settings.
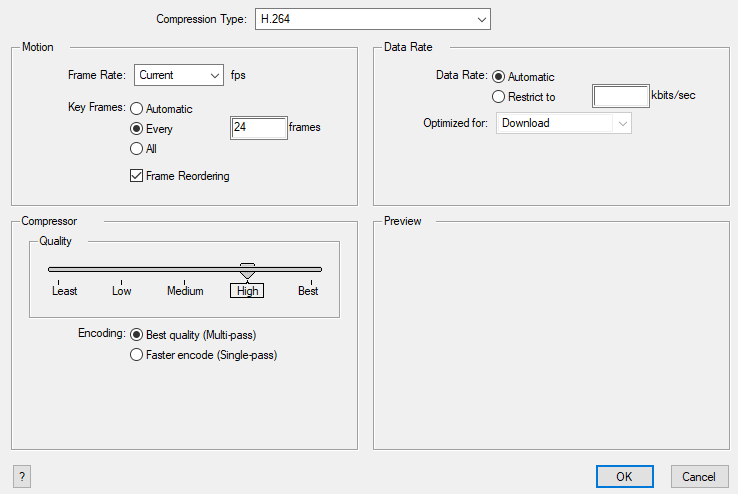
The Standard Video Compression Settings dialog box opens.

- From the Compression Type menu, select a codec. The availability of certain compression settings depends on the Compression Type selected. For example, when the Animation compression type is selected, the Data Rate option is greyed out.
- In the Motion section, choose a Frame Rate from the list.
By default, it is set to match the frames-per-second (fps) of your Storyboard Pro project. If you choose a lower frame rate, your export playback will be faster than your actual project. The reverse is also true for a higher frame rate.
- If you want keyframes inserted, select the Every option and set the number per frame.
This is the option recommended by QuickTime. For further details, refer to the QuickTime documentation.
- In the Quality section, use the slider to choose a quality setting. Remember that the better the quality of the export, the larger the file.

- From the Data Rate section, either choose to allow the program to automatically select the most optimal bit rate, or enter a Restricted rate to save space and allow for faster downloading at a cost to the quality of the export.
- In the same section, from the Optimized For menu, select the intended viewing method for the export.
- Click OK.
- From the Movie Settings dialog box, click Sound Settings.
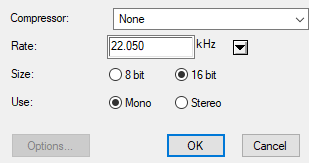
The Sound Settings dialog box opens.

- From the Compressor menu, select a compression type. The default setting is None. This exports your audio as is without performing any lossy compression or conversion, preserving its fidelity. Other compressors can be used if you need your movie's audio track to be exported in a specific format, or if disk space or download speed is critical, but they may impact the quality of your movie's soundtrack negatively.
- From the Rate menu, select a rate. It is best to export your audio at a rate that matches the rate of your original sound files. For example, if your file has an audio sample rate of 48 kHz and you choose a conversion rate of 22.05 kHz, the sound will play at the same speed, but higher frequencies will be missing, making it sound muffled. For reference, the standard sound quality is 48 kHz for broadcasting and DVD. Lower rates are liable to impact the quality of your movie's soundtrack negatively, but they can be useful if disk space or download speed is critical.
- Select the Size of your audio's encoding. Also known as Bit Depth, this determines the amount of precision used to record each wavelength in the audio track. The standard size is 16-bit. If you choose 8-bit, the amount of disk space the audio track of your movie file requires is halved, but the audio quality will be significantly lower.
- Select whether to Use the Mono or Stereo channel mode. Stereo sound has a separate audio track for the left and the right speakers, allowing to make the origin of each sound realistically match the origin of their corresponding action. If you choose Mono, the audio track in the exported movie file may use less disk space, but both the left and right channels will be merged into a single track.