
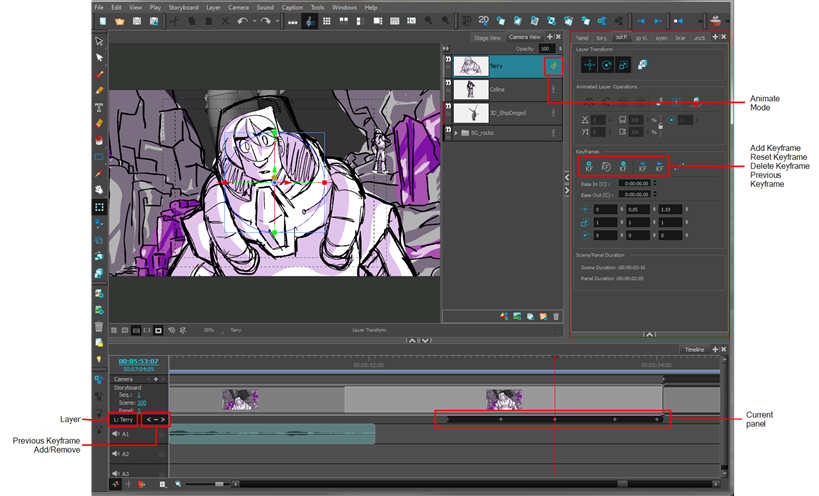
Animating Layers on the Layer Track
By default, layers are not animated. To animate a layer, begin by setting a keyframe on the desired position. You can use the Transform tool to move the layer and set as many keyframes as needed for your animation then edit the keyframes and timing with the Layer track in the Timeline view.
- In the Timeline view, drag the red playhead to the frame on which you want add a keyframe.
- In the Camera or Stage view, select the layer on which you want the keyframe applied.
- Do one of the following:
| ‣ | In the Timeline view, click the plus |
| ‣ | With the Layer Transform tool |
| ‣ | In the Stage or Camera view, click the Animate button. |
A keyframe is added in the Layer track at the exact position of the red playhead. The Animate button  turns yellow to indicate the presence of keyframes on your layer. Note that if you select a different layer or change panels, you will no longer see the keyframes until the layer is selected again.
- Select the layer you want to see.
- Do one of the following to navigate between keyframes within the same panel:
| ‣ | In the track controls of the layer track, click the Previous Keyframe |
| ‣ | With the Layer Transform tool |
- In the layer track of the Timeline view, select a layer keyframe.
The keyframe turns blue.
- Drag the keyframe left or right within the same panel.
- In the layer track of the Timeline view, select a layer keyframe.
The keyframe turns blue.
- Do one of the following:
| ‣ | Select Edit > Copy Layer Keyframe. |
| ‣ | Press Ctrl+C (Windows) or ⌘+C (Mac OS X) . |
- Move the playhead to the position within the same panel where you want to paste the keyframe.
- Do one of the following:
| ‣ | Select Edit > Paste Layer Keyframe |
| ‣ | Press Ctrl+V (Windows) or ⌘+V (Mac OS X). |
A keyframe is pasted at the location of the playhead.
- In the layer track of the Timeline view, select a layer keyframe.
The keyframe turns blue.
- Do one of the following:
| ‣ | Press Delete. |
| ‣ | Select Edit > Delete. |
| ‣ | With the Layer Transform tool |
| ‣ | In the track controls of the layer track, click the |
| ‣ | Press Ctrl+R (Windows) or ⌘+R (Mac OS X) to remove all keyframes on the selected layer. |
The keyframe is removed from the Timeline view.
- In the layer track of the Timeline view, select a layer keyframe.
The keyframe turns blue.
- With the Layer Transform tool
 active, place the playhead over the keyframe and click the Reset Keyframe
  button from the tool properties view. You can affect several keyframes simultaneously if you selected multiple keyframes prior to the operation.
NOTE: If you selected the Focus on Mouse Enter option in the Preferences dialog box, this may change the options in the Edit menu to the ones of the selected view.