Timeline View
The Timeline view is where you assemble the timing of a scene’s visuals and sounds. You can add sound track layers, as well as edit audio files imported into the sound tracks. You can also add transitions and control the playback of a selected panel or the entire storyboard from this view.
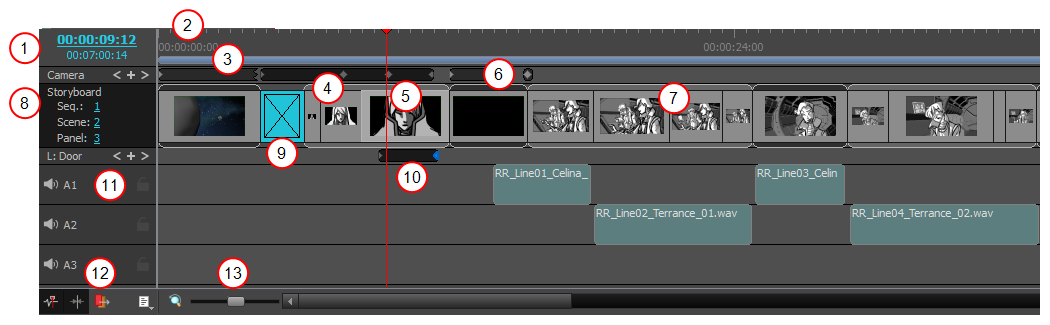
| 1 | The current timecode (playhead position) is displayed in the top-left corner of the Timeline view. The total duration of the project is displayed the current timecode. |
| 2 | The names and beginnings of the different acts are indicated by small flags at the top of the Timeline view. |
|
3 |
Sequences are displayed as blue bars. |
| 4 |
Scenes are represented by grey frames at the top and bottom of the panels. |
| 5 |
Each panel displays a thumbnail. |
|
6 |
Camera movements are displayed as black bars in the Camera track and keyframes as blue diamonds (when selected). |
| 7 |
The audio blocks appear below the scenes. |
|
8 |
The current sequence, scene, and panel names are displayed at the beginning of the panel row. |
|
9 |
Transitions are displayed as blue rectangles between scenes. |
|
10 |
Layer movements are displayed as black bars in the Layer track and keyframes as blue diamonds (when selected). |
|
11 |
The soundtrack names and Mute and Lock icons are displayed at the beginning of the audio rows. |
|
12 |
Sound options are available for manipulating the audio. |
|
13 |
The Zoom tool increases or reduces the width of the frames in the Timeline view. |
For tasks related to this view, see About Timing.
- Do one of the following:
| ‣ | In a view area, click the Add View |
| ‣ | Select Windows > Timeline. |