Function Editor View
The Function
A motion path is easy to manipulate. One important concept to understand is that a trajectory contains both keyframes and control points. Both can be used to shape a path; each have their own behaviour, however only keyframes appear in the Timeline view.
- Keyframes have a transformation value and a position in space at a given frame. Keyframes are locked in time.
- Control points have a position but no fixed frame or timing. It is mainly used to deform a trajectory. There are no velocity handles available on a control point. The velocity segments are set between keyframes only, making curves and trajectories much smoother. Control points can only be added on a 3D path.
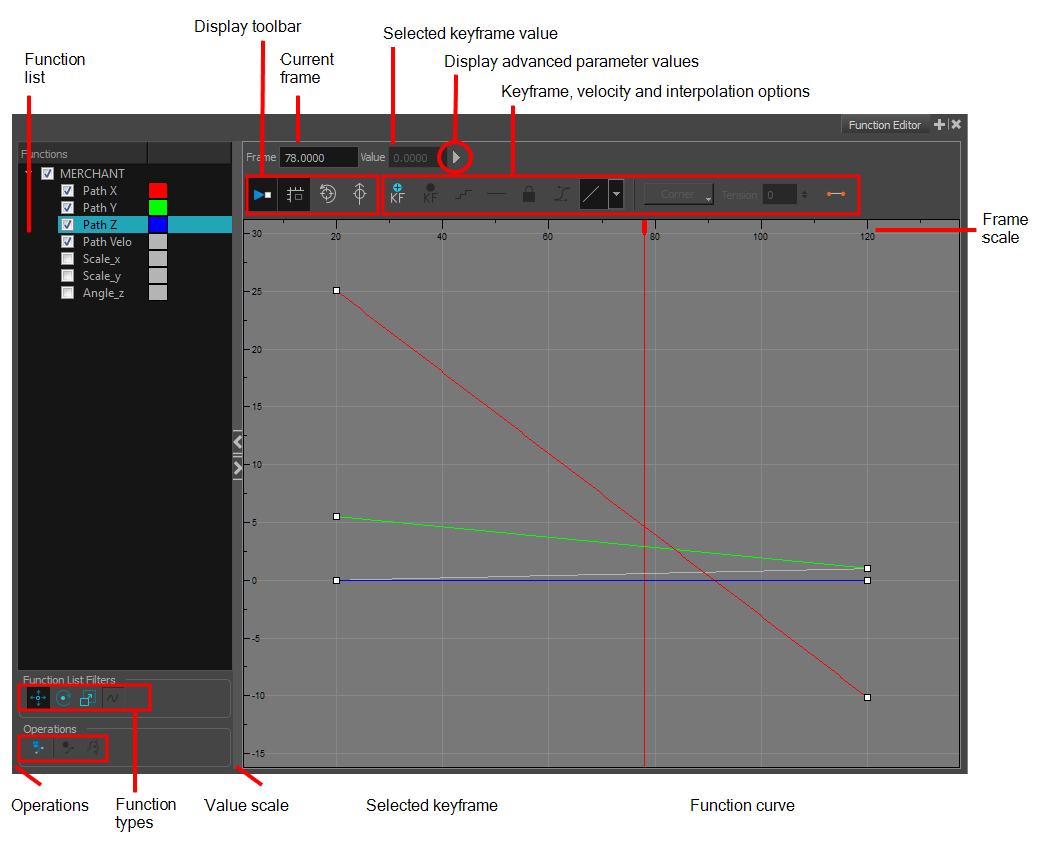
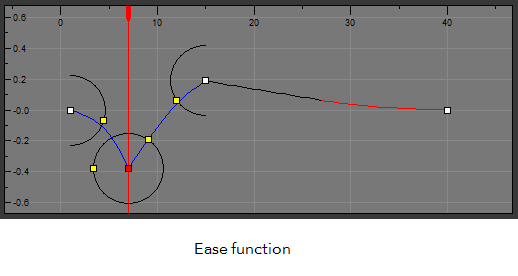
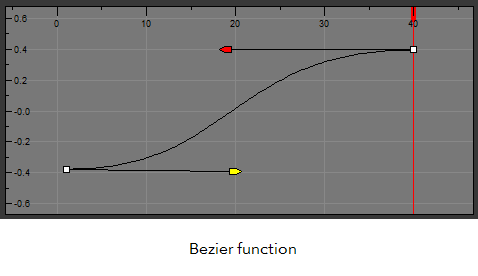
There are two methods of working in the Function Editor — Ease type function and Bezier type function. The use of these functions is a personal preference. When working with the Ease function, the ease in and ease out values can be set in frame counts; Bezier does not have this capability.
- Do one of the following:
| ‣ | In a view area, click the Add View |
| ‣ | Select Windows > Function Editor. |
The Function Editor displays and is blank.
- From the Stage or Camera view, select a layer that contains functions.
| Parameter | Description |
|
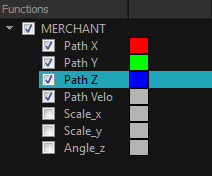
Function List |
When selecting a layer, all the corresponding functions are displayed. Select all the functions you want to see and edit; hide the ones you do not want to see nor edit. You can change the color of the function by double-clicking the color box, and choosing another color from the dialog box that displays. |

|
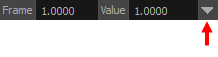
Displays the current scene frame. |

|
Displays the value of the selected keyframe. |
| Display Toolbar |
Allows you to modify how the editing area is displayed. You can hide the grid, disable the synchronization with the current frame, reset the zoom level and normalize the function display by stacking them one over the other to compare them regardless of their value range. |
|
|
Displays the frame currently selected. |
|
|
Diplays/hides the grid. |
|
|
Optimizes the horizontal and vertical view of your keyframes, for better viewing. |
|
|
Optimizes the vertical view of your keyframes for better viewing. |
|
Clicking the arrow gives access to various parameters enabling you to modify the layer animation by adjusting the curve around the selected keyframe. |
|
|
Available when paths other than velocity are selected. In Ease function, this is the angle value of the line on the right side of the selected keyframe. In Bezier function, this is the angle value of the handle on the right side of the selected keyframe. |
|
|
Available when paths other than velocity are selected. In Ease function, this is the angle value of the line on the left side of the selected keyframe. In Bezier function, this is the angle value of the handle on the left side of the selected keyframe. |
|
|
Applicable in Ease function.The velocity of the right ease out. The number of frames that will be included during the ease-out. |
|
|
Applicable in Ease function. The velocity of the left ease out. The number of frames that will be included during the ease-out. |
|
|
Available when paths other than velocity are selected. The length value of the Bezier handle on the right side of the selected keyframe. |
|
|
Available when paths other than velocity are selected. The length value of the Bezier handle on the left side of the selected keyframe. |
|
|
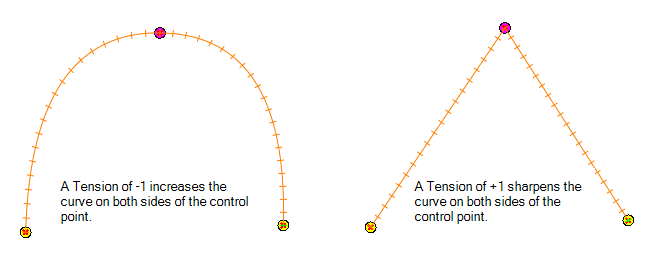
Available when a velocity path is selected. Controls how sharply the path bends as it passes through a control point or keyframe. The higher the value, the more drastic the curve. The lower the value, the more gradual the curve.
|
|
|
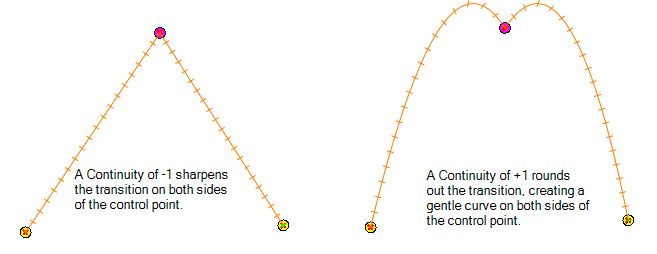
Available when a velocity path is selected. Controls the smoothness of a transition between the segments joined by a point.
|
|
|
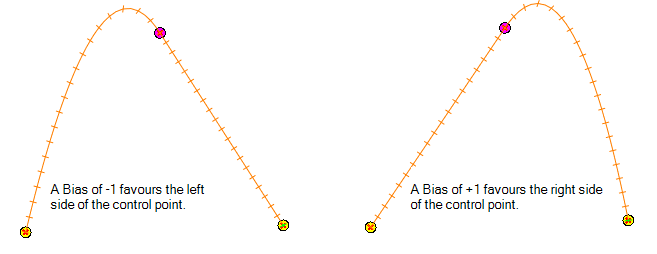
Available when a velocity path is selected. Controls the slope of the path so it flows towards one side of the motion point or the other.
|
| Keyframe, Velocity and Interpolation Options | This toolbar lets you add and delete keyframes, adjust the velocity curve, adjust the segments to motion or stop-motion keyframes and set the velocity to create steps instead of a constant progression. |
|
|
Adds a keyframe at the current frame. |
|
|
Deletes selected keyframes. |
|
|
Creates a stepped curve to hold the same value over a selected number of frames. This works well when you are animating drawings on 2s, for example, and you want to hold the same value for a function over those two frames. |
|
|
Converts a motion keyframe into a stop-motion keyframe. |
|
|
Converts a keyframe into a control point, or a control point into a keyframe. More specifically, indicates whether the point is locked to a specific frame (keyframe) or only locked to a specific position and the curve can flow through it freely as other points are being added, moved, or adjusted (control point). |
|
|
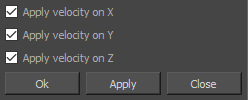
Gives access to the Velocity Editor dialog box. You can apply velocity on the x, y, or z axes, independently.
|
|
|
Defines the ease-in ease-out type for your animation. Click the down arrow to access velocity pre-set choices. |
|
|
Gives access to various Bezier handle manipulation options. Click the down arrow to choose a pre-defined option. |
|
|
Enables you to enter a value for the tension on velocity movement. The higher the value, the more tension on the velocity curve. |
|
|
Converts a motion keyframe into a stop-motion keyframe. The same value is applied to all frames until the next keyframe. Motion changes to the next keyframe's position, when the next keyframe is reached. |
| Function List Filters |
Enables you to quickly select or deselect all functions within a category. |
|
|
Displays the functions related to motion. |
|
|
Displays the functions related to rotation. |
|
|
Displays the functions related to scale. |
|
|
Displays other parameters not included in the Show Motion, Show Rotation and Show Scale filters. |
|
Operations |
Lets you display the Camera functions, add other editable functions and convert to Bezier. |
|
|
Displays the functions related to the camera. |
|
|
Enables you to view the functions of a layer that has no keyframes. |
|
|
Enables you to switch from Ease function to Bezier function. Bezier curves enables you adjust the ease in and ease out of each keyframe. The more the handle is pulled out horizontally, the slower the animation will be. The more the handle is pulled out vertically, the faster the animation will be. |
| Value Scale | Displays the value range for the displayed editing area. It can be referenced to know the value of a keyframe. |
| Selected Keyframe | The selected keyframe is displayed in red. When selected, the keyframe values are displayed in the corresponding fields. |
| Function Curve | The thin line going from keyframe to keyframe is the actual curve. The section of a curve located between two keyframes is called a segment. |
| Frame Scale | The Frame Scale displays the frame range for the displayed editing area. It can be referenced to know the current frame of a keyframe. |